

(Written by William)
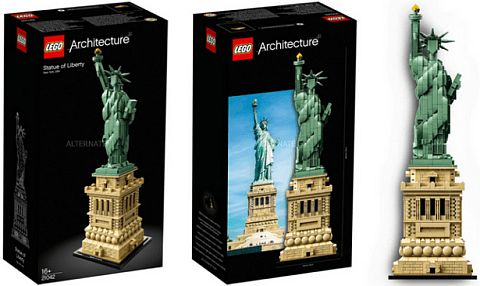
I was very excited when I heard LEGO was going to release a new Statue of Liberty set. I had been in the middle of my dark ages as a fan when the big #3450 LEGO Creator Statue of Liberty was released. My anticipation grew as I found out that this time around the statue will even have a pedestal – something the original one lacked. The price point of $119.99 was not thrilling, but myself and many other LEGO fans were still eager to get it. However, when the first images of the #21042 LEGO Architecture Statue of Liberty became available, the enthusiasm died down. Primary among the reasons for this reaction was the statue’s face. Alongside all the intricate slopes and detailed sculpting was a flat unprinted and pointed tile. The combination of the high price and the issue with the face left this set for the LEGO Architecture diehards.
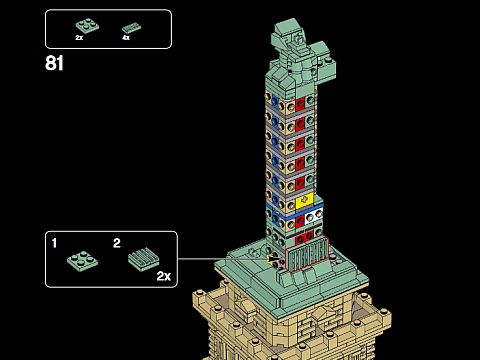
When I finally had the opportunity to build the set myself, I was ready to look at it with fresh eyes and form my own opinions. Sadly, the lack of shaping to the face is a glaring issue that does not look any better in person. It even feels weirder after you spend time building the rest of the set with all those exquisite shapes.
Additionally, there is another issue I refer to as the mosaic effect. From a distance, the statue is fairly impressive. It captures the light well and does an admirable job at recreating an iconic monument. Up close, however, it’s hard not to notice all the individual pieces. Just like a mosaic, if you get too close the whole image is hard to wrap your brain around. This is actually less of a problem if you like to feel a LEGO set. As many of you know, I have a severe vision disability, so I really enjoy building, as touching is another form of seeing for me. To me, the Statue of Liberty with all the intricate wrapping and sculpting feels right the touch. My wife was the one who pointed out that she found the model hard to appreciate up close. This is something I would not have noticed on my own, and it gives me another perspective on this set as well as building with LEGO in general. In the video below, I have included some additional thoughts I have on the set.
Despite these issues the set has a lot to teach us and does have a good value. It just has the unenviable task of being compared with one of the most beloved sets of all time. Please note that if it is only the face that is holding you back from trying out this set, JKBrickWorks has a great and simple solution we talked about here. So let’s try to see what techniques are hidden in this set to see if it’s worth your time and money.
OFFSETTING WITH LEGO JUMPER-PLATES
Most of us have dealt with various types of jumper-plates. The most common one is the 1×2 plate modified with a single hollow stud in its center. They are great for making windows stick out a bit or become just a little recessed. But they have many other uses as well. For example, the pedestal in the Statue of Liberty set is an excellent example of offsetting. It gives us examples of using jumper-plates in several ways. This includes shifting over a stud and then realigning with normally placed studs, effectively using the tubes that appear under plates (both hollow and solid), and overcoming spacing issues that can be caused by offsetting.
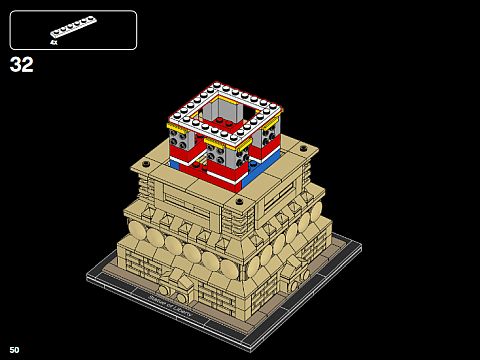
On the pedestal, there is a section of rounded bottom elements. These are connected into four smaller platforms that have offset plates above them. The issue here is with how to invert the studs, and with the offset plates above, how to fill the gap. The solution was to leave the gap as is and just built things over and around it.
With the abundance of jumper-plates offsetting is not hard, but there are still some nuances we can learn from sets such as the LEGO Architecture Statue of Liberty. And, sometimes the lesson is to get the studs out of the way and just use regular flat tiles instead of trying to offset and reset jumper-plates.
CLADDING THREE-DIMENSIONAL LEGO MODELS
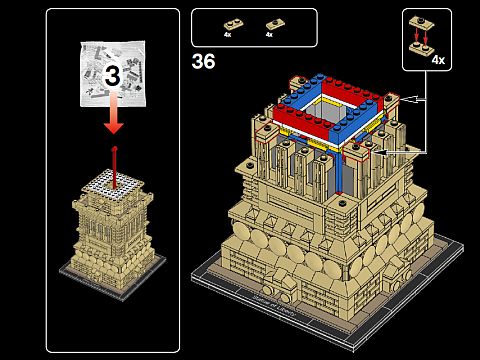
If you only have time to learn one thing from the LEGO Architecture Statue of Liberty set, it should be cladding. I don’t normally build sculptures. The concept of figuring out that much three dimensional space gives me a slight headache. But, that doesn’t have to be the case when it comes to cladding.
Start with a relatively boring shape that is approximately the right height for the model you are working on. Then, proceed to add two plates and then bricks with studs on the side. Repeat this until you’ve reached the correct height for your model. This structure will give you everything you need for the cladding process. From here, you can now place whatever you want on the sides. The toughest part of this process is finding ways to blend the sides together. If you find you need practice, I would recommend picking up a couple of LEGO BrickHeadz set with challenging looking hairstyles. Both the LEGO Architecture Statue of Liberty and the LEGO BrickHeadz sets use the same techniques for cladding, but the Statue of Liberty does it on a much larger scale.
The other important takeaway here is that you don’t have to immediately try for the most advanced cladding design. Perhaps you just want to add a bit of nice texturing to a building. Just like in real-life, cladding is how this is achieved, and you can do simple to very elaborate cladding.
APPLYING WHAT YOU LEARN
As we each grow our building skills there are certain basic techniques that we must learn from the very beginning, while others we can go without for a long time. For example it’s nearly impossible not to acknowledge that we should interlock bricks and plates if we want to have our models stay together. Offsetting, on the other hand, is bit more of a style so doesn’t always seem necessary. However, there have been instances where my own knowledge of offsetting has created solutions for tricky connection points. Therefore, I recommend to at least studying the pedestal portion of this set for a good sampling of what’s possible.

As far as cladding, I do want to point out that there are other ways to approach it. A good example is in the #10237 LEGO Lord of the Rings Tower of Orthanc set. It uses four bricks between each of its brick with studs on the side sections. The math all works out the same, it’s just done on a larger scale. However, for a smaller project the Statue of Liberty is a great example as it offers more studs per square inch, suitable for a more detailed design. Additionally you can graft on more studs with some of the special modified plates like the 2×6 with 4 studs on the side, and the 2×2 plate with two studs on the side. As long as you put these plates lined up with the studs on the sides, their side studs will automatically line up.
Another option is to use brackets for cladding. The only reason why I wouldn’t suggest starting with these is that you have to account for the thickness of the brackets. This means that you have to count half plate thicknesses into your design. This gets even more tricky when you mix together bricks with studs on the side and brackets. But the result can be super impressive. If you want to check out the #21042 LEGO Architecture Statue of Liberty, it is available at the LEGO Architecture section of the Online LEGO Shop.

What do you think? How do you like the LEGO Architecture Statue of Liberty set? Do you have it already? Have you built it yet? And what do you think of the building techniques used in the set? Are there any other interesting techniques you found besides the ones we discussed here? Feel free to share and discuss in the comment section below!
And you might also like to check out the following related posts:


Maybe the designer was angry at Americans and defaced the statue of liberty on purpose. Just a thought….
I hope that’s not the case. But I agree that the face is odd. I also agree with Will’s wife’s observation. The statue is hard to appreciate when being close to it. This happens with everything that’s pixelated, but on a little bit larger scale they could have smoothed out the lines.
I’m thinking that this might work if you have a number of LEGO mosaics on display.
Then you have to step back to enjoy all of it.
I had to put about 10 ft of distance between my wife and it before she was fine with the design.
The pedestal is beautiful, and I like the combination of sand green and tan. From certain angles, the statue itself looks amazing, while from other angles it looks like a confusing mess. Jason’s mod for the face is a big improvement, but I’m still not convinced the statue couldn’t be done better. I just don’t feel like putting energy into it. There are so many other sets I like right out of the box.
This is especially true since we did get back in 2000 the large statue.
I think they wanted to play around with those bow slopes that have the 45 degree cut on the end. And that led to this design.
Still, at a $120 USD price point this is something I’d have reservations buying at full price.
I appreciate what the designer did here. Using those curved slopes is interesting. But I agree with others that the end result is not quite right, including the face.
With the face modification by JK Brickworks, the Statue of Liberty looks much better. The face of a person (even if it’s just a statue) is so important. They did such a good job with the Statue of Liberty in the Apocalypseburg set. It proves that they can do it. Maybe they thought the plate was clever, but it just looks odd. If you have this set, do yourself a favor and at least try JK Brickwork’s mod. You don’t even need extra pieces.