

(Written by William)
Being a fan of LEGO, chances are you’ve seen the work of Nathan Sawaya by now. His artwork features fantastic designs while only utilizing basic LEGO bricks. Most of us have never had the opportunity to work with that many LEGO pieces at one time, so it can be hard to grasp what it takes to make something really large with only one type of LEGO element.
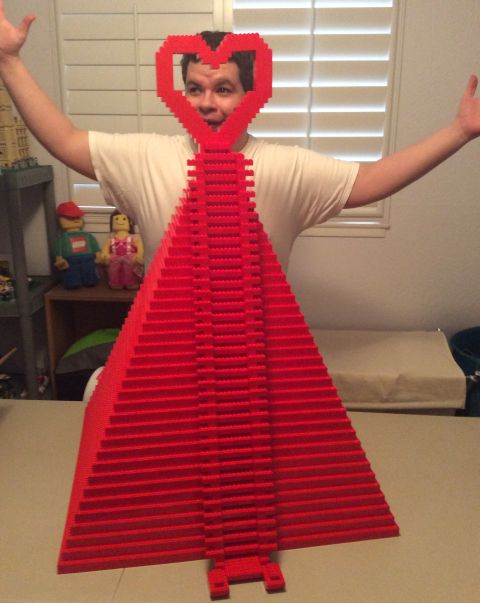
Enter LEGO’s community support team. About a year ago, our local LEGO club received a very large container of just 2×4 red bricks to support our events. A rough estimate would probably put the count over 5,000 bricks. Problem was they got stuck in storage, so the club only had a chance to play with them a handful of times. Recently I moved, which meant I now had the space to store this large treasure trove of basic pieces on behalf of my club. One day I woke up way before sunrise and couldn’t go back to sleep. So I did what any sleepless LEGO fan would do; raided the red bricks stash and… built a pyramid! This was my first experience making a large geometric LEGO model, so I thought I will share some of the things I learned in the process.
➡ LEGO GEOMETRIC MODELS – IT’S ALL ABOUT PATTERNS
Large LEGO sculptures rely on two things; the ability to interlock bricks, and forming patterns. This means you will need to come up with patterns that can interlock the bricks to provide stability. Fortunately, the patterns don’t have to be complex. For my pyramid I used a total of two patterns to make the basic structure, and for interlocking the bricks I simply inverted those patterns. So, you could say I used four patterns; two patterns used two different ways.
By the time I was done building, I had a roughly three-foot tall pyramid that I could pick up and move around easily, even though it was hollow inside. In fact the construction was so solid, I had a hard time taking it apart afterwards. To get a better understanding of how this all works, let me walk you through how the top few layers were built.
➡ LEGO GEOMETRIC MODELS – PYRAMID BUILDING STEPS
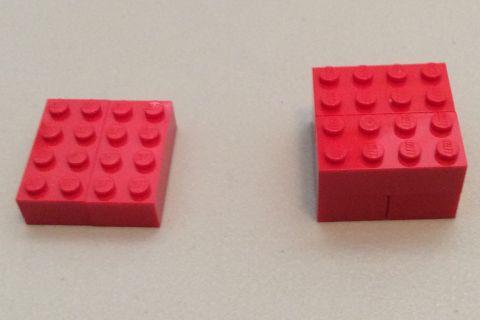
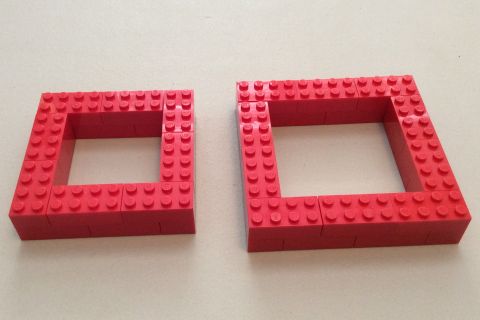
Let’s start with the most square shape possible; take two 2×4 bricks and put them side by side. Now interlock those bricks by putting two more going the opposite way. What you end up with is a block that gives you a 4×4 stud area.
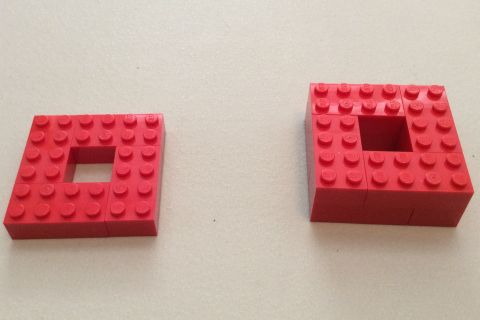
For the next layer, we need the outer dimensions to be 6×6 studs, so we’ll add two more bricks and arrange them in an overlapping pattern. This time we have two bricks vertical and two bricks horizontal to form a square with a hollow center. We then invert the pattern to give stability. Finally, we add the 4×4 block we made earlier to go on top.

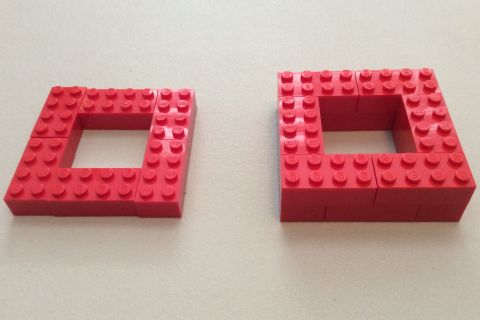
Next we add two bricks and do what I call a “long and short” pattern. Two bricks go vertically on two ends and one brick goes on the top and bottom between them horizontally. This gives us an 8×8 outer square. Invert this pattern with two bricks horizontally at the top and bottom and one brick vertically on the sides for stability and you’re ready to add it to the rest.
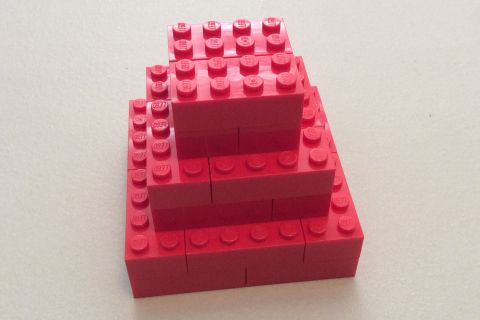
Then you move back to the overlapping pattern and so on. Each layer switches from the “long and short” pattern to the “overlapping” pattern. And if you didn’t notice, the very first layer was a “long and short” with the side-by-side bricks being the “long” and no bricks between them being the “short”.
I would add here that building something like a pyramid you will want to start on the bottom layer first and gradually work your way up to the top. Securing more and more studs all at the same time from top to bottom will just end in trouble.
➡ LEGO GEOMETRIC MODELS – UP-SCALING BRICKS
Another interesting technique I fooled around with was using basic bricks to make larger sized bricks. To do this, you need some very basic math skills. Start by figuring out how much bigger you want the brick to be.

For example, you want a brick double in size. To accomplish this, simply double all the dimensions. So a 2×4 brick now needs to be 4×8 and two bricks thick, where as a 1×2 becomes a 2×4 that is two bricks thick.
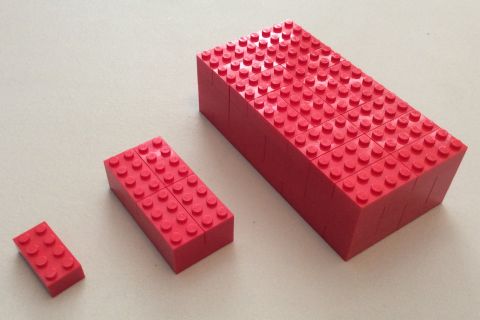
You can scale even further. For example you may want something four times the original size. So now your 2×4 is an 8×16 and four bricks thick. And that 1×2 is now 4×8 and four bricks thick. Just remember to multiply the length, width, and height equally, and you should be fine. And just like with the large geometric shapes, building larger bricks requires interlocking patterns.
If you have a lot of basic LEGO bricks you might want to experiment a bit with building basic geometric shapes. The process can set you up for understanding how to build very large LEGO models, sculptures, and even mosaics, and also how to make your LEGO designs stronger. If you don’t have enough basic bricks, I recommend the LEGO Classic Brick Boxes available at the Online LEGO Shop.
What do you think? Have you ever built any large LEGO models just with basic LEGO bricks? Were you able to make it strong enough? Did you notice any patterns that made your model stronger and more interesting? Feel free to share and discuss in the comment section below! 😉
And you might also like to check out the following related posts:


Oh! So this is what afols do when they can’t sleep! 😀
Now I recall the Mythbusters Lego Ball!…
https://www.youtube.com/watch?v=M8vdTXO0lpE
Building Lego sculptures with only basic bricks has intrigued me for a while. Nathan Sawaya is the master.