

(Written by William)
The #10252 LEGO Creator Volkswagen Beetle has been out for a while, but my wife kept it as a Christmas gift for the end of 2017, so I just had a chance to build it recently. I have built several of the LEGO Creator Expert Builder vehicles through they years, and I would say that this one seems to have the most challenging design because of all the unique shapes and curves. Given LEGO elements’ natural inclination to be box shaped, it was a tall order for LEGO designers to make a car with such a rounded body. So, let’s take a look at some of the interesting building techniques found in the set! 🙂
➡ HORIZONTAL AXLE ASSEMBLY WITH LEGO
Right from the start of building the Beetle, you can tell that space is going to be an issue. The vehicle curves in dramatic ways and comes really close to where the tires are. To deal with this problem, LEGO designers attached the axles in a very smart way. The axles are attached horizontally into the frame, rather than being part of the main structure.
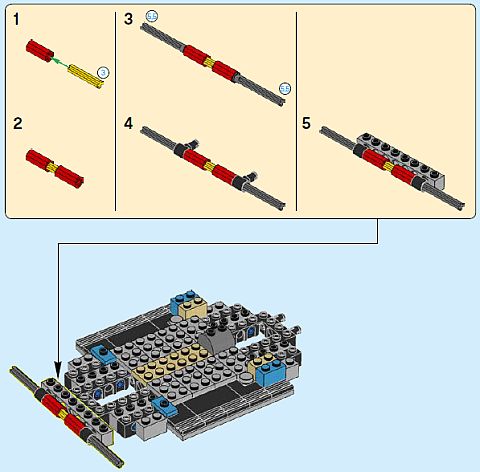
You will typically see this technique in brick-built motorcycles. This allows the wheel itself to have a more dramatic appearance, since it doesn’t need to be hidden within the body of the vehicle. Another nice feature of this technique is that it doesn’t give up too much stability. However, when using this technique, you may want to avoid building up really tall vehicles without doing some major reinforcing.
The most important feature of this technique is that it has the ability to be secured later. This is done by either choosing connections that are open-ended, or by adding LEGO Technic bricks later down the line that slide onto the axles. Just keep in mind; the more connections you add this way, the axle may rub more, causing unwanted friction.
➡ LEANING ELEMENTS WITH LEGO
When you are building fine details into a LEGO model, at a certain point you will have to give up stability. This doesn’t mean you have to completely get rid of stability, but you may need to use some unconventional ways to make it happen. Examples are found in many larger and more detailed LEGO sets, where elements are placed to lean against each other for stability.
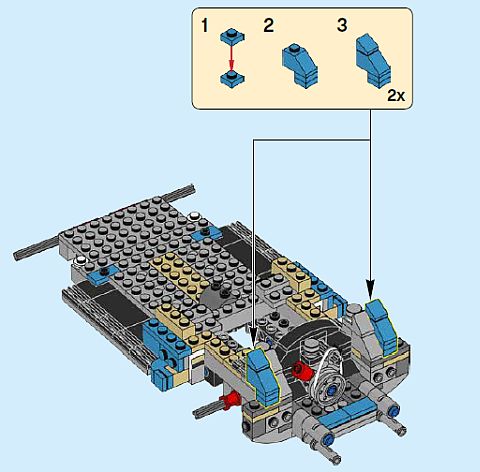
The image I chose to demonstrate this shows a small constructed section attached by only one stud. However, in an earlier step, we put in an inverted slope behind this newly constructed section. That inverted slope provides just enough surface for the new section to not fall in on itself.
The essence of this technique is to figure out where your model will most likely be pressed against or held when picking it up. Then, check if there is any way to add a back support against that direction. It is important to note that LEGO often uses the barest minimum of edges to lean against. This can be as simple as a protrusion of a tile, part of a slope, or even a thin section of paneling. It’s a very clever way of adding stability while remaining inconspicuous.
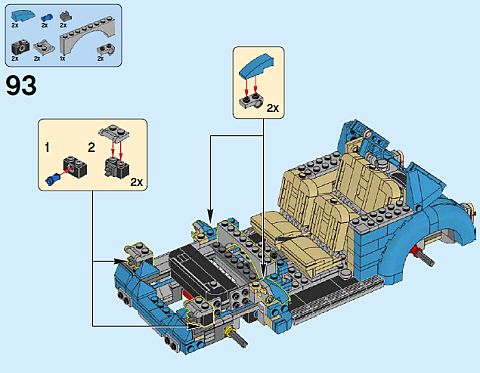
➡ SNOT BUILDING WITH LEGO HEADLIGHT BRICKS
A very popular technique with all LEGO builders is Studs-Not-On-Top (SNOT). Just by changing the direction of how pieces attach enables the creation of the most astounding LEGO creations. Of course, in order to build with this technique, it helps to use parts that really give a lot of variety. One of the best elements for this purpose is the LEGO headlight brick.
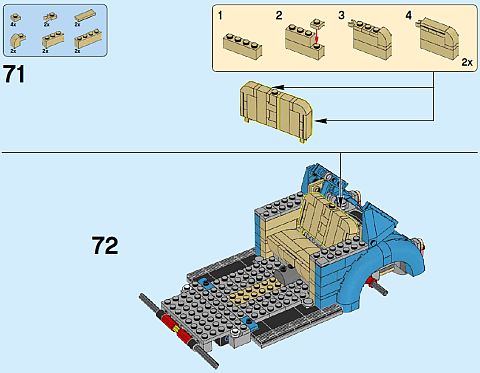
The LEGO headlight brick is a 1×1 stud piece with an additional stud slightly indented on one side, with a square hole on the opposite side. Whether connecting from or into studs, this little piece definitely gives a lot of options. In the #10252 LEGO Creator Volkswagen Beetle, you can see an excellent example of using the headlight brick for building the center of the back seat.
When you build sideways with LEGO, you will usually need to keep in mind the two/five rule. This means that for every two studs of space in one direction, you can fit five plates of thickness in the other. However, if you off-center a few pieces, you may find instances where you aren’t building things that measure exactly two studs.
This is the case with the back seat in the #10252 LEGO Creator Volkswagen Beetle. The seat is made up of three sections; a center column using four headlight bricks, and two sides, which are built separately, and then attached to the column. Given the amount of space available for the seat, this required that LEGO designers change up the thickness of the sideways builds in the central column while still making them symmetrical. So the headlight bricks are used by placing two on their backs and the other two upright. The upright bricks have their side-stud face the foot of the bricks that are on their backs, and then 1×1 plates are added to the side-studs to make the construction symmetrical. The end result is a small column that has studs on two sides and is three plates thick rather than the normal five. This makes the back seat fit and function in the given space just right.
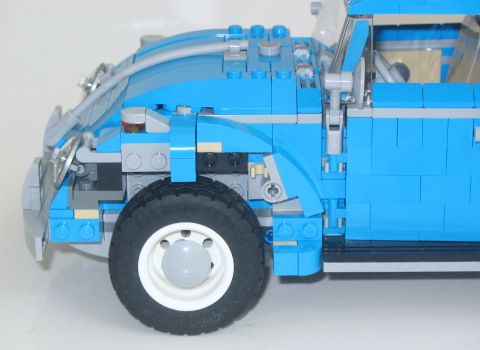
➡ ADDING SHAPES WITH LEGO
Now comes what I consider one of the coolest techniques in the #10252 LEGO Creator Volkswagen Beetle. Remember how I mentioned this set had a lot of interesting shapes and curves? Well that’s hard to do even with the wide array of slope pieces LEGO makes. Therefore, a little creativity is thrown in, and in such a way that is mind bogglingly simple.
In some places in the #10252 LEGO Creator Volkswagen Beetle, LEGO designers needed to do some unusual shaping, where the pieces have no other function but to create a particular shape. They don’t need to help secure anything else down, nor do they have to provide any useful functional component. They are just there to aid in the shaping of the model. We can see this very clearly with the curved sections being attached on to pin connectors, as demonstrated on the picture above. The pin is securely attached to the body of the car, and the pin connector holds the curved 1×3 curved brick in just the right angle to shape the front wheel wells.
This is a fantastic way to create an interesting model with unusual curves and angles. The downside of this technique is that it tends to eat up a lot of space, so it may not be great if you don’t have much room/thickness to work with. The technique could also be used when you are just trying to figure out what kind of shapes you want to create before fully locking them in using other techniques. This allows useful compartmentalization of a large project, so you don’t have to tackle every aspect of it all at once.
The only thing to look out for with this technique is to make sure that the connection points are solid. Aside from providing a certain shape, this technique only has one other function, and that is to stay attached. So make that attachment point the right one. If you are the type of person who tend to use firm connections already, this is a great technique to expand on and maybe even add some SNOT elements and graduate into more advanced shape building.
➡ APPLYING WHAT YOU LEARN
It is important to note that adult-oriented LEGO display models can differ significantly from more play-based sets. Models like the #10252 LEGO Creator Volkswagen Beetle emphasize style over durability and playability. However, many of the techniques mentioned here are attempts to give builders the most stylish options without sacrificing stability.
Horizontal axles are a perfect way to elongate low-profile vehicles with tight spaces around the wheels. The trouble is that many LEGO fans aren’t familiar with the variety of LEGO Technic options that could be used for such situations. Even if you are not attracted to LEGO Technic, it is worth picking up at least some of the small to medium size sets to get yourself familiar with LEGO Technic parts and building techniques. LEGO Technic is excellent for making the strongest connections in the least amount of space. The #10252 LEGO Creator Volkswagen Beetle uses the bare minimum of LEGO Technic elements for some of the trickier techniques, so it shouldn’t be too overwhelming to study them.
Leaning LEGO pieces can not just provide interesting shaping, but it can also make your LEGO model less dense and heavy due to the less use of connecting pieces. And, if you use the technique right, your model should still be stable enough to hold together well.
As for the last two techniques discussed here, they are great ways to explore the most accessible levels of advanced building with LEGO. Counting plates for creating clever connections might get tiresome, but they can really improve the shaping of your LEGO models. Adding shapes on flexible connections is used for the same purpose, but on a larger scale. The two techniques together can also create some very interesting possibilities.

What do you think? How do you like the #10252 LEGO Creator Volkswagen Beetle, and the techniques discussed here? Are there any other interesting building techniques in the set that you really like? Which of these techniques have you used in your own LEGO models? Feel free to share your thoughts and discuss in the comment section below! 😉
And you might also like to check out the following related posts:


This is probably the best model car lego released. We can’t overemphasize how difficult is to build curves with lego, and on the beetle almost everything is curved. The leaning technique is interesting because it can also add curves. I’m going to have to study that seat building technique you mentioned. It is hard to wrap my brain around what’s going on there.
Yes, the Beetle is definitely a work of art and engineering. Both in real life and the LEGO version. I’m planning to look at that seat technique also, because it is an interesting way to handle space. When I built the set, I remember thinking it was really cool, but then I forgot to study it further.
It’s hard to study these techniques while I’m building, because I’m focused on finishing the set. Do you guys take your sets apart to study the techniques after? Or do you just build really slow and methodical studying each step as you build?
Another option is to study the manuals.
For the sets I write reviews for, I have a notepad and pen as I built, so I can remind myself of interesting techniques, building challenges, unique pieces/colors, etc. But when I build just for myself, I just focus on building, and may look at techniques later.
As Hakan, said studying the manual is also a good option. You can even look at (or download) the manuals online, but in my experience it is hard to really appreciate the steps and techniques without having to work with real pieces. So it’s a good idea to have some of the same or similar pieces around to experiment with while looking at manuals, even if you don’t have the full set.
You can also build the sets in LEGO Digital Designer, following the instructions, but again, without physical bricks, it is a bit hard to visualize the finer techniques. At least for me. I know some people who almost exclusively build in LDD, and they really grasp the techniques.
I like to focus o building the set when I first put it together, but I put a marker in the instructions where I notice an interesting technique. Then just go back to the instructions later to study that technique some more. It’s a good way to learn.
Lego should publish a book where they explain building techniques and the concept behind them in a kid-friendly way. I find that modern lego sets are much more complex with building in several different directions, instead of just stacking pieces like we did in my childhood. This is hard for kids to understand and copy in their own builds. Even sets for younger kids are built in very complex ways.
There are several books with only instructions available, from Lego and Third Parties…
Yes, and they are definitely great, however it is also interesting to learn directly from LEGO designers by using official instructions. Maybe a YouTube series would be a good option. They are already doing some simple ones for the Creator line.