

(Written by William)
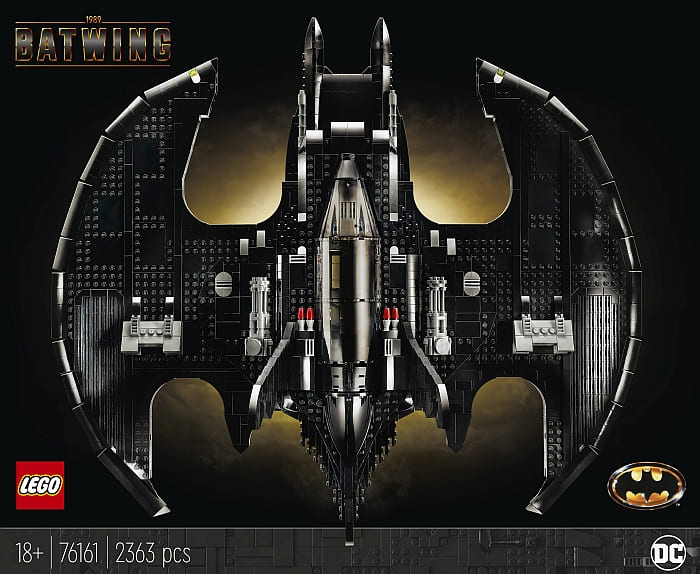
I absolutely loved the #76139 LEGO 1989 Batmobile, so when I heard LEGO was going to release a similarly scaled Batwing, I knew it had a pretty high bar to live up to. And it also went right on top of my wanted list. In fact, the very first day the #76161 LEGO 1989 Batwing became available, I placed an order and built it as soon as possible.
Unlike the Batmobile, the Batwing doesn’t feature much in the way of functional elements. You can adjust some wing flaps, pull off the canopy, lift up an engine compartment, and that’s about it. You’d think I’d be disappointed by the lack of functionality, but honestly, I had a very satisfying building experience and I’m in awe of the this model.

First of all, the Batwing recreates some ridiculous curves and angles. It also tackles various building challenges I hadn’t thought of that present themselves at this scale. And on top of this, the final model commands attention with its dramatic look, especially when mounted up on a wall.

The mounting feature is particularly impressive, especially if you think about it from a builder’s point of view. How many large vehicles do you know that can handle the stress of being displayed both horizontally and vertically without suffering some form of strain or even collapse? Most of the techniques we will look at today will focus on the solutions LEGO designers used to make this possible. But before that, in the video below, I will share some of my general views on the set, then we can jump into talking about building techniques.
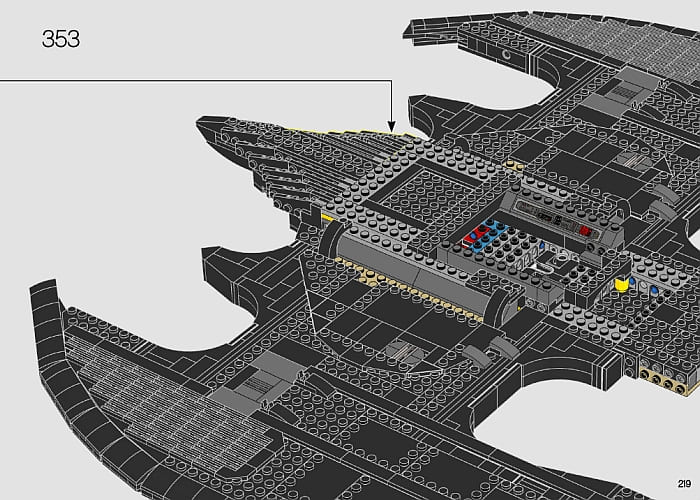
LEGO BATWING – FILLING THE CORE
One of the major features of the LEGO 1989 Batwing is that it is built to allow you to turn it vertical and mount it to a wall. This can usually be done with smaller sets without issues, but once you get to the size and weight of something as large as the Batwing, a whole lot of structural issues come into play. Thus, I was very interested to see what sort of techniques LEGO designers used to help solve these.
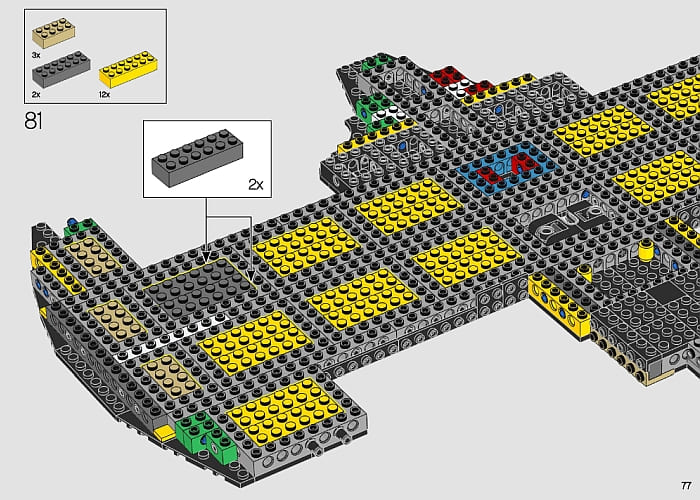
Turns out that the solution is remarkably simple. Larger LEGO vehicles are usually built over a LEGO Technic frame. This is especially true when the vehicle has a unique shape. It’s safe to say that the Batwing has a very specialized shape, so it does contain a LEGO Technic frame. Though, there is a big issue with this approach.
LEGO Technic frames tend to flex and bend. This allows them to handle rough treatment. All is well and good until you introduce standard LEGO system parts into the same model. These are much more rigid, so when you combine these two different building styles near a two-foot wide wingspan, chances are the vehicle might fall apart.
Therefore, it is necessary to strengthen the frame. In the Batwing, this is done by filling in all the empty spaces of the LEGO Technic frames with basic bricks. Filling these cores lends additional stability by eliminating much of the capacity of the frame to move around. This means, no matter which way the Batwing is oriented, the internal brick cores are there to lend their support.
I must admit this is a very clever solution that doesn’t require much skill to implement. The only downside is that this technique does create a bit more weight to the model than we are used to, which makes handling it a bit tricky. Just keep that in mind if you plan to play around with this technique.
LEGO BATWING – CREATING CONTINUOUS PRESSURE
The outer curves of the Batwing are extremely impressive. They help define the iconic shape of the vehicle while tapering the wings down to make them feel more aerodynamic. The big question is, how to build something like this?
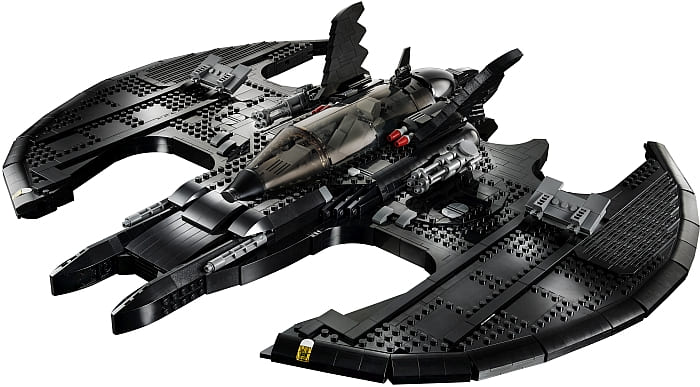
Well, LEGO designers used a wrapping technique that we already discussed in the Brick Breakdown of the #76105 LEGO The Hulkbuster Ultron Edition set (see links at the end of this post. This technique is great for creating curved edges, however it is usually only used for decorative features as it is hard to secure the wrapping elements to the main model. This is also the reason wrapping is usually done as the last building steps. But how do you use this technique with something as big as the wings of the Batwing?
The first solution would be to use gravity to help maintain pressure and keep the shape. Problem is the Batwing’s wings are on the edges going sideways, so gravity is out. However, you can use rubber bands to simulate gravity. Because the gradual curve of a wrap means you probably won’t be able to connect into a frame precisely, using something flexible is a good alternative.

LEGO designers chose the least secure sections of the wrapped edges and placed bands which hooked into the frame of the model. The tension from the bands means no matter which position the Batwing is in, it’s always continuously pressing against the hull. Additionally, this means the end connectors which are typically not the most secure connections, have less stress placed upon them. This means the only building challenge is figuring out how to hide the bands.
LEGO BATWING – SLICE SCULPTING
As we discussed already, the Batwing is a vehicle with a lot of curvature. Both its profile and general body work has interesting slopes and dynamic contouring. This could be achieved with highly specialized slopes, or you could use an optical illusion to solve the problem. And this is exactly what LEGO designers chose for the Batwing. I should point out that slice sculpting will not work in every situation. It has a very unique look that may not fit with your model. But if it does fir your design, then you have several ways to execute it.
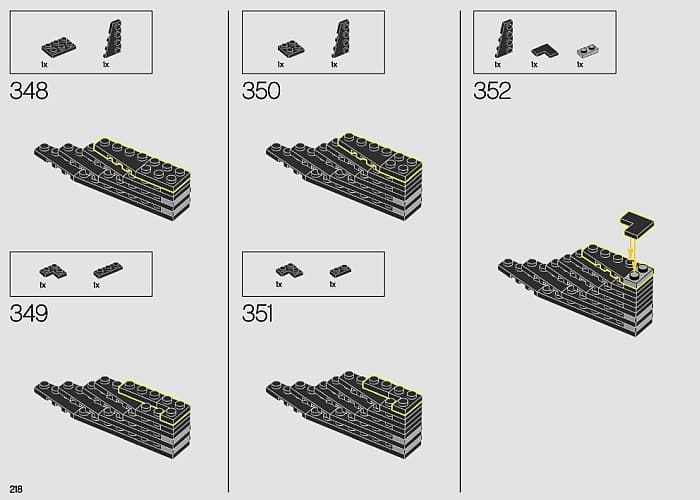
To demonstrate side sculpting, let’s take a look at the back of the Batwing. Where the middle of the craft tapers down to a point there are many vertical lines that form a very distinct contour. The way all of it is sloped would be impossible to be made solid, since there are no slopes shaped that way. The entire idea is to take individual slices of an object and separate them with space between each slice. Taken separately, each slice is a rough approximation of where your object needs to be sculpted. Put enough slices together and you trick the eye in thinking it is all one seamless object.
In the case of the Batwing, LEGO designers went even further with their sculpting technique. They placed dozens of grills tiles on the wings. This is a way to provide camouflage for the center section. By seeing all the vertical lines on the wings, it becomes much more natural to see more vertical lines in the tail section. Remember, this is a highly distinct technique. The more you can do to make a person not question it, the better it will look in the end.
APPLYING WHAT YOU LEARN
Depending on what you build out of LEGO bricks, you’ll have different needs for making your model stable. Models like buildings simply need stacked bricks to hold a lot of weight. Large vehicles on the other hand often need a flexible yet strong frame to handle being moved around. Filling the core of frames strikes a balance between the two concepts. The trade-off is a lot more weight added to your creation. This is why it is good to use the biggest bricks possible for your filling (smaller bricks add more plastic, which translates to heavier filling). If you do use this technique, it might be wise to reduce any excess weight when possible.

Granted, only large models will even need techniques like filling the core frames. Additionally, creating your own continuous pressure with things like rubber bands is a solution brought about when you scale up a design. Many builders may never even face this sort of building challenge. However, if you do, it is good to have possible techniques to draw upon to help with your design.
Slice sculpting, on the other hand, can be used in any size creation. It has its own limitations though. Mostly it locks you into a particular artistic style. This can be offset a bit by clever color usage and filling in areas that you don’t need to simulate complex curves. Though your time might be better off trying to make the slices seem less important. The Batwing did it by normalizing the long vertical lines by having them in other areas of the vehicle even when they weren’t necessary. Just know that blending is the major challenge when using this technique.
In summary, although the #76161 LEGO 1989 Batwing has very little in the way of play features, it impresses with its highly dramatic design, and features some truly inspired techniques. It’s a great example for those builders who are looking to build large LEGO models.

What do you think? How do you like the LEGO 1989 Batwing? And what do you think of the techniques we discussed here? And are there any other interesting building techniques you noticed in the set? Feel free to share and discuss in the comment section below!
And you might also like to check out the following related posts:


I loved building this set. The fill of the technic frame was really interesting, and it was fun seeing how the hanging system played out. I’m a little disappointed they didn’t have a way to integrate the plaque & cathedral section with hanging, but really, how much can a guy ask for?
I was hoping my wife would get me the Batmobile for Christmas, but alas, I guess she doesn’t love me.
Maybe you have to give more direct hints? 😀
Or do the old “loving parent” technique and offer the giftgiver the required funds for buying the gift in advance… =/
Super impressive set! And the building techniques you pointed out are something to learn from.
I guess that’s what’s usually referred to as a “parts-heavy technique”…
I remember I was trying to make spaceships like this when I was a kid. I was dreaming of hanging them from the walls or the ceiling. Regular Lego and Technic weren’t mixed at that time, so I didn’t know how to make strong frames. And my feeble attempts to solve the problems of structural integrity failed.
I’m looking at the video. Wow. The set is much bigger than I thought! It looks incredible!
How they handled the frame of the wings is very interesting to me. I would have thought it made more sense to keep the core between the technic frames hollow. But I see what you’re saying about the need for rigidity. I haven’t built anything so big that this was needed, but I wonder if there is a specific size or shape where this technique becomes essential.
How much pressure is on the rubber bands? Are they going to snap with time?
We will have to wait for William to respond to that question as I don’t have the set. It’s a good question though.