(Written by BLProductions)
I know that LEGO Technic isn’t the most popular theme (perhaps due to the lack of minifigures), there are in fact several Technic sets that are worthy of discussion. Today I would like to talk about the #42030 LEGO Technic Remote-Controlled Volvo L350F Wheel Loader, one of the LEGO Technic sets released this summer. So let’s have a look. 🙂
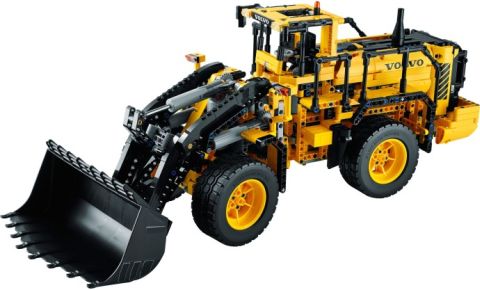
The #42030 LEGO Technic Volvo Wheel Loader includes 1,636 pieces – which makes it the sixth largest LEGO Technic set ever in terms of piece-count (the #42009 LEGO Technic Mobile Crane MK II is the largest, and the only other largest Technic set currently in production). The #42030 LEGO Technic Volvo Wheel Loader retails for $249.99, making it the most expensive LEGO Technic set produced as of today. Why the unbalanced price-to-piece ratio? Because the LEGO Technic Volvo Wheel Loader is fully remote controlled!

Here is the official description of the set: Climb aboard the Volvo L350F! Developed in partnership with Volvo Construction Equipment, this meticulously detailed, fully remote-controlled model has all the features of Volvo’s largest real-life high-tech wheel loader. Activate the Power Functions motors, turn the articulated servo steering and watch the detailed 6-cylinder engine pistons and fan move as you drive it into position. Then it’s time to lift the arm and tip the giant bucket—the largest element we’ve ever produced for a LEGO Technic model! When you feel like another building challenge, rebuild it into the tough Volvo A25F articulated hauler.
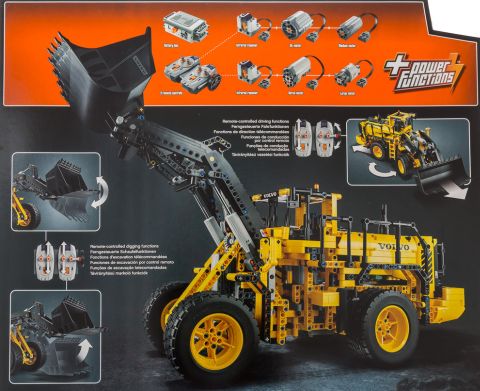
So how do all the functions work? Actually, it’s all pretty simple – at least for a LEGO Technic fan. But don’t worry; even if you have never built a LEGO Technic set, you should be fine. The set is recommended for ages 11 and up, and the instructions clearly guide you step-by-step.
The LEGO Power Functions included in this set are: 2 IR Controllers, 2 IR Receivers, a Battery Box, a Servo Motor, an XL-Motor, an L-Motor, and an M-Motor – which is quite a lot for a LEGO set. The tipping of the bucket is controlled by the M-Motor, which moves a Linear Actuator in and out. When the Actuator moves out, a set of angle beams is pushed forward at the top, causing the bottom to go backwards. This motion pulls another set of beams connected to the top of the bucket, raising the bucket. The L-Motor powers the arm-lifting action with the use of two Linear Actuators, which push out and up, taking the entire arm with them. The force of the motor actually allows the LEGO Wheel Loader to lift objects weighing up to 1 kilogram! 😀

Driving the LEGO Technic Volvo Wheel Loader is not difficult, and neither is explaining the driving systems. Gears and axles turned by the XL-Motor power all the wheels in forward and reverse. The steering is accomplished by the Servo Motor, which turns the whole front of the vehicle left and right. And all of these functions are controlled by the two IR Remotes in your hands.
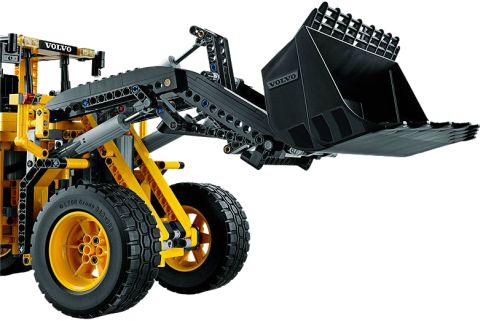
The parts-selection for the LEGO Technic Volvo Wheel Loader is very good for those starting just with LEGO Technic. Probably the coolest piece is the front bucket – as mentioned in the set description above, it is the largest piece for a Technic set ever. The wheels – in yellow – are new to this set as well, and the tires appear in only two other sets. The video below demonstrates the model’s functions and includes a time-lapse build (which ends at 13:27, if you want to skip it).
Awesome, isn’t it? I would highly recommend getting the LEGO Technic Volvo Wheel Loader if you want try an interesting and complex set, plus get a lot of LEGO Power Functions parts. If you are interested, you can find more details and pictures at the Online LEGO Shop.

So what do you think? How do you like the LEGO Technic Volvo Wheel Loader? Have you built it yet? Do you think it’s worth the price? And what do you think of the LEGO Power Functions selection included? Feel free to share your thoughts and discuss in the comment section below! Also, this is my first article here at theBrickBlogger, so your feedback is welcome! 😉
And you might also like to check out the following related post:


First Comment! 😀 Not that I need too…. 😉
But, admin, can you switch the first two pictures in the article so that the picture of the box is after the second paragraph, and the main image is first?
All right. I switched them around for you. I do understand your logic for doing so. In general I like to keep the main picture as #1 because that’s what people see first. A lot of people don’t actually read articles unless you pull them in with an awesome picture. But in this case both pictures are in the awesome category, so switching them around is just fine and it fist better with the text. 😉
This thing is a beast! How is the alternate model? Does it have moving functions too? Oh, and BTW, I think the pictures should be kept as they are. The first picture shows the whole set with all the bells and whistles. It should be the main picture. But that’s just my opinion.
I don’t know much about the alternate model, but it includes the power functions, so there are some functions. Sariel also has a review for that, here’s the link: https://www.youtube.com/watch?v=koZd5dkWF9g 😉
I want the box after the second paragraph b/c the first two paragraphs build up to that picture, unless you ignore the “+ Power Functions” on the box. But I do see your point.
It’s a really good article!
Hey, just wanted to let you know I put my order through on BrickForge and it has shipped so I assume I’ll be getting my yellow checker scooter.
Cool, thanks for the update! I will probably place an order either tomorrow or on Monday. Of course I will email them first to see if I can get a yellow checkered scooter too! 😛
build this over this weekend spending more than 15 hours. now the loader does not move forward or backward….so disappointed. looking for tips o fix this. Lego should provide intermediate testing scenarios to avoid finding it too late….anyone can help?
Vishnu, that’s actually a good suggestion. I’m a LEGO Ambassador, so if you would like me to, I can give your feedback to LEGO on this. The Wheel Loader is a very complex model, so the problem could be anywhere. I would suggest that you turn it on and see if anything is rubbing against the tires that prevents them from moving, or see if there is any other obstruction. I also suggest to watch a good review-video on the set and see if you notice anything that might have been assembled wrong on your model. Here is a really good and clear review from JANGBRiCKS that I would recommend: http://youtu.be/7jDB42kjw2k
Making mistakes while building LEGO sets happens pretty much to everyone at some point. I just talked with someone who spent over 10 hours on a problem with the Death Star. We have talked about it some through email and they were able to fix it within minutes. I actually didn’t know where they made the mistake, but the breakthrough came from helping them change their attitude from frustration and disappointment to openness and exploration. This allowed them to notice the problem they haven’t noticed before, and fix it themselves. How we approach a problem can make all the difference. Wishing you the best with this and let me know how it goes. 🙂
There are multiple problems on this. First, it could be like admin said, and something is built wrong, or it could be other things:
1. The connections between Battery box, receiver, and motor could be assembled incorrectly (as in misplaced tabs). In this case, check the instructions and your model to make sure all tabs are connected at the proper points.
2. Have you checked the settings between the IR Remote and IR receiver? There are many settings on them, if both the Remote and Receiver aren’t on the same settings, it won’t work. There are four settings to the orange thing in the center of both parts, and there is also some vertical dial on the remote (but I’m not sure what it does).
If both of those above issues are irrelevant, either something is built wrong or one of the Power Functions is faulty. Good luck. 😉
Thanks for the detailed tips, I don’t have this set personally so I could only give general ideas. I hope these will help the OP out! 🙂
Hello,
Just built this with my son, and the it won’t turn right. It seems as though it considers left as straight, as when you turn right, it then straightens up. Hopefully that makes sense? Any ideas why this could be happening and how to fix it. All the other remote functions are working correctly.
Any assistance would be most appreciated.
Paul, it seems like some of the connections got mixed up. I know it is a pain taking apart a Technic set, so what I would do first is to take the motor and connect it to a smaller but similar assembly to make sure both the motor and controller are working right. Once you have done that and everything is working right, there is no other option but to look through the assembled set little by little and see where the mistake was made. IT is very easy to make mistakes with large sets like this. Hopefully you will notice it right away. 🙂
Hello, very late to the party, but I had this exact problem so will leave this here in case anyone else encounters it.
In my case, the problem was caused by the stepper motor being connected in the wrong position. Not sure if it was shipped in that position, or my son had the model in the turned position when the motor put in place, but it proved nearly impossible to correct without using more force than I was comfortable with, and was so deep within the model that in the end it required disassembly back to the state at page 77 and rebuilding from there (with testing as soon as it was connected to make sure it would turn correctly!).
To anyone building the set for the first time wishing to avoid this, there’s some black dots on the stepper motor to indicate whether it is in the central position, so make sure that these are lined up and that the model is completely straight when putting the stepper motor in.
Thank you, Bobby! Really appreciate that! Technic sets – especially the large ones – are very unforgiving, so it is a good idea to check and re-check every step, and also check the various functions regularly as you build to make sure they work.
I honestly didn’t recognize this as a lego build. It looked like the real deal at first glance!
Yes, it does look like that indeed! 😀
My loader won’t drive correctly. The front and rear wheels turn opposite of each other? Any tips or suggestions?
Rob, sounds like something was installed backwards. I hate to say this, but the only way to solve this problem is to go through that part of the instruction again and study each step to see where the issue is.
Hi Rob,
My son has just completed it and we are experiencing the same problem. Have you got any advice to assist us in solving the issue?
Much appreciated,
Tom
Hallo
Still need advice?
Joa
Hi
Now Dec 2016 when I built this model and had wheels turning in opposite directions. My rear wheels were in reverse. The big gear in the bellhousing was on the wrong side. This is exactly what you are warned against in the diagram at the start of the build. I presume if your front wheels turn in the wrong direction it will be the same problem at the front. Took me an hour to find and fix. Quite straightforward,just dismantle the rear section,reverse sides for the big gear and rebuild. Luckily this section can be easily stripped and rebuilt without disturbing any other parts, you do not need to remove the square chassis section, I needed to twist it around institu to line up red connectors to be on one side and the yellow connectors to be on the opposite side, as in the warning diagram at the start. Hope this helps. Mine is now flying forwards and backwards at full speed.
Hello all. We had exactly the same problem, easy enough to solve when you realise what’s wrong though I’m glad it was not just me. I found it easier to swap the cog at the front as opposed to the back.
I also tweaked the controller so that the steering and forwards/backwards worked the correct way round.
Thanks for sharing, Ben! I’m glad you were able to fix the issues. 🙂
Hi all ,,
I ddnt finish mine yet but im doing the green engine in page 85 .. When i done with it i noticed that the fan dnt rotate (page 91)
So I o a test it was so noisy bcoz there is wrong in this part with the cylinder dnt move up and down
Any idea
Mashknani, I would go through each step again carefully and see where the problem is. It is very easy to make mistakes in Technic assemblies, especially engines. You may even have to take that section apart completely and rebuild it again. As you move along, with each step, check if everything is moving freely.
I have a problem with the motors. The bucket functions work at the same time as forward and reverse functions, but not by themselves. All settings on the remotes are exactly as shown in the manual. Any help greatly appreciated.
Further to my previous post, drive forward and the bucket arms raise. Reverse and the bucket arms lower. Turn left and the bucket tilts down, turn right and the bucket tilts up. The right hand controller doesn’t do anything. Help!!!!!!
Dennis, I will ask our Technic expert on your behalf, see if they can figure that out for you.
Sorted. I hadn’t set one of the receivers to position 2.
Dennis, really glad to hear. I have been thinking about your dilemma ever since you mentioned it. With Technic sets – especially the large ones – it is often a simple thing like that. Congrats for figuring it out!
Time for work.