(Written by legogeek)
Today I would like to talk a bit about posing your LEGO minifigures. While LEGO minifigures have some range of motion (arms and legs moving back and forth, wrists and head turning) they do miss a lot of the natural movement of the human body. Therefore it can be challenging to put your minifig in a natural looking pose. Below I will show you a couple of tricks I use to make minifigures look better in dioramas or for taking pictures. 🙂
➡ LEGO MINIFIGURE SWORD HOLDING POSITION
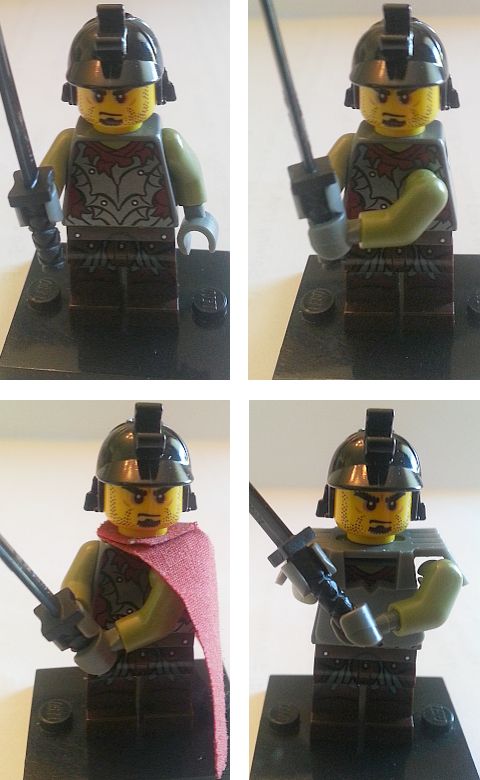
LEGO Minifigures by default can hold swords in one hand (first picture ), and because of the movement of the wrists, you can get a good range of motion. However if you would like your minifigure to hold a larger sword with two hands, you would have to use some unconventional methods; you will need to pop out one of the arms from its socket and the clip the unattached hand/arm assembly to the sword. (Please note that the arms are not intended for regular attaching/detaching like you can do with the legs, torso and head. Regularly detaching the arm will eventually loosen the joint so you will end up with a very limp arm. However you can safely pop the arms in and out 2-3 times without any permanent damage.)

With the arms attached this way (second picture) they look much better and more natural, however now you are left with a hole in the side of the minifigure. The easies way to fix this is to put a cape over the minifigure and hide the side of the torso (third picture). A slightly more complex way would be to barely attach the hand to the arm (and thus elongate it) and position the arm as close to the arm-socket as possible. This way you can hide the hole at the side of the minifig. You can even add an armor piece for a more complete coverage (fourth picture).
➡ LEGO MINIFIGURE LUNGING POSITION
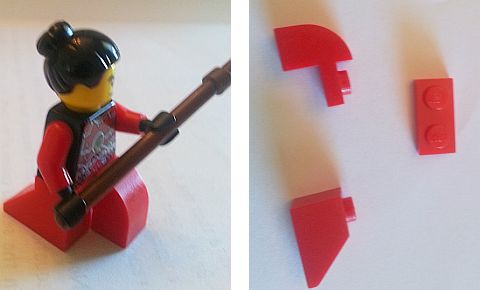
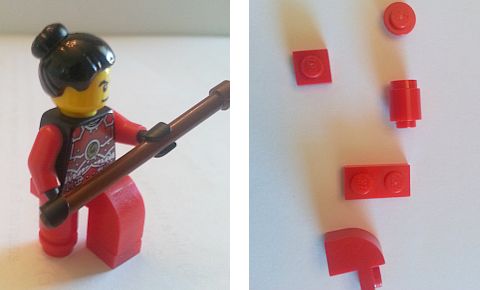
With the method above, you have put your minifigure into a very dynamic pose, ready to fight, but his legs are just standing there without much movement. So how could you make your warrior look like he is lunging forward for an epic battle? Since regular LEGO minifig legs are very limited in movement you will have to use another technique. In fact, you can achieve some really interesting poses with basic LEGO elements.

In the first picture I used three common LEGO pieces to achieve a position where it looks like the minifig is carefully creeping up on his enemy. For the second position I used five common LEGO elements to create a slightly different pose.

I hope this article gave you some ideas for posing your LEGO minifigures in interesting positions. Being creative and thinking outside the box with your LEGO brick can give you some surprisingly great results. What do you think? Have you used any of these methods in your own LEGO creations? Do you know other unique and interesting ways to pose LEGO minifigures? Feel free to share in the comment section below! Also, I’m a TFOL (Teen-Fan-of-LEGO) and this is my first post here at theBrickBlogger. Thanks for reading and feedback is welcome! 😉
And you might also like to check out the Building Techniques section for more tips, tricks and building techniques, or select from the following posts:
- Building with LEGO – Shapes & Mosaics
- Building with LEGO – Micro-Scale Building
- Building with LEGO – Picture Perfect Scenes
- Building with LEGO – Bases & Borders
- Building with LEGO – Beautiful Landscaping
- Building with LEGO – Customize Your Minifigs
- Building with LEGO – Buildings & Vehicles
- LEGO Building Technique: Forced Perspective
- LEGO Forced Perspective with a Twist


Thanks Admin, sorry I forgot to give you a title. 😉
It’s all right. I sometimes have to tweek titles anyway as I like to keep them on one line. But yeah, titles are important. 😀
Huh, it does seem more realistic with the arm out. However, I prefer to keep my minifigs’ arms in, as many of them are already loose jointed (it seems many CMFs are made that way). 🙁 I can’t say I like the leg thing, though, the first one looks like he’s crouching, the second one looks like he’s got a peg leg. I have seen MOCs where the leg that was sticking out (in your case a half-arch) was removed, and placed in front of it’s original spot. This does leave a gap, but that’s not noticeable from most angles. 😉
Also, congrats on your first post, legogeek! 🙂
What I do is that I have some torsos with detached arms, and I just keep them that way exactly for these kind of purposes. Some generic color torsos like black and white work in pretty much any situation. I also don’t like to take out arms, and only do it when I’m really sure I want to change the color and plan to keep it that way. You can safely do it 2-3 times without loosening the joint. 🙂
Yes I know of that technique I just wanted to keep it short so people don’t just look at the pictures (like I am guilty of ;)).
He-he… it does help your writing when you know your own habits in reading, doesn’t it! 😛
Awesome, thank you so much! I feel like you’ve solved one of the great mysteries of life. 🙂
I like this tip. I didn’t know you could only remove the arms a couple times. I changed arms and torso to make a unworthy Thor minifig. It looks like I need to keep the torso in its current state. Since I altered a different torso, I still have the original minfig.
Yeah, every time you remove the arms it weakens the joint. They are just not meant to be removed. But you can get away with it a few times. Especially on newer minifigs where the joints are more forgiving.
I am shameless 🙂 I regularly remove hands, arms, and legs for different characters.
Maybe I have to go over and rescue your minifigs! 🙄
Nah, it’s probably best you don’t. Right now I have Katniss put together 😀
Meaning you don’t want to get in her way…It was a bad joke :P.
Hey off topic. I never told you guys about the cell phone case I ordered from sillybrickpics.com. I love it! Good quality and awesome picture. I picked this one http://sillybrickpics.com/collections/lego-star-wars-iphone-cases/products/iphone-6-case-lego-minifigure-chicken-suit I’m very happy with it and highly recommend it if you’re looking for a great Lego themed cell phone case.
LOL! That’s super cute! I wouldn’t mind to get an iPhone just to be able to showcase that cover! 😛
If not, you could just build one.
It is admittedly a good conversation piece =D
Yeah, I can see that! I think it should be added to the best gadgets of year year list! 😛
neat article, more on this topic would be nice. keep up the good work.
Sam C
This was great – I’d love to see you guys touch on how people pose minfigs standing in other ways besides flat on their feet. Such as walking. Any info ? 🙂
I’m not sure what you mean. Other than moving the leg?
It’s all about balance for walking. It can be done without any tricks.
Not so. The trick is balancing! 🙂
I mean in pictures I’ve seen where a minifig does not have either feet firmly planted on the ground. Or it only has one firmly planted. In ones I’ve seen it didn’t appear that just balancing would do the trick, but maybe I’m mistaken.
Sarah, that could be Photoshop or animation. In real life you have to attach at least one feet to a stud, or one hand or some other part of the minifig to be able to balance. We all think of minifigs as little people with their own personalities, but they are not able to defy gravity. 😉
Yep, that’s what I was thinking and wondering how they were doing it. Photoshop seems the most likely answer. Thanks !
I strangely have to say that I don’t really like the way the arm looks on some of these.
Very neat! I’ve used that “dislocating” method several times. (more than three which would explain why my figs have very poor arm strength) I never thought of adding the cape though. That makes it look so much better!
I’m doing the arm/sword trick with my Aragorn minifig as soon as I get home!
Nice! Keep us posted how it went! 😀