LEGO Creator designer Jamie Berard regularly shares building tips on how to improve your building skills by using more advanced techniques and create some impressive masterpieces. Today we will look at how to build LEGO columns using simple and advanced techniques. 🙂

Building columns is actually really easy with LEGO: you just stack LEGO bricks on top of each other. In fact, if you give LEGO elements to a small child, it is likely the very first thing they would build. You can use regular LEGO bricks, round LEGO bricks, and pretty much any other pieces that can stack on top of each other to create columns with interesting shapes. There are also larger, pre-moulded column pieces that you can find in certain LEGO sets. While some people like to stay with the most basic elements, the specialty pieces also have their place; they can be used when rigidity is required or you would like to cut down on the weight of a LEGO creation.

Besides basic LEGO columns where you stack elements on top of each other, there are also advanced methods you can use. The benefit of these is that you can achieve shapes and details that is not possible by just stacking bricks on top of each other. This is especially helpful when you want to recreate something from real life and there are no pre-made LEGO shapes that mimics what you want to achieve. You usually don’t find these methods in regular LEGO sets as they require more pieces and time to put them together, however in more advanced models, like in the LEGO Creator Expert Builder line and LEGO Architecture line geared towards older teens and adults, they are quite common. Building such advanced models gives you a real appreciation for what can be achieved with LEGO, and that it is certainly more than just a toy. However even if you don’t own any of these sets right now, you can learn some advanced techniques to incorporate them in your LEGO creations.

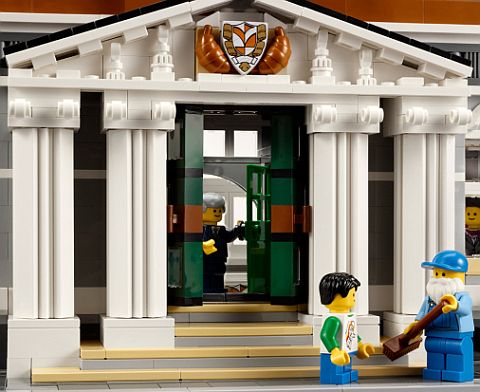
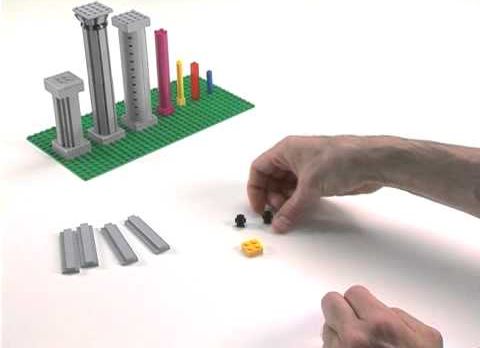
In the first video Jamie shares how to build a column using SNOT-techniques (Studs-Not-On-Top), taking advantage of bricks with studs on their sides and long plates. Please note that while Jamie is using 1×8 plates here, you can certainly achieve the same thing by using shorter plates, as long as they are all the same size. You will just have to use more sections to build up a tall column. This technique is used in the #10224 LEGO Creator Town Hall set for the front columns and have a very nice classic Greek column look. You can add whatever finish you want at the base and at the top.
In the second video Jamie shares a similar column using SNOT-techniques, taking advantage of all those 1×1 round plates that most people probably have tons of. (As Jamie mentioned, they are included as extras in sets where they are used in the model, in case you loose some of them.) The interesting thing about this column is that it has a final shape that could be used for many applications. Jamie mentioned the wheels of the Flintstones’ car, but it could also be used as a barrel, water-tower, spaceship-engine, or many other things where a cylinder shape is required.
I hope you learned something interesting from these tutorials. What do you think? Have you ever played with more advanced building techniques? Did you ever use the column shapes mentioned here? Do you know of other interesting ways to make a column? Feel free to share in the comment section below! 😉
And you might also like to check out the Building Techniques section for more tips and tricks to enhance your LEGO building skills, or select from some of these related posts:


Cool, that looks almost too easy. My problem is that I don’t have close to enough of those 4-sided SNOT bricks – I have about 1. 🙁 However, I don’t usually make buildings in my MOCs, so I don’t work with columns often. But I do like them. There is also a way to make a smaller version of the technique Jamie showed first: use a 1×1 area inside, and no jumper plates. That’s the type of column I use most. 😉
And what is the first image from? I’m guessing that’s a MOC, but do you know who made it? Looks very nice. 🙂
I think it’s the entrance to the Town Hall modular if I’m not mistaken.
Ah, yes, you are right. Wow, I hadn’t known that the set looked like that. Fascinating. Thanks! 🙂
Nice videos. He described the process very clearly. The first video didn’t have a clear shot of the SNOT brick but by his description I thought I knew which piece he was using.
I’m glad the second video had I clear shot of it. Now i know what piece to search for.
I got the Decorating the Tee (#40058) Ploybag at TRU. Might build it with my son tomorrow. The set has a lot of the one by ones.
Yes, Jamie has some great videos. I may post some other ones as well in the future that are particularly interesting. Have fun with decorating your tree! 😉
Having just ordered 600 of the 1×1 with 4 studs I might have a play with some of these 🙂
LOL! Yeah, you can build lots of columns with those! 😛