(Written by William)
In this Brick Breakdown series I review official LEGO sets, from the perspective of looking at interesting building techniques we can all learn from. Today we will be examining the newer Ecto-1 in the #75828 LEGO Ghostbusters Ecto-1 & Ecto-2 set. 🙂

I have to say that I haven’t been too excited about the new Ghostbusters film. I still plan to watch it eventually, but I don’t feel the need to see it in theaters. However I was very much looking forward to the release of the #75828 LEGO Ghostbusters Ecto-1 & Ecto-2 related to the movie. We already had a full review of the set that you can read here: LEGO Ghostbusters Ecto 1 & Ecto-2 Review, so I will only briefly share some of my overall thoughts, then we will take a look at the building techniques.
Along with the heavily detailed minifigures, the overall design of the new version of the Ecto-1 is very solid. The previously released #21108 LEGO Ghostbusters Ecto-1 (related to the classic movie) may have prettier lines when it comes to the shape of the vehicle, but the new one has greater functionality. I didn’t think having opening doors would matter that much to me, yet it adds greatly to the charm. Throw in a boatload of interesting parts, and this set is well worth the price tag.
➡ LEGO BUILDING TECHNIQUE: BUFFERING
When building a LEGO vehicle that uses wheels, it’s typically a bad idea to put the wheels on too early. This is due to the rolling motion that may make it harder to press parts together as you build the model, and the wheels will also raise the vehicle up before its infrastructure is ready to support weight. Plus wheels can can just get in the way. So, what do you do when you need to wait with putting an element in place, but it will be difficult to do it later?

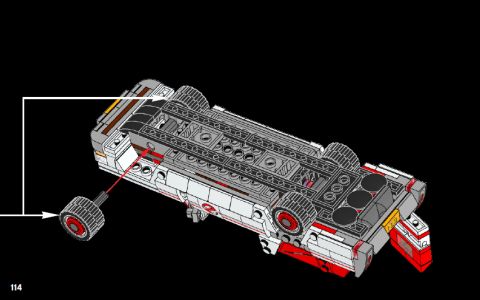
In this set, the answer is buffering. During the construction of the Ecto-1, you may notice placing extraneous parts around where the wheels connect in. The pieces are not uniform, since the ones in front don’t match the ones at the back. Additionally the parts don’t look like they are made to connect anything. That’s because they are used as buffers.

When the time comes to attach the wheels, you must place a LEGO Technic sheath inside the wells on the underside of the car. Without buffers this process might be extremely irritating. First, you need to thread an axle through a hole before you have a chance to line it up with the sheath. If the sheath was loose, you may feel the urge to take apart a good portion of the car just to get a better handle on things.

Thanks to the buffering elements, it’s very simple to attach the axles. You are given just enough space to line things up, but not rub against anything once all the parts are assembled. As far as a technique goes, this may be hard to plan for. Therefore, if you do want to use it, I suggest that it becomes a skill you use when you redesign a creation. LEGO fans often make and remake their models a number of times, before they are happy with the result. It is during this process of rebuilding that you might use the buffering technique in areas that are difficult to assemble. You may also use it when you create building-instructions for your model for others to use.
➡ LEGO BUILDING TECHNIQUE: CONSTRUCTING A GRID
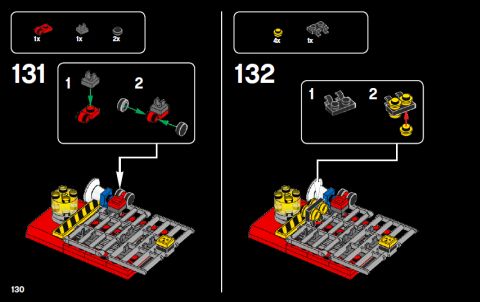
Using grids is a common practice with LEGO models. After all, studs are laid out in a grid pattern. This is why LEGO designers and LEGO fans refer to parts as 2×4, 6×8, etc. However we tend not to think about making a different style grid, but that is exactly what was done for the roof of the Ecto-1, and it’s something we can learn from.

In this set, LEGO designers traded in the stud-based grid system with a bar-based grid. This, of course, gives you completely different options for connections, while taking away certain others. The biggest loss is the dependable consistency and flush adjacency found in the stud-based grid system. What is gained, however, is a much more fluid system that can slide and achieve tilting angles.
The bottom line is that both systems offer a framework for building, they are just different. And it is worth exploring how to best take advantage of each. Generally, grid usage is ideal for large-scale designs. So if you find yourself in need of covering a large area, consider what possibilities might exist if you construct a grid.
➡ APPLYING WHAT YOU LEARN
Buffers are a great tool for helping to reconstruct LEGO models more efficiently. Their major fault is that you often don’t know you need them until it is a bit too late. The other problem is to create a buffer in such a way that they don’t become an obstacle. You may end up putting a buffer up to position something correctly, only to find that it blocks the motion you were trying to create in the first place. A good solution for this is to construct removable buffers. Build a temporary prop for a frame, then remove it when it is no longer needed. This is a common practice in the real world when large vehicles are constructed, so why not use it on a small scale?
When it comes to grids, it is often best to use them as the outermost layer of a LEGO creation. This is not to say you can’t use them as foundational elements, but a constructed grid will often need to give up stability by its very nature. The simpler you make a grid, the more stable it will be. An example of this is mounting a large plate somewhere. In this instance, the grid is a single piece. However, a grid that is not stud-based can offer some very different connections. Bars, axles, and pins, are just a few options you may consider when thinking about a grid design.

So what do you think? How do you like the LEGO Ghostbusters Ecto-1 & Ecto-2 set? And what do you think of the building techniques used here? Did you learn something new that you can incorporate in your own creations? Feel free to share your own tips and ideas, or ask questions in the comment section below! 😉
For other reviews in the Brick Breakdown series focusing on interesting building techniques in official LEGO sets, see my author’s page. And you might also like to check out the following related posts:


William, please go see Ghostbusters! It was delightful, fun, and hilarious!
Thanks for sharing that. I will make sure he sees your comment. 🙂
I haven’t been around to it, yet, but my friends liked it.
I am in the middle of building the GHOSTBUSTER fire house headquarters, and let me tell you it is very well detailed. As goes for the work / time you put into it putting it together . I also have both ECTO-1’s and the ECTO- 2. Have not built the ECTO 1 and 2 yet. Thanks for showing me the build.
Yeah, the Firehouse HQ is a very detailed set. And you can put your Ecto-1 inside. 🙂