(Written by William)
Last year, I finally caught up with what I considered my “must have” LEGO sets, and with a bit of extra money left in the budget, I decided to take a second look at some of the sets I initially passed on. I was particularly considering the vehicles in the LEGO Creator Expert line. I decided against them the first time around because of the price and because of my disability. I don’t talk about my disability too much around here because I feel it’s not relevant, however being legally blind means that I don’t drive, and thus I have never been much of a car guy, including LEGO cars. That all changed however when I got my first LEGO Creator Expert vehicle, the #10220 LEGO Creator VW T1 Camper Van. The set impressed me so much I wanted to explore the other large automobile models as well.

So today, we will examine the #10242 LEGO Creator Mini Cooper MK VII, another excellent set that captures an iconic vehicle. From the upholstery of the seats to the walnut dash, this set has an amazing level of detail that just brings a smile to your face. And there are many other little features that you won’t even notice and appreciate until you have a chance to examine them closely. However because this is the Brick Breakdown series, we will mainly focus on the unique building techniques found in the set. So let’s begin. 🙂
➡ BALL & CLIP CONNECTION WITH LEGO
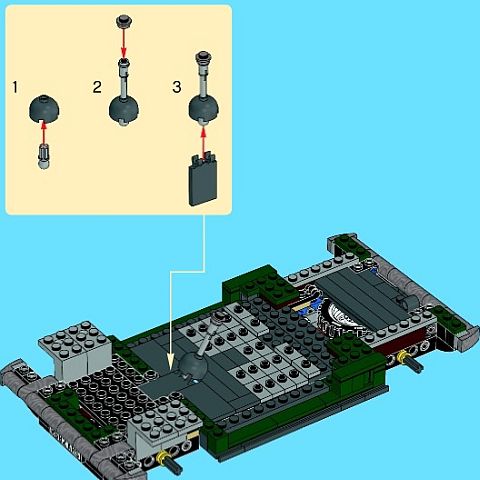
Every now and then, you’ll run across a technique or application in an official LEGO set that makes you pause with admiration. Even veteran builders will find that there is always something new and interesting to try, and finding innovative techniques while building a new LEGO set is such a satisfying experience. I normally don’t talk about how connections are made between LEGO elements because they are usually self-explanatory, however there is one example in this set that is so unique, I thought to bring it to your attention. It is also an excellent example of how much care and thought goes into designing LEGO pieces.

As you can see on the picture above, the shifter is made up of several small pieces. The interesting part is at the bottom section where a LEGO Technic ball-connector is inserted into a 2×2 dome piece. At the other end, the ball-connector is attached between two horizontal clips that are part of a modified 2×3 tile. And, wouldn’t you know it, that’s a perfectly working connection!
Up to this point, I knew of three uses of the small LEGO Technic ball-connector. The most obvious one is to attach them to a ball cup receiver for making a rotating ball-joint. The second is to use the ball-connector as a decoration (i.e. door-handle, hanger, etc.), and the third is for stretching and holding rubber bands. Then, thanks to the LEGO Creator MINI Cooper, I discovered that two horizontal clips can also hold a ball-joint. This is all possible because LEGO elements are buildt around a strict set of geometric dimensions – something that inspired a great many LEGO fans to dedicate themselves finding all the secrets of LEGO’s geometry. When you have a chance to work with a new LEGO piece, I suggest that you take a few moments to really study it and think about its geometry, connection points, and how it fits into the LEGO building system. It will take your apparition of LEGO to a whole new level.
➡ LEGO FLUSH MOUNTING WITH CHANNELS
Mounting things flush to the sides of LEGO models is much less difficult these days than it has been in the past. With the wide array of elements with studs on the sides, there are plenty of choices to build in every direction. But what happens when what you want to mount doesn’t want to sit flush with the surface due to some unique feature?

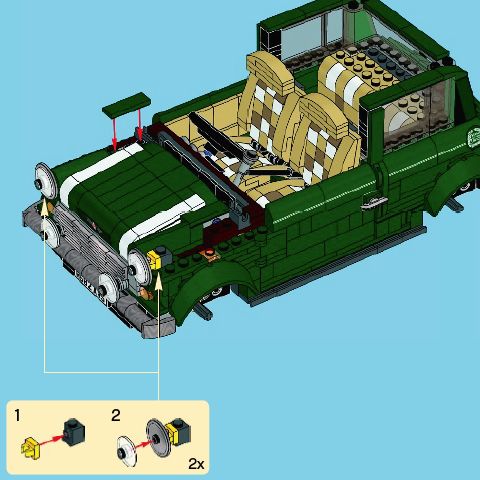
Take a look at the shield pieces used for the headlights in the LEGO Creator MINI Cooper. The shields have a handle jutting out at the back, which means they can’t be mounted flush to the body of the vehicle in a conventional way. The solution LEGO designers used is to make a long empty channel inside the body of the vehicle behind each shield. This empty space gets the appropriate pieces to hold on to the shield, and then is covered up with a tile.
Recall how in the last section I mentioned the precision and geometry of LEGO elements? This means that in the case of an odd connection, the issue isn’t going to be whether the pieces will fit, but rather, how much space is needed to make the connection. This is where having an empty channel comes into play.
Let’s say you have an interesting piece you want to mount flush, but have no idea what will be the right distance and right connection to make that happen. In a situation like this, you can leave an empty channel to give you the opportunity to experiment. For the LEGO Creator MINI Cooper, the connection ended up being a recessed headlight-brick with a 1×1 modified tile with clip, which holds the shield handle. There could have been other ways to solve the problem as well, because of all the space the channels provide.
➡ APPLYING WHAT YOU LEARN
It’s always refreshing to see an old part used in new and innovative ways. For this reason, it is a good idea to expose yourself to as many styles of LEGO sets as possible. Don’t pass on a set just because you are certain it’s not your thing, and not something you want to display or collect. Sometimes it’s worth looking at LEGO sets just for learning interesting building techniques. So build them, and study them carefully. What you learn will make you a better builder, and could inspire you to create something great on your own.
With the knowledge that every LEGO part is meant to fit together with exact specifications and in more than one way, you can be rest assured that what you want to build is possible. You may just need to leave a little space – like a channel – to get things absolutely perfect.

What do you think? How do you like the LEGO Creator Expert vehicles? Did you build any of them already? And how did you like the building techniques mentioned here? Did you find any other interesting techniques in the sets? Feel free to share in the comment section below! 😉
And you might also like to check out the following related posts:


There is a similar clips and ball connection in the Assembly Square. I was very delighted and surprized to see it as it was the first time I encountered the technique. Nice review!
Oh, yes! I remember being very excited about that connection too, as I have never seen it before! 😀
Great article! I love reading your insight into building techniques, especially your delight and learning something new about parts and their usage.
Might I suggest the Ferrari F40 as your next foray into large LEGO cars?;-)
I will make sure Will reads your suggestion. 😉
I’ve actually seen that ball-with-hinge connection before, on #60013 City Coast Guard Helicopter (though that was before Mixel joints existed). I’ve also used it before, when building out of Mixels, since I sometimes ran out of ball cups and needed to use hinges as an alternative. It’s a bit of a looser connection, since there’s less surface area in contact, but it’s still very cool. The channel technique is helpful, as I often have problems making things flush. I agree that there are multiple ways of doing a flush mount, but usually there’s one way that takes far less space than others.
Also: https://brickset.com/article/27964/minecraft-21137-the-mountain-cave-revealed That is a big set! So many cool features, and I’m glad the mine-cart system is begin used again. It’ll be over $200, I guess, but hopefully the set will be worth that much. 🙂
That cave is MASSIVE! I wonder how much it will cost. Of course, LEGO always shows the best side of a set, so it may be totally hollow on the other side, but even just this one side looks bigger than The Village.