(Written by William)
The #21309 LEGO Ideas NASA Apollo Saturn V is on top of the list of record-breaking LEGO sets in more than one category; the first LEGO Ideas set that costs over $100, the LEGO Ideas set with the most pieces (now beaten on both counts by the #21310 LEGO Ideas Old Fishing Store), the second tallest LEGO set (after the #10181 LEGO Eiffel Tower from 2007), and it’s also on top of the list of LEGO sets that sold out faster than most people had a chance to hit the purchase button…

While I admired the set, at the time of its release it was not one of my priorities. However hearing all the very positive feedback from people who already built it, and understanding that I may be missing out on one of the best LEGO sets of all time, I decided to get a copy. Unfortunately, because the set sold out within just a few hours after its initial release, I had a hard time finding it anywhere. I eventually caught one of the brief periods when it was restocked at the Online LEGO Shop, and I was able to purchase it. I don’t think anyone – including LEGO – expected the set to be this popular, and they still haven’t been able to catch up with demand! Anyhow, I’m glad I was able to get it and build it, and now let’s talk about what I always look for, and appreciate the most in new LEGO sets; unique building techniques! 🙂

➡ STUDS-NOT-ON-TOP (SNOT) TECHNIQUES WITH LEGO
If you spend any time on any of the LEGO forums, chances are that you have seen LEGO fans talking about SNOT techniques. In most cases, SNOT is a generalized term, referring to techniques that encompass a wide arrangement of ways to build, using non-traditional orientation of parts. There are a large number of common SNOT connection types that don’t really need explaining, and are frequently used both by LEGO designers and LEGO fans. However, when a single LEGO set uses nearly every connection-point for this purpose, you may want to take notice.

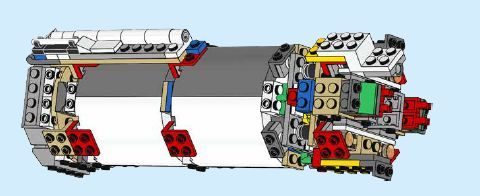
In fact, I would call the #21309 LEGO Ideas NASA Apollo Saturn V the perfect demonstration of nearly every SNOT technique that advanced builders use, all in one place. It’s like the set is a 101 class of all the SNOT connections, blended together perfectly, and ending up as a very attractive display model. So, let’s take an inventory of all the SNOT techniques found throughout the set:
- Use of brackets
- Use of parts with studs flush on their sides
- Clip and bar connections
- Ball-joint connections
- Bar in hollow hole connections
- Locking finger-hinge connections
- LEGO Technic pin and axle connections
- Tilt hinge bricks
- Bar in axle-hole connection
- Free floating parts (this makes up the floats on the retrieval pod)
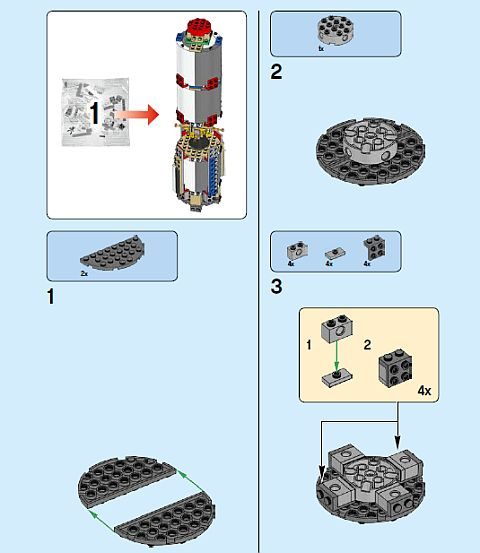
Taken separately, these connections and building styles aren’t that complicated. However, it is extremely rare to see them all used in such a tight and compact manner to create what is essentially a single structure. At certain points, these common techniques are overlapped to set up other connection potentials. A great example of this comes up at the very beginning of the building process.

In this step, you are creating the underside of the base rocket. You use brackets with LEGO Technic bricks to lay on their backs (see Step 3 in image above). This simple act does three things. First, it creates LEGO Technic connection-points that will be used later on. Second, it creates a facsimile of a brick with studs that are flush going out to the sides. Third, it fills in the space, so that you are still building on something that is set one brick high. Ultimately, it is one SNOT technique that not only builds evenly, but also acts as two different SNOT techniques.
➡ USING HOLLOW STUDS WITH LEGO
When I first saw the 1×1 round plate with hollow stud a few years ago, I got very excited. As we have seen with the 1×2 jumper-plates and other parts with a hollow or semi-hollow stud, the usefulness of a part is greatly increased when you can attach pieces (usually rods) inside of the studs. And this set is probably one of the best examples of taking advantage of hollow stud connections.

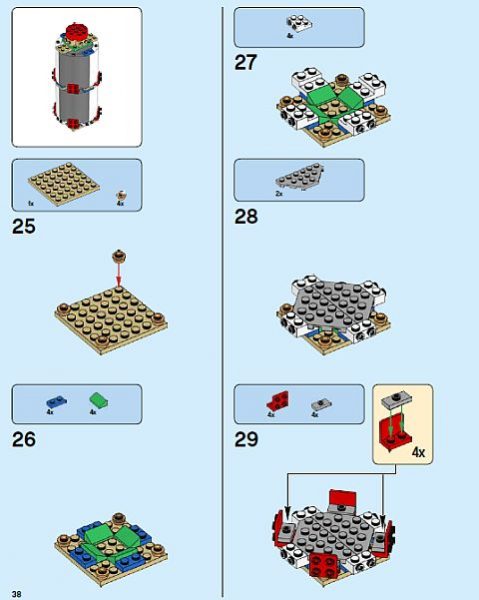
During the construction, you will build an interior frame that makes sideways connections up, down, left, and right of the center. However, in the lower two sections of the model, the corners also need ways to connect curved sections of the rocket. In order to accomplish this, elements with hollow studs are used to mount lots and lots of brackets. This includes 1×1 round plates with hollow studs, 1×2 jumper-plates, and even quarter cylinder wall elements. On their own, each connection-point is rather flimsy, but by sandwiching the brackets between larger sections it provides a secure connection (see Step 28 and Step 29 in image above).
Usually, we see LEGO designers using hollow studs to offset windows, using plates that are one stud wide. Not sure what I mean? Grab a 1×2 plate or even a 1×4 brick for that matter. Notice how the undersides of these parts have bar shapes. A hollow stud can attach onto these bars or in between these bars like normal studs, creating solutions for offsetting other sections. So, from a building perspective, you can do a lot more with a piece that has at least some hollow studs.
➡ APPLYING WHAT YOU LEARN
If you’re looking to supercharge your sideways building skills, the #21309 LEGO Ideas NASA Apollo Saturn V is an excellent set to study and learn from. It has a varied approach that demonstrates a rather impressive array of sideways building techniques, and it even gives advanced builders ideas on how to go about layering simpler connections into a more complex structure.
Understanding all the aspects of a LEGO piece is a great way to develop your own unique building style. Exploring the potential of unique features like hollow studs, can deepen your understanding of LEGO elements, and how they can provide solutions for your building problems. LEGO designs each and every part with lots of different uses in mind, and they also carefully standardize the way parts are measured. This means that newly released pieces have the potential of connecting with older elements in interesting new ways. In short, it’s worth investigating the potentials of every piece, and paying attention to how LEGO designers use parts in novel ways in official LEGO sets.

What do you think? Have you had a chance to build the LEGO Ideas NASA Apollo Saturn V yet? How do you like the building techniques? And what do you think of the final model? Did you find any other interesting building techniques that you were particularly impressed with? Feel free to share your thoughts and own review in the comment section below! 😉
And you might also like to check out the following related posts:


So is the set going to be back in stock? Or is it now retired? I have been reading contradictory information.
Yes, we have been very emphatically told on the LEGO Ambassador Forum that the set will be back, and any rumors that say otherwise are wrong. So yes, the set will be back. 🙂
Great to hear this will be re-stocked, it’s a great set. Any small chance that the NASA Mars Rover 21104 will ever be re-released? Still kicking myself for missing it 3 years later.
Christi, no, there is no chance of the NASA Mars Rover being re-released. However, you can find the instructions online and build your own. 🙂
Everything about this set is amazing. The interior, especially, is mind boggling. You really have to see it in real life. I have no idea how designers came up with the complex connections of the core. I really wish that a couple of the panels were transparent, so you could see the insides.
A clear panel would be awesome! It would be perfect for displaying the interior! Great idea! 😀
It seems that the transparent 30562 panels would be fairly common, mostly due to Friends sets. You could place a Bricklink order and do some customizing.
^In which set of the Friends theme please ?
See here.
https://www.bricklink.com/catalogItemIn.asp?P=30562&in=S
https://www.bricklink.com/v2/catalog/catalogitem.page?P=30562&idColor=12#T=P&C=12
https://brickset.com/sets/containing-part-4599452
Those large curved panels are actually used on the inside of the rocket, and are not large enough to cover the outside. The outside is covered with plates and curved bricks, which are not available in trans-clear. Best is to just keep some of the outer panels off. 🙂
Ah. Ouch!
Thanks.
I just found this aftermarket piece to enhance the playability. I’ve ordered one but have not received it yet:
Lego® Saturn V escape tower blast shield
https://www.shapeways.com/product/GDYC7Z3SS/lego-reg-saturn-v-escape-tower-shield
Wow! That’s actually really neat! Thanks for sharing! Keep us updated on how you like it once it arrives. 🙂