You might remember that in my review of the #21314 LEGO Ideas TRON: Legacy set (see: LEGO Ideas TRON: Legacy Set Review), I mentioned that the bikes couldn’t connect to the display-stand securely. I originally thought that this had to do with the bikes being too large and heavy to be supported by only two studs, and I experimented with adding additional jumper-plates. It looked like 4-6 studs for each bike provided a better balance between keeping the bikes on the grid securely, while still allowing easy removal. So, I mentioned this in the review, wrapped up my thoughts on the set, and went to sleep…

However, when the following day I was looking at the display again, I realized that the reason two studs couldn’t hold the bikes securely wasn’t because of having too few connection points. It was because the wheels are slightly wider than the chassis, elevating the bikes just a tad. This very small elevation is what allows the wheels to turn freely when on a flat surface. (As you can see on the picture below, the 1×8 color plate at the bottom of the chassis clears the surface by a small gap.)
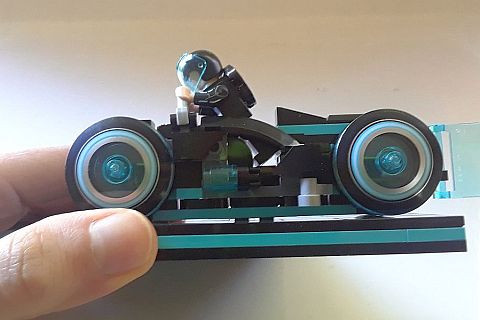
According to the instructions, you then suppose to use the same 1×8 color plate at the bottom of the chassis to attach the bikes to the display-stand, which is completely smooth except for two studs for each bike. As you will discover, connecting the bikes to the studs this way is simply impossible because of the slight elevation of the chassis created by the wheels. This small gap between the chassis and the surface prevents a secure connection and makes the bikes precariously teeter on top of the two studs.
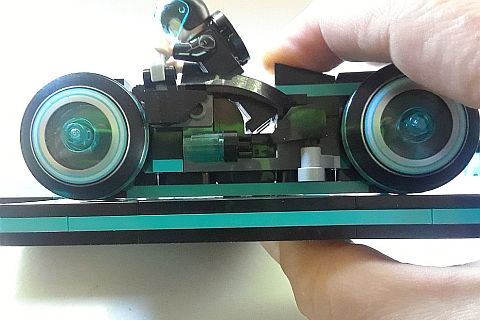
You can push down on the bikes to try to create a stronger connection, which is probably what most people would naturally do before realizing what the real issue is. Or, you can add more studs like I did when I first ran into the problem of the bikes falling off. However, both of these methods will put stress on the parts by unnaturally bending them, which can result in eventual cracks. And we don’t want to have cracks on those beautiful wheels, do we? So, it’s best to just leave the bikes loosely sitting on top of the studs, or if you are more adventurous, you can redesign the grid by either elevating the jumper-plates by the height of at least half a plate, or create grooves for the wheels to drop into.

While there are solutions to fix the loosely connected bikes, my bigger question was why did LEGO design the set like this in the first place? The elevation of the chassis seemed purposeful as this allows the wheels to turn. So, it doesn’t seem like LEGO designers didn’t notice that there was a slight gap under the chassis which prevented the bikes from connecting to the grid. In addition, LEGO sets go through rigorous testing and review to make sure there is no stress on any of the parts and there are no dodgy connections. However, we have never seen a LEGO set where pieces are expected to just teeter on top of studs, nor is it pointed out in the instructions that the connection between the bikes and the display-stand is meant to be only half a stud deep. So, was this design a mistake that just slipped through, or was it on purpose? And if it was on purpose, why?

I eventually reached out to the LEGO Ideas team as well as representatives of other LEGO fan groups through the LEGO Ambassador Forum to understand what was happening with the LEGO Ideas TRON set. It turns out that other LEGO fans also noticed the unusual connection between the bikes and the display-stand, and both Brickset.com and BrickFanz.com mentioned it in their reviews. In addition, I have also contacted LEGO’s customer service to see if they have an official explanation. Eventually, we heard back from the LEGO Ideas team with the following response:
Having conferred with the design team, we can assure you that the TRON: Legacy set has been through and passed all the usual and rigorous model quality tests as any other LEGO set available today; tests that ensure that we deliver the highest quality product and experience. Our LEGO designers are continually pushing the boundaries of the LEGO building system as elements evolve and this affects our building techniques and guidelines for doing so. Particularly through LEGO Ideas products we’re not shy about pushing these boundaries (no doubt inspired by how fans build sometimes) in order to bring the most innovative and cool products to market that will please both AFOLs (Adult Fans of LEGO) and other fans. In this case, the decision was made to allow this connection as it would allow for an easier removal of the Light Cycles from the base.
So, now we know that the connection between the bikes and the display-stand was indeed very much on purpose. As I mentioned at the beginning, the slightly elevated chassis allows the wheels to freely turn, and LEGO deemed the light connection between the chassis and the display-stand suitable for keeping the bikes easily removable. I don’t necessarily agree with the building technique of using only half a stud for the connection, as this keeps the bikes much too loose, however I do appreciate LEGO designers continuing to push boundaries and develop new techniques.

I just hope that in the future, when LEGO designers use new and never-before-seen techniques, they will clearly point them out in the instructions. This way, they won’t be missed or misinterpreted by LEGO fans, resulting in incorrect building or usage. In the case of the #21314 LEGO Ideas TRON: Legacy set, it is very easy to make the mistake of pressing down on the bikes too hard to try to connect them to the base and thus put stress on the elements (particularly the edge of the wheels). The instructions don’t point this out, but the bikes suppose to just hover over the surface and slightly sit on top of the two jumper-plate studs – sort of like how the Light Cycles seem to hover over the grid in the film. 🙂

If you have any questions or concerns about the update from the LEGO Ideas team in regards to the #21314 LEGO Ideas TRON: Legacy set, post them in the comment section below, and I can forward them on your behalf. Also, you are welcome to discuss your thoughts on LEGO designers using interesting new building techniques. Are there any other unusual techniques you found in recently released sets? Feel free to share! 😉
And you might also like to check out the following related posts:


Interesting, thanks for asking and posting. I guess there was no other way to facilitate the connection given the diameter of the wheels.
True, but they could have used different techniques to build the base to make a better connection. I’m sure the designers could have handled the challenge. Now I want to get this set just to mess around with it and see if I can come up with something.
Coming up with a better design is definitely a fun challenge! Feel free to share when you come up with something! 😀
Huw, nice to have you over. At least now we know what happened and why. 🙂
Wow. I didn’t even notice the gap, but the bikes indeed come off easily. I followed your previous suggestion of adding more studs, which worked, and I never noticed the gap. Good research!
On mine I went back to two studs only so the parts are not under constant stress. I also tinkered some with lowering the trans-blue lights, but it’s a little tricky as they don’t exactly align with the wheels in their current configuration. Need to work on it some more. 🙂
Very interesting information. Thanks for looking into it and sharing. I have never seen a half connection either, so this is interesting news. I wonder if it is included in other sets too, and we just never noticed them.
Furiously looking through old lego sets……… I don’t know! My world is falling apart! Can’t we trust lego anymore?
Don’t know, but it shouldn’t be our job to fix lego sets. Doing alterations is one thing. Fixing connections under stress is not the customer’s job. This set is so expensive already, and I certainly wouldn’t want to crack the wheels.
Giza, the parts are only stressed when the bikes are pressed down. People who are aware of the issue wouldn’t press down on the parts. It’s just a weird connection, but once you know about it, it’s easy to avoid stressing the parts.
Hm… they usually use pretty solid techniques. I wouldn’t worry too much about it, and hopefully they take our feedback seriously and in the future include clear instructions. But it is always interesting to study the techniques and see how LEGO’s geometry works. 🙂
Yeah, that’s the disturbing part about this. We don’t know if there are other elements that are stressed in a similar way. However, based on the response from the LEGO Ideas team, it’s unlikely that this technique has been used in regular sets.
Lego should have really included a picture of the bikes only connecting halfway. As you said, it is very easy to stress the parts and the wheels. Thanks for the info. I’m also wondering, like David, if this is an issue in other sets too and we just never noticed. There are reports of pieces cracking, and perhaps this has to do with that?
Yeah, if they would just have included a clear picture, people would immediately know not to force the bikes on the studs. It seemed from LEGO’s response that this is an unusual technique they don’t normally use. The cracking parts has to do with the quality of the plastic. It appears to be a common issue with LEGO sets that come from the factory in Mexico.
Wait, what? A half a stud connection? How is that allowed? Doesn’t Lego has strict rules for techniques like this? They even call them illegal, isn’t it?
Yes, they have a list of illegal techniques. This isn’t considered illegal because the construction itself doesn’t stress the elements. The elements are stressed because users not being aware of the technique and trying to force the bikes on the studs. I wouldn’t consider it illegal, more like dodgy. 🙄
Thanks for the heads up. I will make sure not to push down on the bikes when building this set. Really great info.
Sammy, you’re very welcome. Enjoy building the set! It’s great fun! 🙂
I don’t think that in this case, the half stud connection is such a big deal, as it doesn’t stress the parts by itself. It’s because people don’t notice what’s going on and end up stressing the parts by pushing too much. IMHO, Lego should have pointed this out in the instructions. Would it be so hard to show a clear picture of the half connection?
Yes, exactly! A clear picture in the instructions would have saved so much time and trouble!
Can’t say this will be a widely adopted technique.
It does make me think of two other techniques that I still haven’t found good uses for even though they were from LEGO.
One involves standing up a plate between two rows of studs. The rows of studs are just wide enough to hug the plate. Plus the studs on the plate hug one set of studs in the row. Everything is off center and just feels odd.
The other technique was in the Ghostbuster’s Firehouse. The sink foset in the kitchen area just rests sideways on two studs. The studs are used to prop the section up to make everything level, but it was so odd just slotting a slightly built piece in and forgetting about it.
I did notice in the Hulkbuster set they were using sideways tires to create traction. So this could just be one more way LEGO is trying to play with various friction-based designs.
I think a standing plate or tile between two rows of studs is considered illegal by now, although it’s been used in official sets in the past.
And I guess slotting, although loose, doesn’t really put any stress on the bricks and isn’t considered such a big deal.