(Written by William)
Last year, when I was a guest on The Bricks King Podcast talking about the best sets of 2019, I put the #76129 LEGO DC Super Heroes 1989 Batmobile at the top of my list along with the #21318 LEGO Ideas Tree House. The reason why I split my number one pick was because I hadn’t built the Batmobile yet. So, although I loved how it looked, I didn’t have personal experience with it. Now that I had the chance to build it, I think I’d put it by itself at the top.

First and foremost, the sculpting of the body of the Batmobile is next level. It perfectly captures the sleek and powerful impression that the one in the movie evokes. Granted, many people might not be familiar with this movie since today superhero films are a dime a dozen. But this was a blockbuster when those types of films weren’t given the time of day.

As such, many think of this Batmobile and the Adam West version as the two most iconic looks for the car. If you want fun Batman, go with the TV show version. But, if you want the Dark Knight, you’ll probably want this one.

Speaking of the Dark Knight, you get a pretty sweet minifig version of him in this set. The cowl and cape are a single moulded piece, so he always looks dramatic from every angle. You also get Vicki Vale and the Joker, all displayed on a simulated building’s edge flanked by gargoyles. Personally, the gargoyles fall flat for me, but I also just got through building one of the coolest LEGO cars I’ve ever put together, so I can cut the designers some slack.

Many times, when I see a price tag like $250, I usually don’t feel the set has lived up to the price. In this case though, I kind of feel it goes above and beyond the price point. The set has some serious size to it, which include the weight of the model. I even found the way LEGO designers approached building to be entertaining. If they knew the stage was going to be a bit dry or lackluster, they threw in one of the three minifigs to build. Otherwise, you’re assembling interesting mechanisms or adding in slick curves to the model, so the building experience is never dull. In the video below, I will discuss some of my general thoughts on the set, then we will look at the interesting building techniques in the text below.
PRINCIPLES OF LARGE LEGO VEHICLE FOUNDATIONS
It’s no mystery, this version of the Batmobile is one of the largest LEGO will probably ever sell retail. And just like any of their many large vehicles, it has a pretty intense foundation to hold it all together. We’ve briefly touched on some structural foundation techniques in past Brick Breakdown articles, but we never really studied what you really need to consider at the most basic level. And it doesn’t get much more basic than the foundation.

I particularly like the 1989 Batmobile to talk about this subject because of how straightforward its overall shape is. There are not odd bulges or fancy curves. The base of this vehicle, for the most part, is a simple yet long rectangle.
Let’s start with why there are so many LEGO Technic brick rectangles in the base. As far as structural strength, the LEGO Technic rectangle brick is one of the most solid pieces LEGO makes. Additionally, it’s highly versatile in the number of ways you can attach other parts to it. It also has a good deal of open space, which is a major plus.

I can hear you think; why would open space be a plus? Generally, the more studs you have, the harder it can be to press every one of them down securely. This may mean small gaps appearing in your model and causing all sorts of alignment issues later down the line. Having fewer studs means you can pretty much guarantee a solid connection at the lowest level.
However, you don’t want to just connect these squares together in a series and think everything will be okay. Having the same connection over and over again can produce a lot of strain on the pegs you use to connect the rectangles. That’s why straight bricks are added as crossbeams and outer structural support. In essence, you are just building bigger and better rectangles by relying on other pieces’ strength where the connection seams are located.

Then there are the beams that stick vertically up from the frame. Honestly, you may not build these in your first pass when you’re working on you own custom model, as they require a great deal of foresight. But the idea to provide vertical options to anchor your model to its foundation is the way for you to get the most use out of the strongest part of your creation.
So, in summary, use strong building shapes as a base, then use supplementary parts to make larger versions of what shape you’re working with. And remember to strengthen seams. Keep in mind that not all negative space is bad. It can avoid connection issues, and even make your model lighter and easier to move. And finally, your base foundation can work the best if it is properly secured to the rest of the model.
COMPLEX STEERING FOR LEGO VEHICLES
I have built a number of large LEGO cars with working steering, but I wasn’t prepared for just how involved LEGO designers made it for this set. When dealing with tools, a simple tool involves a very basic structure. For instance, a wedge or a wheel. They then become a complex tool when combined together. For example, a wedge mixed with a wheel can give us a gear. After all a gear is just a wheel with a lot of wedges on its outer rim. So when I say complex steering, I have to explain it in its more simple parts.

Let’s start by looking at where the wheels go. For this to work right, the tire will need to pivot in one of two directions. To accomplish this, LEGO designers made it so that the connection point for the tire tilts. This may make more sense if we look at it from above.
Above and below the wheel connection is a flat beam that is kind of shaped like a coat hanger without the hook part. It is attached to thin lift-arms to the left and to the right. These lift-arms are anchored on an axle that doesn’t move. Only the hanger shape can move.

This essentially gives us a swing. The hanger is the seat of the swing and the thin lift-arms are the chains of the swing. When you push the hanger closer to one of the arms, something interesting happens. The one it is pulling away from gets taut and pulls the hanger up. Meanwhile, the one it is being pushed toward is given more slack, so it pushes the hanger down. To make this action more dynamic, the thin lift-arms are in a “V” shape. This means the one the hanger is being pushed towards has more slack than normal and the one it’s pulling away from is already under tension. This design gives us the tilt we need. And now comes the coordination.
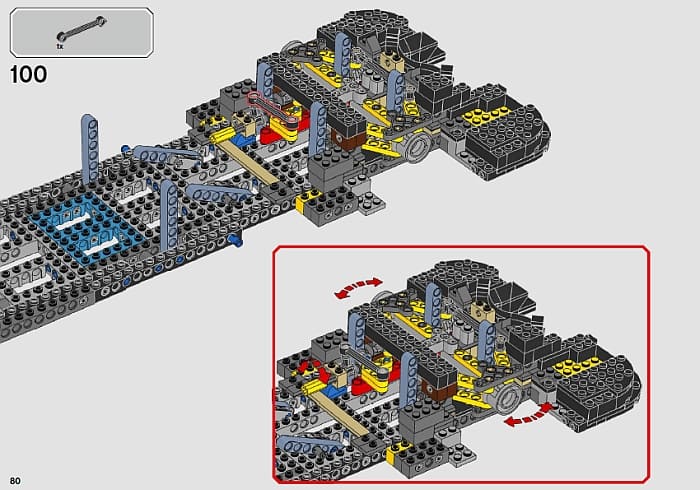
Great, the tires can tilt, but for the steering to work right, the wheels need to work in tandem. What’s more is that they need to move opposite of one another. This, thankfully, is done much simpler. A “T” shaped frame is suspended between these to swing hinges. The top of this “T” frame is connected to each hinge so that, when you move the leg of the “T” shape, the ends move in opposite direction. This, in turn, means that when the tires closer to the front need to angle outward, then its counterpart tilts that front edge of the tire inwards. Even though the action is opposite, it manages to make their overall alignment from overhead become parallel.

Oh, and we still haven’t even connected the steering wheel in yet. Fortunately, things get simpler from here. Attached to the end of the leg of the “T” frame is a ball-joint. We use a link between it and another ball-joint that is connected to a basic axle. Ball-joints are used primarily because we don’t want to give unlimited movement, so these joints provide a built-in limitation of being able to only move so far in each direction.
Finally, since one of the ball-joints is connected to a basic axle, we then add in a steering wheel along with a special part that can help bend the axle connection. In this case, a ball and cup connector is used to maintain the turning ability while at the same time allowing for an interesting angle. Throw it all together and you’ve got one serious mechanism. However, the take away here is that it’s made up of smaller more simpler mechanisms. Unfortunately, given how it is assembled, it can be a little tough trying to decipher how it all works together.
BUILDING A SLIDING CANOPY FOR LEGO VEHICLES
When I heard about all the play-features of this set, I thought the sliding canopy was the most interesting. This is because it’s not a mechanism really used much in LEGO sets. Whenever a canopy is involved, the typical method of building for LEGO is to just put it on a hinge. This gives access to the driver’s area, but it definitely does not recreate the sliding action.
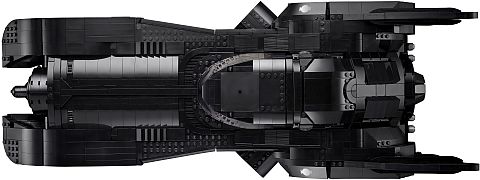
And there is a good reason for this. There are a lot more factors to consider when trying to create this action. First of all, where does the canopy go? Many times in real life, the canopy slides inside another component. However, LEGO elements can only get so small and so thin. This means that building-wise you can only get the canopy so small before it looks too chunky. Therefore, you need to seriously consider where you have negative space. In this model, the canopy slides forward over the hood of the vehicle giving you pretty much infinite amount of space.

The next hurdle to overcome is how to slide the canopy while keeping it locked down. For this, you need some sort of rail system. In the Batmobile, LEGO designers use LEGO Technic axles for this purpose. They only need to be long enough to span the width of the driving compartment. Plus, since they can slide easily in pin-holes, they offer a good deal of mobility.
Following this, you need to figure out how to prevent the canopy from catching and/or stay in line. Looking at the underside of the windshield, you can spot some rail plates and boat slides near its front edge. These additions not only help it not catch on surfaces, but they also keep the alignment of the canopy straight.
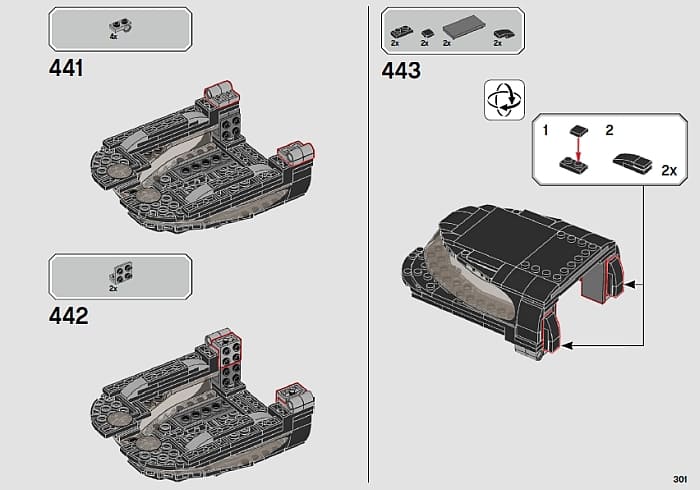
Then there is the issue of the canopy staying in place when it’s closed. It would look pretty odd if you’re moving the model around and the canopy is sliding all over the place. This design issue is overcome by adding curved edges on the underside of the canopy. The curves – just like the boat slides – let the piece be mobile, but the size of these edges mean they will naturally slot into an opening if they are given half a chance. And that is exactly what happens. When the canopy is over the seats, you can press down on it slightly and feel those edges settle into the open slots left for them, thus giving a moderate locking mechanism.
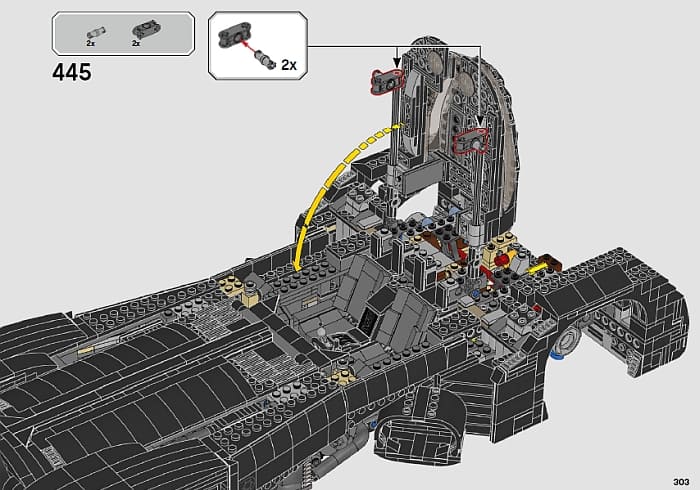
But wait, there’s still one more problem to face. How can these edges lock down since they need vertical mobility not just horizontal movement? This is where we see the other end of the axle. It is a specialty connector with a pin on one side. The length of the connector is just so the axle doesn’t sag. The pin, on the other hand, does not connect into anything. Rather it floats in an empty space, and when the axle gets pulled up, it runs into some parts built above it. This gives a very limited amount of vertical mobility to make the locking edges work.
SURPRISE GUNS IN THE LEGO BATMOBILE
I would be remiss if I didn’t talk about one of the key play-features of the set. Just like in the movie, the Batmobile has some hidden guns that can pop out and fire at an unsuspecting target. Granted, these guns don’t actually fire, they just look right for the part.
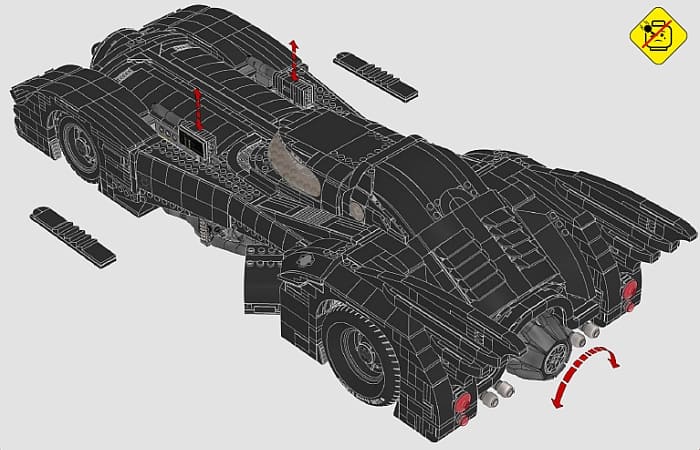
Before I go into just how these things work, I want to say I was hoping for some sort of hinged panel when it came to concealing the guns. As it is, the guns simply knock off a panel on the car, so you have to replace these panels if you want to hide the guns again.
The guns themselves are actually the simplest working component on the vehicle. They both are controlled by a single axle that interacts with a gear-rack. A gear-rack is like a 1×4 tile with gear teeth on top instead of a smooth surface. These are useful for turning rotating motions into straight directional movement. Once the rotating axle and mini gears reach the end of the gear-rack and hit a tile, they have reached full extension. Beyond this, there is only one other part of the mechanism that’s worth mentioning.
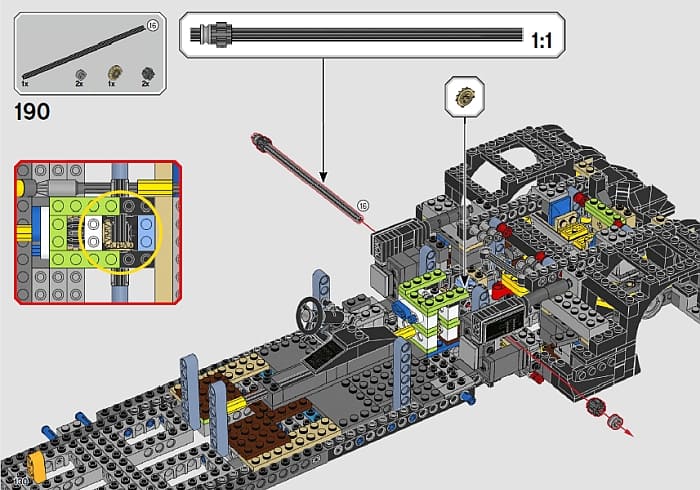
When setting up the small gearbox in the center that changes the axle motion from going down the length of the car to going side-to-side, there is one differential gear change.
A differential gear change is when you have two different sized gears interacting with one another. In this case, the control gear, – the gear that the operator is initially turning -is larger than the next gear in the mechanism. This results in less turning to get more action. This extra bit of force lets the guns appear much quicker giving them an explosive quality to when they are revealed. And since they share the same axle, they are instantly in perfect synchronization.
APPLYING WHAT YOU LEARN
Big vehicles present an interesting design challenge in how to deal with their weight. Unlike buildings, they are meant to be moved more than normal. Therefore, having sound foundational skills will start you off in the right direction. Additionally, in this set, there are many times the foundational structure needs to be extended in some way. Knowing fundamental principles of how these foundations work will aid you in this area as well.

Going from the simple and basic to the complex is no easy feat. That’s why, when you are presented with a mechanism that seems utterly baffling, it is a good idea to break it down into its simpler components. That’s how we could better understand the steering in this set. And by doing that, perhaps we can recreate it in our own models.
Of course, a new model could involve trying something new or rarely done. We examined the sliding canopy to show just how many design challenges can pop up when doing something novel. When you persevere and accomplish the challenge, it can be well worth the trouble. The key is analyzing each step and allowing for solutions.
But remember even the simplest mechanisms can look the coolest. Unlike the canopy and steering, the surprise guns give us a strong narrative for our play. Often this can be much more powerful than a play-feature that is just practical.
If you don’t have it already, but you are interested, the #76129 LEGO DC Super Heroes 1989 Batmobile is available at the LEGO DC Super Heroes section of the Online LEGO Shop.

What do you think? How do you like the #76129 LEGO DC Super Heroes 1989 Batmobile? Do you have it already? Or are you planning to get it? And what do you think of the building techniques we discussed here? Feel free to share your thoughts and discuss in the comment section below!
And you might also like to check out the following related posts:


I have the 76139 “1989 Batmobile”, and it was an absolute joy all the time that I spent building it
It is gorgeous
I haven’t paid much attention to this set, but now that you talk about it, I have to check it out. I wasn’t expecting you to rate it so high.
Personally, I wasn’t sure how I’d feel about it either. I know I loved the styling of this version of the Batmobile, but that was about it. When I built the Tumbler I was a bit disappointed with it. Granted it still had plenty of interesting techniques, but I was not enamored with the end vehicle.
I think in part all the black coloration really disguises just how much goes into this set.
The back end looks incredible. Are there any interesting techniques going on there?
And look at the air intakes on the sides too. Some cool shaping going on there also.
There are a couple of interesting builds. I’m not sure I’d call them techniques. What you have are some of the slickest methods of using part geometry. For instance, the back fins are half built upright while the other half is built upsidedown. The upsidedown portions are attached onto two clip and bar sections just so they can get the angled bits in all the right places.
Another fascinating instance was the back section where it looks as though there are vents. These are created by creating two open holes and then a series of these specialized angled panel with bar on their undersides. They look like the weirdest shield piece you’ve ever seen. But when you let the shape of the piece speak for itself and put it in a series with the same part, you can get some very impressive designs.
The steering looks interesting. Is it in any other vehicles that are not Technic? Is it similar to the steering of the Mustang?
It does share one important principle with the steering on the mustang. Each wheel is attached to its own joint. Opperating these joints, how these joints actually work, converting the steering wheel’s turning motion into a different type of motion are all different.
I did bring up the steering since it does appear to be very different in its fundamental design than I’ve seen. Granted, there may be a Technic set or two out there that this is a normal system, but from a LEGO System side it’s pretty unique.
The sliding canopy is so satisfying. I know it’s harder to make than a flip-up type canopy, but it’s so much cooler.
For the canopy alone I knew I needed to check this set out. And boy did they hit a homerun with it!
I’m getting very comfortable modifying sets and even building some smaller mocs on my own. But building something so big and complex from scratch is beyond my capacity. Would would you suggest to go from smaller mocs to larger ones?
Personally I like experiencing the build of a set totally not in my wheel house. It exposes me to new parts and techniques that I can then apply in my other builds.
I’d say if you are into modifying sets then a big set would let you stretch your muscles on a broader scale. Maybe giving the Batmobile a paint job might be an interesting challenge.
Going in cold turkey to just say “Hey I’m now going to build big” might be a hard transition since new complications can come up in a larger MOC like structural integrity.
Still I wouldn’t tell you to do one thing or another. LEGO represents a creative experience that’s unique to everyone and there’s no right or wrong way to play or work with it. I’d say, if a set inspires you then try your hand at it. That’s the best way to find out if it’s right for you. Plus, there is the added bonus that if a big set isn’t your cup of tea, you now have a lot of parts usually in a similar color which helps with other types of builds. 😀
For those of you are interested, I’ll be a guest on The Bricks King podcast soon and we’ll be talking about this set in particular. We’re recording the episode tonight so keep an eye out for it on an upcoming Thursday!
I’m really struggling to get the virtual pivot point steering working. I’ve built up to that point, but when I try to place the virtual pivot point in, it can’t move, there is no movement from it at all, I don’t know where I’m going wrong.
Since I can’t be exactly sure where the issue is let’s try going down the list of possible sections in the steering.
First, you have the big “T” section with swinging hinges that need to fit into the body of the car. Most of the movement should all be in the swinging hinges. If they don’t have movement it could be one of two things. Either the wrong type of pin was used and you’re running into friction resistance or the interior body was mis-built and you don’t have proper clearance. I did find that some of the long pins with bushes on the end might need securing or double checking to make sure everything in the body is properly aligned. Now if this “T” section is fine then we can move on to the next component.
The next area is the two ball points or towballs if you prefer. The one connected to the “T” will move side to side and should move free if the first section was okay. Then you move to the one on the left side of the car. Make sure this rotates freely. If not, it may have gotten secured into an axle hole which could indicate it is placed in the wrong spot or is being too tightly secured. If it is moving then you can use the Technic link to connect the two balls.
These are the two major areas it can jam that I can think of. Again, your two points of articulation are in the swing hinges where your wheels attach and the steering shaft. Check these first to make sure you have movement. If these are fine then move to see where the “T” frame could be getting pinched and hung up.