With the release of Star Wars: Episode VIII – The Last Jedi, we also get a series of new LEGO Star Wars sets. The first wave of the 2018 LEGO Star Wars sets are already listed at the Online LEGO Shop, although they won’t be available for purchase until the beginning of January. If you do want to get them early, some retailers already have them on shelves, so it’s worth looking around. Today, we will take a look at these newest sets a bit, so you know what’s coming. To be respectful to those who haven’t seen the film yet, we are avoiding spoilers. I will say though, that if you have any interest in Star Wars, I highly recommend watching this last episode while it’s still in theatres. The story is quite complex, and Star Wars on the big screen with 3D effects is a very satisfying experience. 🙂

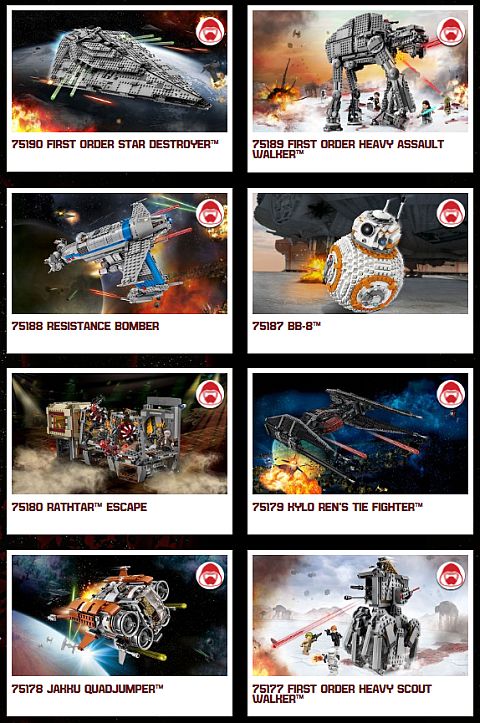
As far as the LEGO Star Wars sets related to the film, many of the larger sets were released earlier this year, including the #75177 LEGO Star Wars First Order Heavy Scout Walker, the #75179 LEGO Star Wars Kylo Ren’s TIE Fighter, the #75188 LEGO Star Wars Resistance Bomber, the #75189 LEGO Star Wars First Order Heavy Assault Walker, and the #75190 LEGO Star Wars First Order Star Destroyer. Also, we can’t forget the #75187 LEGO Star Wars BB-8 – an excellent brick-built representation of the spunky little droid. Most of the sets in the first wave of the 2018 LEGO Star Wars collection are on the small side, and thus easy to get. They are great additions to the larger sets, and are also excellent for minifig collectors.
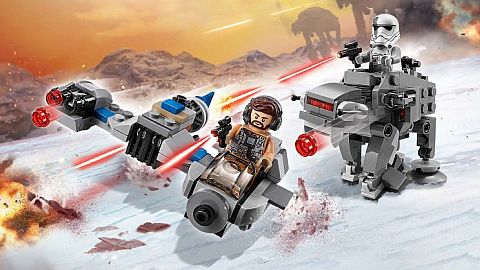
➡ #75195 LEGO STAR WARS SKI SPEEDER VS. FIRST ORDER WALKER MICROFIGHTERS: I really like the pilot in this set. Both his headgear and his pilot outfit are going to be very useful in many other (even non-Star Wars) applications. The Walker Driver is also a nicely detailed minifig. And both the Walker and the Speeder are really nice little micro-builds. Here is the official description: Enter the world of Star Wars: The Last Jedi with this LEGO Microfighters dual pack. Featuring a Resistance Ski Speeder and First Order Heavy Assault Walker, each model includes stud shooters, lots of authentic detailing and space on top for a minifigure. This LEGO Star Wars toy also includes a small trench build with stud shooter and extra ammo as an extra play starter, and with separate building instructions for each model, Star Wars fans will love building with friends and family. Includes 2 minifigures: a Resistance Speeder Pilot and a First Order Walker Driver. Resistance Ski Speeder measures over 1” (3cm) high, 3” (10cm) long and 4” (11cm) wide. First Order Heavy Assault Walker measures over 2” (6cm) high, 3” (8cm) long and 1” (5cm) wide. 216 pieces. Price: $19.99 – SEE AT THE ONLINE LEGO SHOP
➡ #75196 LEGO STAR WARS A-WING VS. TIE SILENCER MICROFIGHTERS: Here, again, both minifigs come with very useful accessories, and the little vehicles are fun too. Here is the official description: Play in a Star Wars: The Last Jedi galaxy with this LEGO Star Wars Microfighters dual pack, featuring a Resistance A-wing and Kylo Ren’s TIE Silencer. Each model includes dual flick missiles, lots of authentic detailing and space on top for a minifigure. This LEGO Star Wars toy also includes a mini maintenance station build as a bonus play starter, and with separate building instructions for each model, Star Wars fans will love sharing their building experience with friends and family. Includes 2 minifigures: Kylo Ren and an A-Wing Pilot. Resistance A-wing measures over 1” (4cm) high, 3” (9cm) long and 3” (8cm) wide. Kylo Ren’s TIE Silencer measures over 1” (4cm) high, 3” (8cm) long and 2” (7cm) wide. 188 pieces. Price: $19.99 – SEE AT THE ONLINE LEGO SHOP

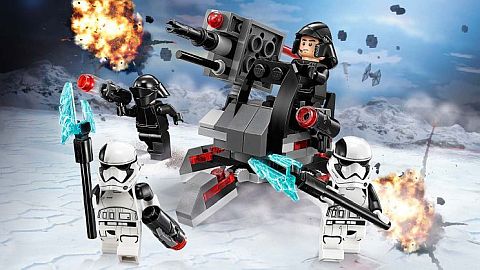
➡ #75197 LEGO STAR WARS FIRST ORDER SPECIALISTS BATTLE PACK: LEGO Star Wars minifigs are becoming more and more awesome. Just look at these four! This set is definitely a great army-builder! Here is the official description: Expand your forces with the First Order Specialists Battle Pack. This LEGO Star Wars toy features a rotating and elevating laser cannon with spring-loaded shooter and gunner’s seat, plus 4 minifigures with a selection of weapons: a First Order Gunner, First Order Shuttle Pilot and 2 First Order Stormtrooper Executioners. Laser cannon measures over 2” (7cm) high, 3” (9cm) long and 3” (9cm) wide. 108 pieces. Price: $14.99 – SEE AT THE ONLINE LEGO SHOP
➡ #75200 LEGO STAR WARS AHCH-TO ISLAND TRAINING: The island is so important in the movie, so it’s somewhat disappointing that we are only getting a small set. However, it does include some key elements that could be incorporated into a larger diorama. Here is the official description: Join Master Luke as he trains Rey at his mountainside dwelling. This LEGO Star Wars toy features a hut with detailed interior, removable roof section for easy play, small bonfire build and rotating training function with an opening boulder with knockaway feature. With 2 minifigures and a Porg figure, this LEGO brick version of Luke’s dwelling from Star Wars: The Last Jedi will immerse any Star Wars fan in a galaxy of Jedi adventures. Includes Luke Skywalker and Rey minifigures, plus a Porg figure. Hut measures over 4” (11cm) high, 4” (11cm) wide and 6” (17cm) deep. 241 pieces. Price: $29.99 – SEE AT THE ONLINE LEGO SHOP

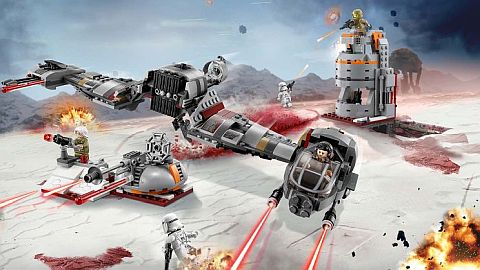
➡ #75202 LEGO STAR WARS DEFENSE OF CRAIT: I really liked the Ski Speeder in the movie, so it’s nice to see that the LEGO version is quite good as well. I would have liked a bit more color though, to show how old and beat up these vehicles really were. The rest of the set doesn’t include much, but could be used as seed elements for a larger display. Here is the official description: This exciting Defense of Crait LEGO Star Wars toy has everything a Resistance warrior needs to play out the epic final battle from Star Wars: The Last Jedi. The set features a highly detailed Resistance Ski Speeder with spring-loaded shooters, removable engine section, minifigure cockpit and a lowering stabilizer. There’s also a command tower with stud shooter on top and assorted weapons and tool elements, as well as a foldout trench section with rotating laser cannon and spring-loaded shooter, plus a gun emplacement with a stud shooter. Includes 5 minifigures. Includes 5 minifigures: Captain Poe Dameron, Admiral Ematt, a Resistance Trooper and 2 First Order Snowtroopers. Ski Speeder measures over 4” (12cm) high, 8” (22cm) long and 14” (38cm) wide. Command tower including trench section measures over 4” (12cm) high, 8” (21cm) wide and 3” (9cm) deep. 746 pieces. Price: $84.99 – SEE AT THE ONLINE LEGO SHOP
All in all, the first 2018 LEGO Star Wars sets are good as add-ons, and I’m particularly happy about the minifigures, but after seeing the movie, I wanted at least one large and epic set to coincide with the release of the film (I guess that supposed to be the #75192 LEGO Star Wars UCS Millennium Falcon, but sadly, LEGO still hasn’t been able to catch up with demand). The starships, vehicles, and locations are so awesome in the movie, that when you come home, you just want to sit down and build something big! It would be sad if we are only going to get small to medium sets related to this very memorable episode, so I hope more will come. Below, JANGBRICKS will show you all the new sets in more detail.
If you are interested to check them out, You can find the previously released LEGO Star Wars: The Last Jedi sets (and shortly, the new sets) at the LEGO Star Wars section of the Online LEGO Shop.

What do you think? Did you see Star Wars: Episode VIII yet? How do you think the sets compare to the film? Did you get any of them yet? Feel free to share your thoughts and own review in the comment section below, but please keep them spoiler-free for people who haven’t seen the movie yet. 😉
And you might also like to check out the following related posts: