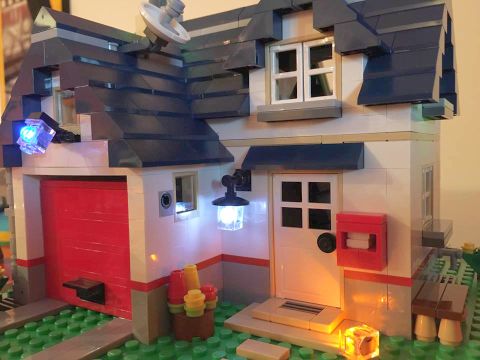
There is a revolutionary LEGO related project on the crowd-funding platform KickStarter that I wanted to show you today. It is called the i-Brix Wireless Lighting System for LEGO Building. In the past we have looked at several great lighting systems for LEGO (see links at the end of this post), however they all need some kind of direct battery or other power source with wiring that can make them bulky or challenging to install in certain situations. i-Brix takes the LEGO lighting system to a whole new level because it is completely wireless. 🙂

Simply put, i-Brix is the first wireless lighting system designed to be used with LEGO building components. It requires no batteries or wires in the bricks, giving you full freedom to build. So how does i-Brix work then? In concept it’s pretty simple, and similar to how wireless cell-phone chargers work. For a new setup you’ll need a Power Plate which can go underneath your LEGO building surface. Since the power is able to transmit through plastic surfaces, the Power Plate can be concealed underneath regular LEGO baseplates without taking away from the appearance of the system. Then you simply add the i-Brix Lit Brix units and place those above the Power Plate.

Unlike a cell-phone, toothbrush, and other wireless chargers, the LED Lit Brix receivers do not require direct surface contact with the transmitting Power Plate. Lit Brix 1×1 brix can work about 6″ away from the Power Plate, or even further when combined with the Booster Plate units (for example, one booster plate could increase your range to up to 12″).
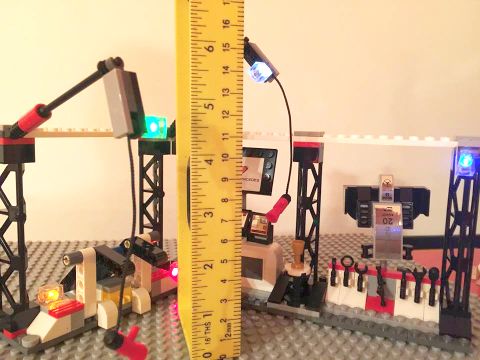
The fact that the Lit Brix can be lit up without wires is awesome in itself. For example you can light up your LEGO City simply by placing the Power Plate under the baseplates, and adding the Lit Brix wherever you want without having to route and hide wires. But there is another, even greater advantage; you can use the Lit Brix for moving vehicles! One of the major problems with wired systems have always been that they could not be used for small LEGO City size vehicles because the battery-box had to behidden inside the vehicle. With i-Brix you don’t have to do that. As long as the vehicle is placed on top of the Power Plate, the lights will work! 😀
Creator of i-Brix Dustin Culton shares: “Now, we haven’t invented the concept of wireless power – Nikola Tesla is given most of the credit for this amazing wonder from years ago. However, we have refined the process to make it work on a very small scale. When you take into consideration just how small our wireless LED receivers are, it’s simply amazing! We’ve fit a wireless receiver and LED into a space that’s only 8mm square. “
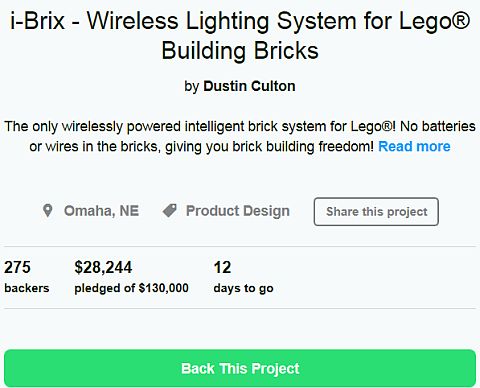
The concept of i-Brix have been enthusiastically received by the LEGO fan community. It has been blogged about, discussed and shared on pretty much all major LEGO fan blogs and forums. JANGBRiCKS also did a video about them ,which I’m including below. Unfortunately i-Brix cannot be bought just yet. Prototypes have been made and the project is ready to go, but it still needs funding. This is why Dustin started a KickStarter campaign, and it only has a few more days to reach it’s funding goal.
Dustin shares the following about the campaign: “We are bringing i-Brix to Kickstarter to generate buzz and momentum behind it so that we can have these produced in volume, allowing all of you to enjoy i-Brix! With our pre-configured packages that feature special introductory pricing, you can get setup with i-Brix at a great price and be one of the first to own them. We have several kit options available on Kickstarter, some include Power Plates, Lit Brix and even the Booster Plates. We feel Kickstarter is the best place to kickoff i-Brix because it gives us a chance to bring out an exciting new product while also giving our backers first dibs at getting them into their hands.” The Kickstarter funding will be used for:
- Mould fabrication for our Brix that will hold the LED core as well as actual brick manufacturing
- Receiver production and assembly
- Finalization of engineering work and product testing
- Board production that holds the electronic components, including the LED(s)
- Packaging for each i-Brix product
Just like many other LEGO fans, I find this project super exciting and I really hope that it will become an actual product. If you would like to pledge, or read more about i-Brix and how it works visit the i-Brix.com, or go directly to the i-Brix KickStarter campaign page.
So what do you think? How do you like the concept of wireless lighting for LEGO? Would you be interested to get them if and when they become available? Are you planning to support the project or have you already done so? What Brix moulds would you like to see made? Feel free to share your thoughts and discuss in the comment section below! 😉
And you might also like to check out the following related posts:
- Light Up Your LEGO Models with BrickStuff
- Custom LEGO Street Lights & More!
- Custom LEGO Light Bricks Now in Color!
- LEGO Light Bricks – More Options!
- LEGO Light Bricks – 12 x 12 Light-Up Base
- Let There Be Light! Light Up Your LEGO World!
- Light Up Your Halloween LEGO Haunted House!
- Bring Your LEGO Creations to Live with ATOMS!