There have been rumors circulating that the #10218 LEGO Creator Pet Shop is going to get retired soon. While LEGO usually doesn’t outright say that they are planning to retire a set, there are signs that indicate a set is soon going to be gone. In case of the LEGO Creator Pet Shop there are several indicators; the set has been around since 2011, and based on how long previous LEGO Modulars stayed around (two-four years), it is due to being retired this year. In addition, the only place you can still find the set is at the Online LEGO Shop (it shows as out of stock but you can still order it). So let’s talk about this before it’s to late. 🙂
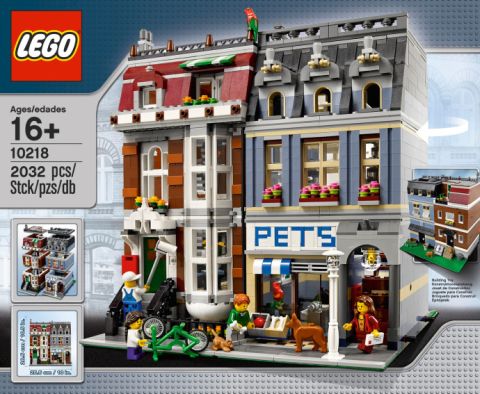
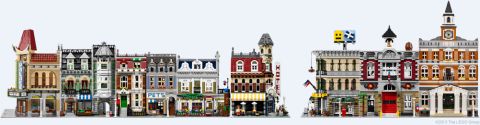
As I have mentioned above, the #10218 LEGO Creator Pet Shop was released in 2011 and to this day it is considered one of the best sets in the LEGO Modular Buildings line. The most obvious feature of the set is that it is split into two buildings on two 16×32 stud baseplates. This makes the buildings extremely versatile; you can put them next to each other in two ways, and you can also mix them in between other buildings. Also, if your display-space is a bit short, you might still be able to squeeze in one half next to the other sets that are all on 32×32 baseplates.
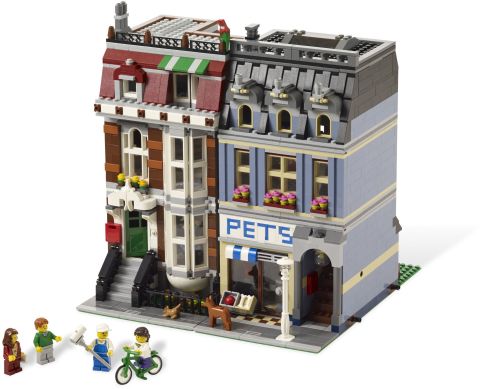
The LEGO Creator Pet Shop has another major advantage; it is the easiest building to duplicate to create row-houses. In other words, if you get multiple sets you can put several of the apartment side of the buildings next to each other to make a row of apartments, and you can also duplicate the pet shop side to create a row of small stores. I have also seen people rebuilding both sides on a full 32×32 baseplate, thus making both buildings wider. While others add an additional second story to make the buildings taller. And you can also rebuild both buildings in different colors (the sand-blue side of the buildings looks particularly nice in sand-green). The point is that this is one of the most versatile of all the LEGO Modular Buildings.

The inside of the LEGO Creator Pet Shop also has a lot of options. The pet shop side of the building can be turned into other type of small stores (I converted mine into a little grocery store). You can also play with the lettering above to the shop to make out different words and learn the art of lettering with LEGO. And the little split-story apartment above the pet shop is absolutely lovely. The other side with the big three-story apartment is originally quite bare, with just a couch, small tables, moving boxes and a minifig painting the walls – all indicating a family just moving in. Some LEGO fan’s didn’t like that this building is not finished on the inside, however I think this increases the playability, and allows you to tinker with the set long after you finish building it. (I should add here that all of the first LEGO Modular Buildings were unfinished on the inside. It is a fairly new development that now they have a fully furnished.)
As you can see, the LEGO Creator Pet Shop is very modular and very creative in so many ways. While the other sets in the LEGO Modular Buildings line are a lot more specific, and would take quite a bit of effort and money to make them into something else, the LEGO Creator Pet Shop can easily be duplicated, modified, refurnished, redecorated in so many different ways. It is truly the most adaptable of the entire collection. And it also looks really sweet as it is. A lot of people consider the LEGO Creator Pet Shop as their most favorite LEGO Modular Building to this day. I myself count the set in my top three favorite LEGO Modulars – especially the sand-blue side (photo below: Pet Shop Steet by cimddwc).

Going back to how this set is rumored to be retired soon, if you have ever considered getting it, please don’t wait. I remember last year when the #10224 LEGO Creator Town Hall was retired suddenly and ahead of schedule. The LEGO Creator Town Hall is the most expensive in the collection and a lot of people felt that it was a bit too big, too expensive, and not too interesting compared to the other ones, but still, when the set disappeared from the shelves there were so many frantic people trying to get one. It was just really sad. The LEGO Creator Pet Shop is much more desirable than the LEGO Creator Town Hall, and it is also much cheaper. Once the set is gone though, expect prices to skyrocket on the secondary market, like we have seen with all other LEGO Modular Buildings. So even if you are not fully ready for it, just get it now and put it away until you are.
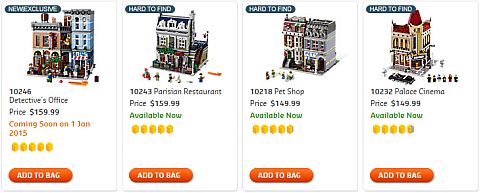
The #10218 LEGO Creator Pet Shop is listed as out of stock at the Online LEGO Shop, however this simply means that you can still order it, but may need to wait a bit until you receive it. Although the listing says it will ship in 30 days, in my experience out of stock items ship much-much faster than that. There is a limit of five sets per household, so you have the option to get extra ones for customizing and expanding, like we talked about before. Also, remember that this set qualifies for free shipping even if this is the only item you get, and also right now we are still in the Double VIP Points period (expires in just four days), so you can earn 299 points on this set, which is basically like a $15 discount. You can find the LEGO Creator Pet Shop, as well as the more recent LEGO Modular Buildings at the Online LEGO Shop.
So what do you think? Do you have the LEGO Modular Pet Shop already? Or are you considering getting it while it is still available? Are you planning to get just one, or get some extras as well? Feel free to share your thoughts and discuss in the comment section below! 😉
And you might also like to check out the following related posts: