There are some exciting things happening at LEGO stores according to the February and March LEGO Store Calendars, so let’s check them out! 🙂

In February a lot of the LEGO store promotions are related to The LEGO Movie, just released in theatres. Also, the #71006 LEGO The Simpsons House has become available to non-VIP members. The 2014 LEGO Star Wars sets will be released mid-month in the USA. And there is more! Below is a summary of all of the February LEGO Store Calendar promotions, and you can also directly visit the Online LEGO Shop.

- Free Exclusive LEGO Piece of Resistance with purchases of $50 or more!
- Get 50% off Race Car, Light Repair Truck or Monster Truck with $50 LEGO City purchase!
- The #71006 LEGO The Simpsons House is now available to the general public.
- On February 17th the 2014 LEGO Star Wars sets become available in the USA.
- On February 17th there is a new exclusive LEGO set for VIP members only. I have heard rumors that this will be the highly anticipated #78010 The LEGO Movie MetalBeard’s Sea Cow. 🙄

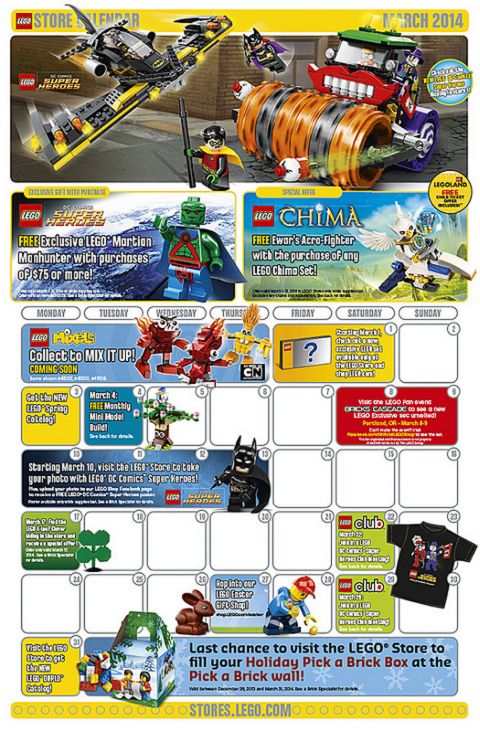
In March the LEGO surprises continue! The exclusive LEGO Super Heroes Martian Manhunter should get LEGO Super Heroes collectors very excited! Also, the 2014 LEGO Batman sets will be released: the #76010 LEGO Batman: The Penguin Face Off and the #76013 LEGO Batman: The Joker Steamroller. And those cute little LEGO Mixels characters are also coming! Below is a summary of all of the March LEGO Store Calendar promotions, and you can also directly visit the Online LEGO Shop.

- Free Exclusive LEGO Martian Manhunter with purchases of $75 or more!
- Release of the 2014 LEGO Batman sets: #76010 LEGO Batman: The Penguin Face Off and #76013 LEGO Batman: The Joker Steamroller.
- Free Ewar’s Acro-Fighter with purchase of any LEGO Chima set!
- The release of the LEGO Mixels.
- On March 1st there is a new exclusive LEGO set that will be available at LEGO stores and at the Online LEGO Shop. Most likely this is the #78010 The LEGO Movie MetalBeard’s Sea Cow, although it is not yet confirmed.
So what do you think? Which of the LEGO promotions are you looking forward to the most? What are you saving up for? Feel free to share your thoughts and discuss in the comment section below! 😉
And you might also like to check out the following related posts: