Now that the second The Hobbit movie has been released, as well as the second wave of LEGO The Hobbit sets, there is also a new LEGO The Hobbit video-game coming. Warner Brothers and TT Games recently announced the latest LEGO video game based on the first two films of The Hobbit Trilogy, The Hobbit: An Unexpected Journey and the upcoming The Hobbit: Desolation of Smaug. The game will be available in the spring 2014 on the Xbox One, Xbox 360, PlayStation 4, PlayStation 3, PlayStation Vita, Nintento Wii U, Nintendo 3DS, as well as Windows PC and Mac. 🙂
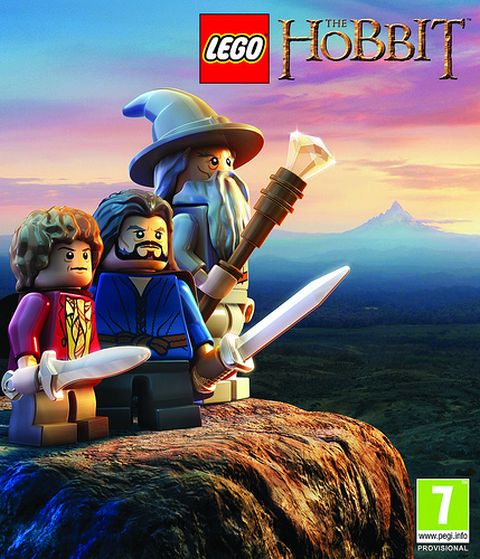
Following the storyline of the first two films, LEGO The Hobbit will take players on quests throughout Middle-earth, joining Bilbo Baggins, Gandalf the Grey, and Thorin Oakenshield and Company in their exciting adventures toward the Dwarven Kingdom of Erebor. “We are thrilled to depict the characters and environments of Peter Jackson’s Middle-earth in LEGO form with the LEGO The Hobbit videogame”, said Tom Stone, Managing Director, TT Games. “Our family-friendly take on these thrilling adventures will have kids and parents playing and laughing together as they build and explore in LEGO Middle-earth.” (See trailer below.)
LEGO The Hobbit sends players of all ages on an unforgettable interactive journey through the first two films in The Hobbit Trilogy, The Hobbit: An Unexpected Journey and the upcoming The Hobbit: Desolation of Smaug. Players will follow Bilbo Baggins as he is recruited by the Wizard Gandalf to aid Thorin Oakenshield and his Company of Dwarves. Bilbo leaves the comforts of the Shire on a journey through Middle-earth to help the Dwarves reclaim their lost Kingdom of Erebor within the Lonely Mountain. Along the way, he is introduced to ravenous Trolls, dangerous Orcs and, of course, Gollum and his precious Ring. Players will utilize and combine the Dwarves’ unique abilities — often with hilarious results — to solve the most diverse Quests of any LEGO videogame to date.
In LEGO The Hobbit, kids and families will be able to take on the form of their favorite Hobbit characters, including Bilbo, Gandalf, and all of the Dwarves: Thorin, Fíli, Kíli, Óin, Glóin, Dwalin, Balin Bifur, Bofur, Bombur, Dori, Nori and Ori. Each has his own special – and quite hilarious – ability: For instance, Bombur can be used as a trampoline that enables his companions “belly-bounce” out of danger!
Players will visit key locations from the films, including Bag End, Bilbo’s Hobbit-hole in Hobbiton, trek through the treacherous High Pass over The Misty Mountains, and explore the depths of Goblin-town, Mirkwood and Rivendell. Along the way, players will solve countless puzzles, partake in Treasure Quests and battle with Orcs, Trolls and fouler things. They will also be able to mine for gems, discover loot from enemies, and craft powerful magical items or build immense new LEGO structures.
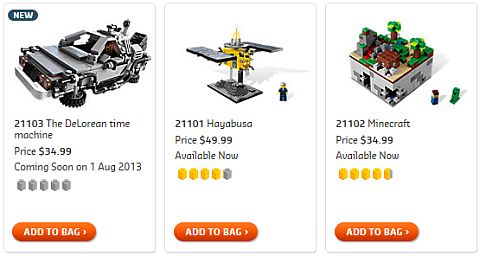
If you are interested in the LEGO The Hobbit video-game, you might also want to check out the currently available LEGO The Lord of the Rings video-game for lots of fun and entertainment. It is available here: LEGO Lord of the Rings Video Game on Amazon
What do you think? Are you planning to get the LEGO The Hobbit video-game? How did you like the trailer? And did you see the second movie yet? Did you like it? Feel free to share in the comment section below! 😉
For more LEGO Lord of the Rings and LEGO The Hobbit news, reviews and discussions, check out the LEGO Lord of the Rings section, or select from the following recent posts: