As you may have noticed already while browsing the Online LEGO Shop, the new LEGO The Hobbit sets are now available! The four new sets are all tied with the second movie, The Hobbit: The Desolation of Smaug. We have talked about the sets before (see: 2014 LEGO The Hobbit Sets Pictures!), and now we can finally get them. So let’s take a closer look! 🙂

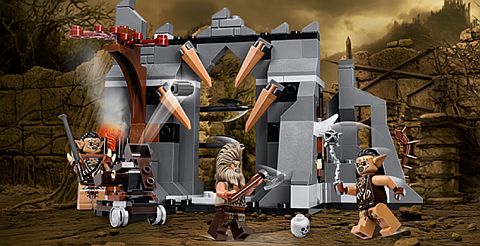
➡ #79011 LEGO THE HOBBIT DOL GULDUR AMBUSH: Fight through the Gundabad Orc ambush and into Dol Guldur! At the fortress ruins of Dol Guldur the Gundabad Orcs lie in wait for Beorn with their weapons and firing mobile catapult. But that’s just the start of the danger for the great warrior. There are traps everywhere in the old ruin. Can Beorn avoid the huge spikes at the entrance, hidden flick missile and deadly swinging hammer and axe traps? That’s for you to decide. Includes 3 minifigures with assorted weapons: Beorn and 2 Gundabad Orcs with exclusive new armor. 217 pieces, price: 19.99 – BUY HERE

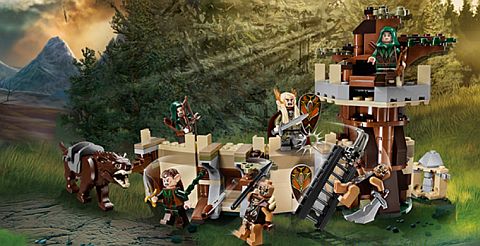
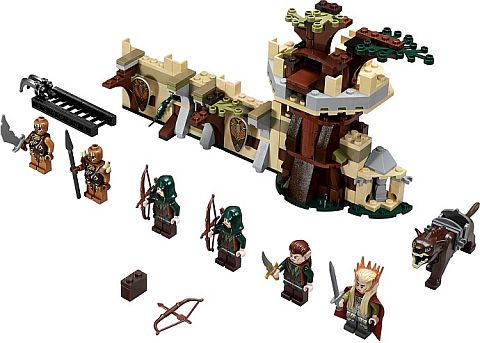
➡ #79012 LEGO THE HOBBIT MIRKWOOD ELF ARMY: Defend the Elven fortress against invading Orcs with the Mirkwood Elf Army! The Orcs are trespassing on the lands of the great Elven king, Thranduil, and a thrilling battle is inevitable. Climb the rotating tree at the edge of Mirkwood Forest and keep watch. When the Gundabad Orc warriors draw near on foot or riding the ferocious brown Warg, defend the Elven stronghold with the Mirkwood Elf army. Watch out for Orcs using the ladder to scale the wall. Flick missiles from the wall, then grab a weapon from the rack and attack! Split the tree in two for ambush mode to send Elven warriors flying over the wall and shock the Orc invaders! Includes 6 minifigures with assorted weapons and accessories: Thranduil, Mirkwood Elf, 2 Mirkwood Elf Archers and 2 Gundabad Orcs. 276 pieces, price: $29.99 – BUY HERE
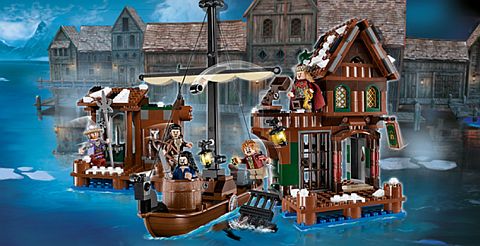
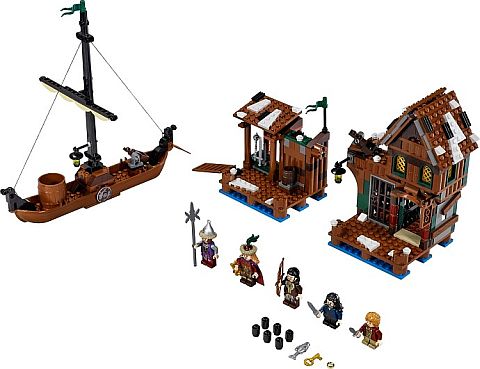
➡ #79013 LEGO THE HOBBIT LAKE TOWN CHASE: Escape from the Master of Lake-town with Bilbo Baggins in a Lake-town Chase! Bilbo Baggins and Thorin Oakenshield have washed up on the shores of Lake-town. Help the heroic Bard the Bowman to sneak them in aboard his boat, hide in the barrel and sail into town. Sneak through the secret passageway into the armory to grab a weapon and tiptoe past the Guard to take the prison key. Blow out the prison wall for the ultimate distraction! Can our heroes avoid being blasted by the prison roof catapult and escape to safety? Includes 5 minifigures with assorted weapons and accessories: Bilbo Baggins, Thorin Oakenshield, Bard the Bowman, Master of Lake-town and a Lake-town Guard. 470 pieces, price $49.99 – BUY HERE
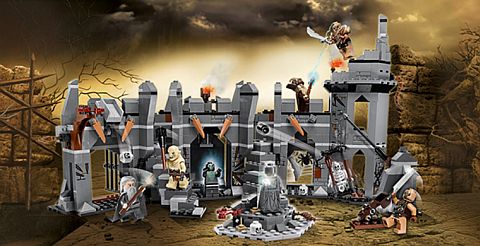
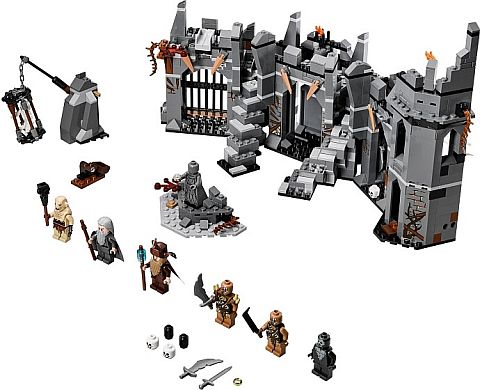
➡ #79014 LEGO THE HOBBIT DOL GULDUR BATTLE: Defeat the forces of evil in an epic conflict with Dol Guldur Battle! Rumors of the rise of an ancient Evil have brought Gandalf The Grey and Radagast to investigate the fortress ruins of Dol Guldur. Flick the magical wall to make the sinister Necromancer of Dol Guldur appear to the Wizards. But beware – Azog and 2 Gundabad Orcs are about to attack with a rolling catapult. Can the brave Wizards dodge the skulls falling from the turrets and swinging blades and axe, and avoid being trapped in the spider web and hanging cage? Will Gandalf discover the treasures hidden within the statue? It’s up to you to decide the fate of Gandalf and Radagast in this epic battle of good versus evil! Includes 6 minifigures with assorted weapons and accessories: Gandalf the Grey, Radagast, Necromancer of Dol Guldur, Azog and 2 Gundabad Orcs. 797 pieces, price $69.99 – BUY HERE
All of the new LEGO The Hobbit sets are currently available at LEGO stores, other LEGO retail locations and at the Online LEGO Shop (just click the link or the image below to get there).

What do you think? How do you like this second wave of LEGO The Hobbit sets? Have you gotten any of them yet? Are you planning to? Which one is your favorite? And how do you like the minifigures? Feel free to share your thoughts and discuss in the comment section below! 😉
For more LEGO Lord of the Rings news, reviews and discussions, check out the LEGO Lord of the Rings section, or select from recent posts below: