(Written by HP)
We have briefly mentioned Series 12 of the LEGO Collectible Minifigs in The LEGO Movie – Second Full Trailer! post a few days ago (click on link to see the trailer), and today I would like to discuss them in a bit more detail. As you probably know already, Series 12 of the LEGO Collectible Minifigures are not just random characters like in previous series, but tied to The LEGO Movie that will be released next year. So let’s take a look! We will start from the top row from left to right, then the bottom row from left to right to go through all the minifigures. 🙂

➡ LEGO Minifigs Series 12 Calamity Drone: This female looking robot looks like is from the Wild West with a mild resemblance to Red Harrington from the LEGO Lone Ranger theme. The hairpiece is new, and looks nice.
➡ LEGO Minifigs Series 12 Gail the Construction Worker: She appears to be working at the same construction company as Emmet. Notice the hardhat/hair combination, which is new.
➡ LEGO Minifigs Series 12 Abraham Lincoln: Don’t tell me you don’t have plans on getting this minifigure! This is one of the most exciting minifigs in the series LEGO fans can’t wait to use in their own creations. The tall hat and the beard are one piece.
➡ LEGO Collectible Minifigs Series 12 Larry the Barista: This is the guy working at the Coffee Shop where Emmet buys his overpriced coffee (see trailer for details). The coffee cup is a new piece, so is Larry’s hair.
➡ LEGO Minifigs Series 12 Panda Guy: My favorite minifigure from this series, giving us another awesome costume. Plus it comes with a re-colored teddy-bear that looks like a baby panda – how cute!
➡ LEGO Minifigs Series 12 Velma Staplebot: Not really sure who she supposed to be, besides being another annoying and angry looking robot. The hairpiece is a new mould.
➡ LEGO Minifigs Series 12 William Shakespeare: Didn’t we get a guy similar to this one not that long ago? (I’m referring to the Hamlet minifig from Series 8). At least now we will have an official Shakespeare minifig and not just a stereotype. The balding headpiece is new.
➡ LEGO Minifigs Series 12 Taco Tuesday Guy: It’s Taco Tuesday! Although this minifig is mostly a re-release of the Mariachi from Series 2, he is surely welcome in my collection!
➡ LEGO Minifigs Series 12 “Where are my Pants?” Guy: I guess his name tells it all. He is surely going to be a weird character, but his Aloha shirt is quite nice. 🙄
➡ LEGO Minifigs Series 12 Wiley Fusebot: Looks like another crazed robot from the Wild West.
➡ LEGO Minifigs Series 12 President Business: According to the trailer we mentioned above, he’s the president of the Octan company, and the World. He is the main badguy who has a soft spot for Taco Tuesdays. His hairpiece is boss!
➡ LEGO Minifigs Series 12 Wild West Wyldstyle: Here Wyldstyle is in a nice black dress with a fan, instead of her usual super-heroine, super-active attire.
➡ LEGO Minifigs Series 12 Hard Hat Emmet: Although he is dressed like a simple construction guy, Emmet is the star of The LEGO Movie! I’m really excited about the hardhat/hair combination.
➡ LEGO Minifigs Series 12 Good Cop/Bad Cop: I’m hoping he has a second face (Good Cop) just like in the movie.
➡ LEGO Minifigs Series 12 Mrs. Scratchen-Post: Notice the name? Very funny! Interesting that she comes right after the other cat-lady in Series 12, but she comes with a new cat-variant!
➡ LEGO Minifigs Series 12 Marsha Queen of Mermaids: Marsha looks a lot like a mermaid Katy Perry. Blue hair, blue lipstick, purple tail, purple eye-shadow, a pink jewel and a rare white clam-piece – what is there not to like?
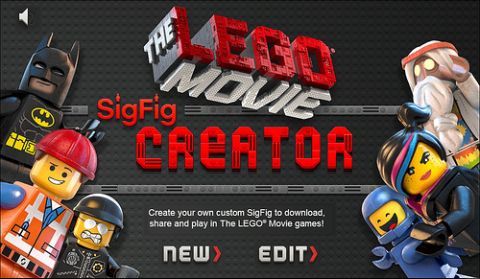
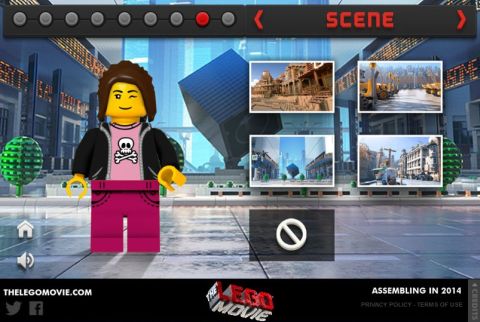
So that’s it as far as Series 12 of the LEGO Collectible Minifig Series. They should be release early next year, along with The LEGO Movie sets in January, and The LEGO Movie in February. In the meantime LEGO also put up a SigFig Creator on The LEGO Movie website where you can create a minifigure of yourself using the many different configurations of facial features, hair-styles, headgear and accessories, clothing, etc. Once you are done you can insert your sigfig into different background from The LEGO Movie and download the images to your computer. Later, when The LEGO Movie video-game comes out you can use your sigfig in the game as well.
So what do you think? How do you like The LEGO Movie Minifigure Series? Do you have a favorite? Or are you planning to collect them all? And have you tried out the sigfig creator? Feel free to share your thoughts and discuss in the comment section below! 😉
And you might also like to check out the following related posts: