Just a bit of a summary of what is happening in the world of LEGO this month. There are several new exciting LEGO sets that have been released, and also the promotions for this month are great. So if you are in the mood of LEGO shopping, here is what September has to offer. 🙂
➡ FREE EXCLUSIVE MINI VOLKSWAGEN CAMPER – first of all, when your order reaches $75, you will automatically get a #40079 LEGO Mini Volkswagen T1 Camper Van polybag. I already have one, and I can tell you it is really cute. You might also want to check out the full version #10220 LEGO Volkswagen T1 Camper Van, which is a wonderful LEGO set in itself. This offer is available for the month of September only at the Online LEGO Shop and at LEGO store locations, while supplies last.

➡ FREE EXCLUSIVE CLONE TROOPER LIEUTENANT – if your purchase includes LEGO Star Wars sets, once your order reaches at least $50, a free exclusive LEGO Star Wars Clone Lieutenant minifigure will be automatically added to your shopping cart. This offer is available for the month of September (but will also be continued in the month of October, based on the October store-flyer) only at the Online LEGO Shop and at LEGO store locations.

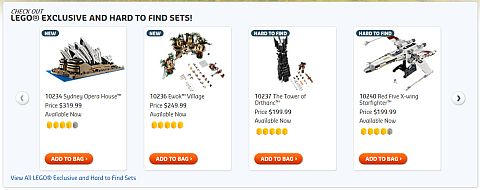
➡ LEGO STAR WARS EWOK VILLAGE AVAILABLE NOW – the #10236 LEGO Star Wars Ewok Village is now available for all LEGO fans, not just LEGO VIP members. This is considered one of the most exciting LEGO Star Wars sets since the #10188 LEGO Star Wars Death Star. We have talked about this set before so I won’t repeat the details here, but you can check out all the relevant information and designer-video at the LEGO Star Wars Ewok Village Press-Release post – BUY HERE

➡ LEGO SYDNEY OPERA HOUSE AVAILABLE NOW – the #10234 LEGO Creator Sydney Opera House is also available for all LEGO fans, not just LEGO VIP members. This is the latest in the large, exclusive LEGO Creator sets, and a beautiful and accurate model of the Sydney Opera House. We have talked about this set before and you can check out all the details along with the designer-video at the LEGO Sydney Opera House Set Revealed! post – BUY HERE

➡ LEGO MINIFIGURES SERIES 11 AVAILABLE NOW – the latest in the Collectible LEGO Minifigure Series is now available at the Online LEGO Shop, as well as LEGO stores and other LEGO retailers. We have previewed these minifigs previously at LEGO Minifigures Series 11 Pictures! Please note that it appears that this will be the last of generic LEGO Collectible Minifigure series. Series 12 will be based on the upcoming The LEGO Movie, and Series 13 will be based on The Simpsons as part of a drive to celebrate their 25th anniversary. Beyond that, more licensed minifigures should be coming. Anyhow, Series 11 is available now, and as usual, we get a variety of great minifigs! – BUY HERE

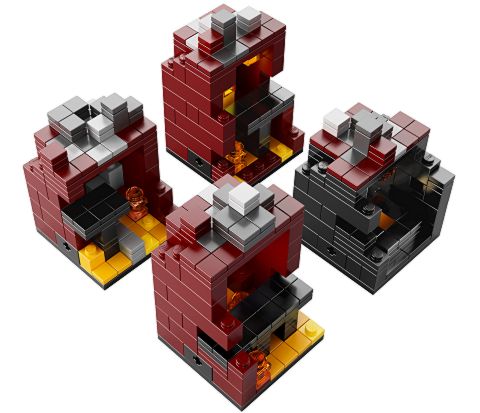
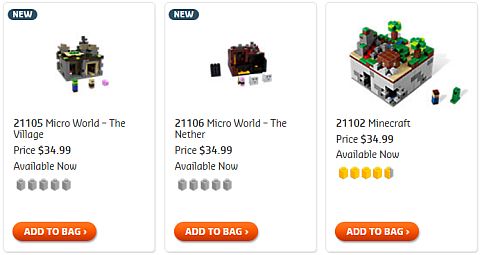
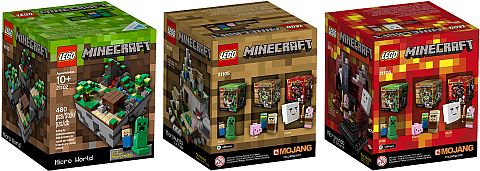
➡ LEGO MINECRAFT SETS AVAILABLE NOW – we have talked about these yesterday (see: New LEGO Minecraft Sets Available Now!), but I thought to repeat it for the sake of completeness; two new sets are available in addition to the original LEGO Minecraft set: the #21105 LEGO Minecraft The Village, and the #21106 LEGO Minecraft The Nether. The original set has been immensely popular and I expect the same with these. – BUY HERE
So that’s the recap for the month of September as far as LEGO shopping opportunities and promotions. Also, don’t forget that LEGO offers free shipping on all orders over $75 to sweeten the deal and make it a bit easier on your wallet. So what do you think? How do you like the new sets and offers for this month? And what are you planning to get? Feel free to share your thoughts and discuss in the comment section below! 😉
And you may also like to check out the following related posts: