(Written by William)
As I mentioned in previous reviews, I’m quite fond of the LEGO BrickHeadz line. I don’t even really mind what intellectual property a set belongs to, as I enjoy the building experience. Thus, I was very happy to have the chance to build all three of the new LEGO Disney BrickHeadz sets; the #40619 LEGO BrickHeadz EVE & WALL-E, the #40620 LEGO BrickHeadz Cruella & Maleficent, and the #40621 LEGO BrickHeadz Moana & Merida.

Generally, I found that LEGO designers go out of their way to approach each BrickHeadz character in its own way. That is really saying something considering that the end product looks fairly plain to most. It’s the small changes in building style you may not see in the finished product that really captures my attention. So, let’s take a look at what the latest LEGO BrickHeadz brings us.
#40619 LEGO BRICKHEADZ EVE & WALL-E
Despite the fact that the name of this set starts with EVE, the building instructions make you build WALL-E first. And wow, this model is eye-opening! The most obvious feature of course is that WALL-E doesn’t have a normal shape, nor is he a person, animal, or whatever the Creeper is from Minecraft. WALL-E is a robot. As such, he has the freedom to establish a new look when it comes to shaping a BrickHeadz character.
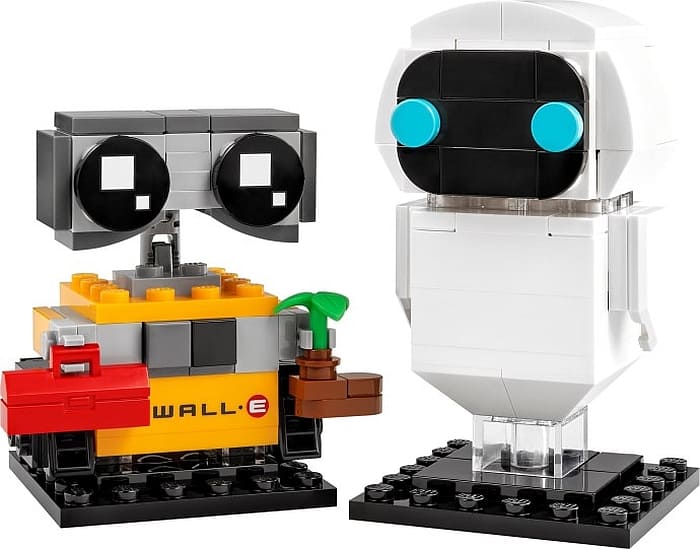
It was nice seeing the treads built out to the sides with added clear 1×2 plates underneath to both support the figure as well as make it compatible with the standard black stand for BrickHeadz characters. But what really blew me away was that his head was built upside-down. This allowed for the perfect pieces to give him his iconic shape.
But that’s not all. Unlike most BrickHeadz, WALL-E features articulation in his head. Articulation is nothing new in BrickHeadz; we’ve seen tails, legs on animals, and even wings that can be repositioned. What makes the head of WALL-E so interesting is that it also conveys emotion. Bent forward and down he looks sad, while bent forward and looking up he becomes eager and interested. For something that doesn’t look like a person, it is amazing to see just how versatile this little guy is at showing emotion.
And if that wasn’t enough, we also get EVE. EVE doesn’t have the vast emotional expression that WALL-E comes with, but she also breaks the mold by looking very different. Her use of clear bricks is rather interesting. There is one underneath to represent that she floats in the air. And there are also added clear 1×2 plates right under her head to over-emphasize the neck joint. This is a clever use of parts to create some interesting optical illusions.
#40620 LEGO BRICKHEADZ CRUELLA & MALEFICENT
When building these three sets, I simply went by the set numbers in order. I was a bit concerned that I had built the best set in the lot first with WALL-E and EVE. But these diabolical villainesses had surprises for me. Let’s start with Maleficent.
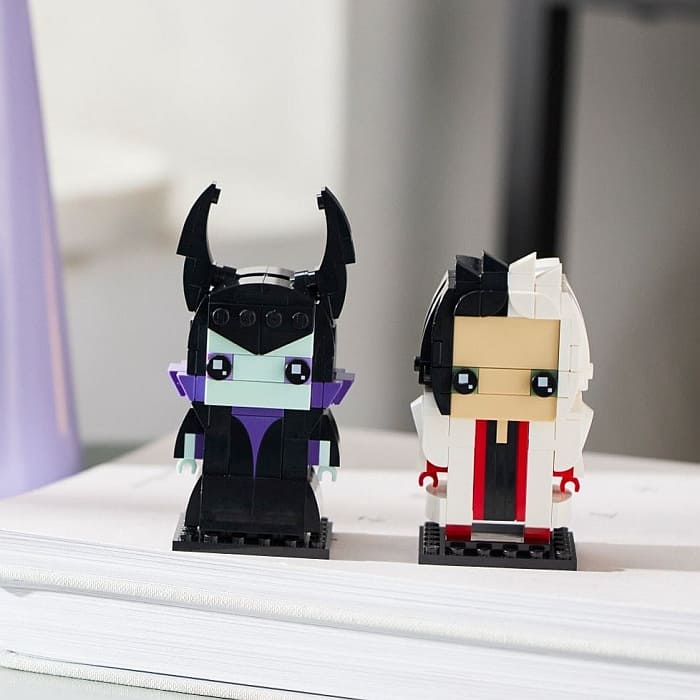
As with older Disney villains, one thing graphic designers liked to do was to give the characters a very distinct outline. Maleficent has always been known for her massive horns, high-collared dress, and flare at the bottom of her dress. Taken as a silhouette, all of this makes a rather unnerving impression, and remarkably, these features are replicated in the BrickHeadz version of the character. Throw in the deathly blue pallor to her skin and you got a truly iconic Disney Villain. Also, it is nice to see a printed brick help make her dress stand out. And if I’m honest, this is the second one you build in the set.
But it is Cruella who really steals the show. Out of all the LEGO Disney BrickHeadz released so far, Cruella is, hands down, the most interesting to build. From her long coat to her split hair color, she is rather striking. But the real fun is in the building experience.
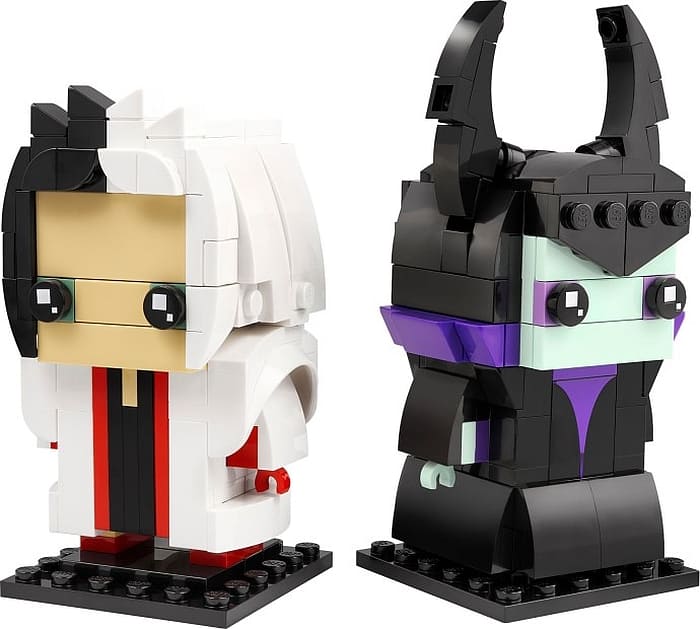
You can find some really cool building techniques, like the wheel fenders over Cruella’s shoulders, and sideways building techniques that go practically to her feet and all the way around, giving the character a sense of dimension. Plus, her dress is built sideways with clip and bar connections.
The weirdest thing is, I’ve always found Cruella to be one of the creepiest villains Disney has ever created. Her long spindly arms and hawk-like face terrified me as a child. But since BrickHeadz softens some of those features in a blocky appearance and normalizes her, it makes the entire character rather cute. It makes it so that I’m happy to have her front and center in my collection, rather than hiding her at the back. And as an added creepy twist, you can even display her next to the #40479 LEGO BrickHeadz Dalmatians released in 2021 in the LEGO BrickHeadz Pets collection.
#40621 LEGO BRICKHEADZ MOANA & MERIDA
Remember how I mentioned I didn’t care what intellectual property a LEGO BrickHeadz character comes from? Although I have seen both films these two were featured in, they aren’t the characters I immediately think of when Disney is mentioned. In fact, I might struggle to remember them at all. That said, I was stoked to see they were released in LEGO BrickHeadz form. This is because I’m a huge fan of how LEGO designers build interesting hairstyles for BrickHeadz characters. And when it comes to untamed locks, it doesn’t get any better than these two!
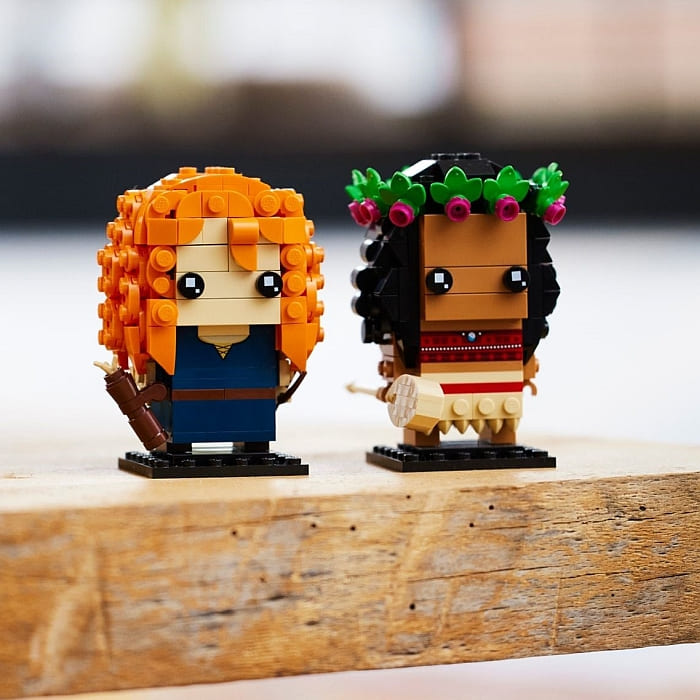
Before you even begin building, you will likely notice that this set is the biggest out of the three new LEGO Disney BrickHeadz sets. That’s because this set is also a great parts pack. Those hairstyles require a lot of the same parts to create the waves, curls, and ringlets. As for unique parts, both have a printed brick to decorate the neckline area of their outfit. I also like the use of the teeth plate to make the bottom of Moana’s dress and the clip on Merida’s belt to hold her quiver.
But of course, the real attraction here is the hair! Moana has much tighter curls, and to achieve this, LEGO designers used a lot of what they call “bun-slopes”. This little slope looks like the shape of a tiny greenhouse. They are paired with plenty of “cheese-slopes” to form points on the sides and back of her hair for additional wave and volume. Added to all this incredible detailing is a flower crown built into the top of her head. The result is rather majestic!
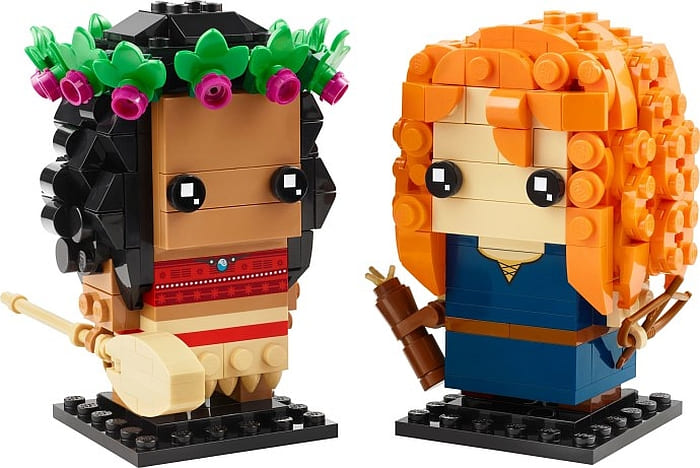
Speaking of majestic, Merida is like a lion with her big flaming orange hair! It’s like a glorious mane! Unlike Moana’s, Merida’s hair has a bit more length to it. So, to capture these slightly more elongated curls, we get a lot of 2×2 round plates. In some places, this layering is as much as three plates deep! This is one of the few times you can’t build the front of the face first since you need to see just how far out the sides her hair goes. Then you use the underside of her face to build out even more hair. As a long-time LEGO BrickHeadz fan, this is the type of BrickHeadz I look forward to building!
LEGO DISNEY BRICKHEADZ – FINAL THOUGHTS
All three of the sets are fantastic. Normally, I can point to one in a collection and say, if you only get one, get this one. I’m not sure I can say that with these three. They each have a lot to offer. Moana & Merida offer something nostalgic. They are more princess-like, which we haven’t seen in a while, along with some great hair volumizing. Then there is Cruella & Maleficent faithfully replicating iconic character designs along with one of the most intriguing building experiences (with Cruella). And I can’t express just how charming EVE & WALL-E are. These little robots are the types of sets that could get someone into BrickHeadz. In the video below, I will show you the sets in a bit more detail.
Fortunately and unfortunately, you are spoiled for choice when it comes to these three. So, if you have a limited budget and want to get just one, my best advice is to go with your favorite characters. Here’s hoping any of these will help your own celebration of 100 Years of Disney! If you want to check them out, they are available at the LEGO BrickHeadz section of the Online LEGO Shop.
What do you think? How do you like the new LEGO Disney BrickHeadz sets? Feel free to share and discuss in the comment section below!
And you might also like to check out the following related posts:


