(Written by William)
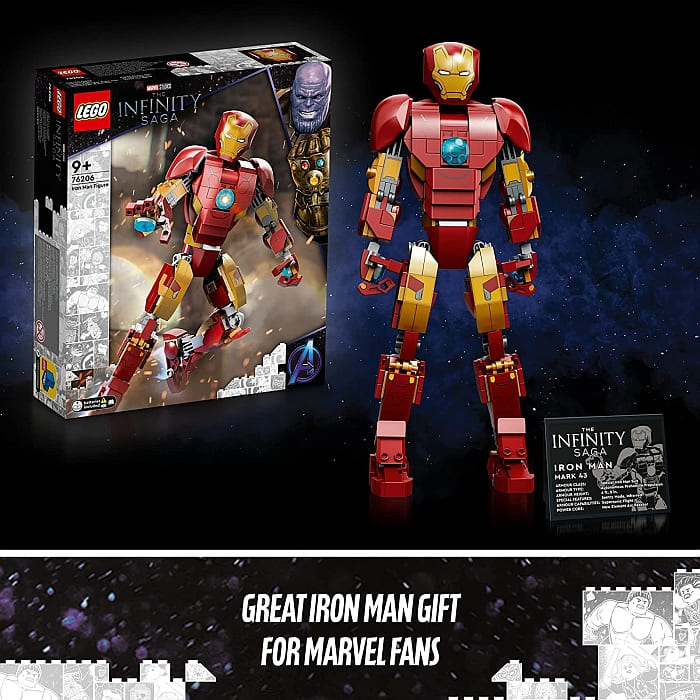
LEGO recently released a brand new constructible brick-built action figure with the #76206 LEGO Iron Man Figure set. This is not the first time the LEGO Marvel and DC Comics Super Heroes lines have seen what some fans refer to as “constraction” (construction + action) models. We’ve been treated to characters like Captain America, Hulk, Batman, Joker, and more in this style. However, at the time of their release, they didn’t seem to sell that well, even though they had a relatively low price-point. So, is the new LEGO Iron Man Figure any different? And what does it has to offer? Let’s take a look!
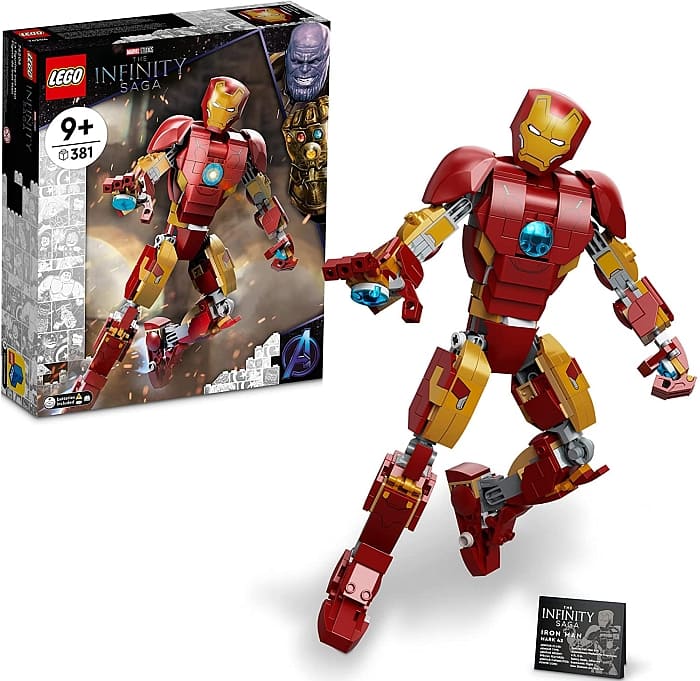
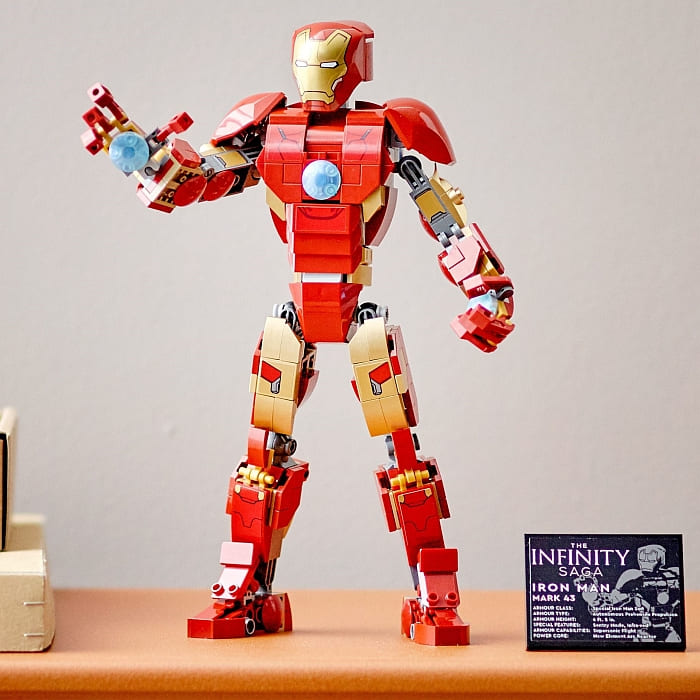
Considering that the price is roughly double the earlier constraction figures, you can at least expect a higher degree of detail. Additionally, when prices increase, we often see a richer color palette. And, I must admit, all the metallic gold in this set is pretty sweet. We also see the deep-red and opalescent-blue lending their hues to the model’s accuracy.
Unfortunately, we do not get printed elements, despite the nifty plaque. Plaques have been more often associated with the higher-end statuary models. In turn, those sets have typically spoiled us with printed pieces. But this is a $40 set , which is extremely well priced for a more art-focused piece.
Then again, the age recommendation is 9+, so it is possible that LEGO is attempting to hit multiple audiences with this set. Having built it, I’d say they had a good reason for that choice. Unlike the previous constraction models, I was actually interested in this set. We will talk about why in the next section.
ARTICULATION vs. AESTHETICS
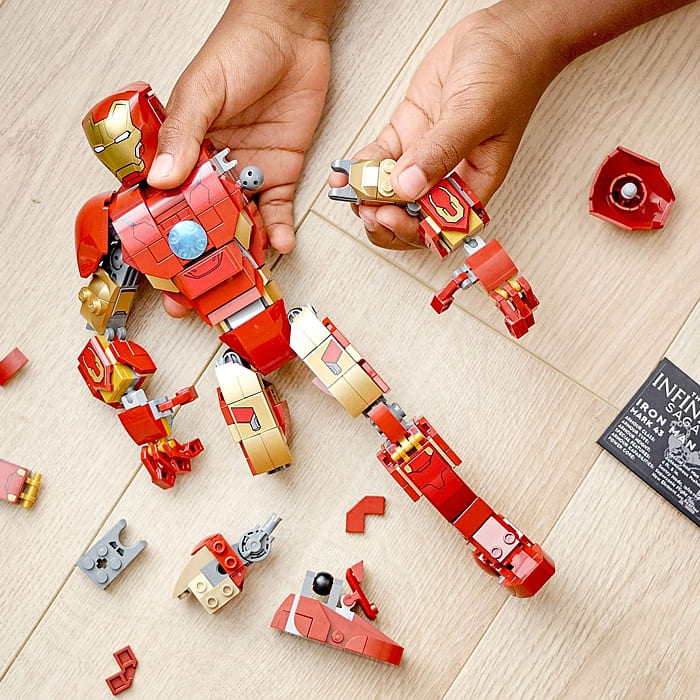
In previous constraction models, the focus seemed to be on articulation. After all, if you are going to build your own action figure, you’re going to want to pose it in all sorts of awesome positions, right? Well, that functional approach comes at a cost. Joints that work usually need clearance to operate correctly. This means that these structures are often exposed, often ruining the look of the figures.
This is especially true when you have a set at a $20 price-point like with the earlier models in this style. The workaround is to make specialized parts, but that could hinder the build experience. So what is the solution?
For starters, upscaling a model isn’t a bad first step. That’s what happened with the new Iron Man Figure set. He stands a bit taller than previous constraction models. And the higher price allows the use of more parts for detailing. This is very noticeable given that there are very few large parts in the set. Instead, LEGO designers used brackets of all shapes and sizes to not only secure areas together, but to also add more detail. And just like the focus on functionality came at the price of aesthetics, so too does this approach have a cost.
In order to get parts looking just right, at times the functionality is sacrificed. This can best be seen in the shoulders and ankles of the model. We can also see where LEGO designers stayed with functionality and allowed some sections to look a bit exposed (i.e.: the knees and the hip sockets). However, blending the two together, we end up with a model that may not be perfect, but it looks rather impressive.
Because LEGO designers tried to find a middle ground, I think they also discovered a couple of connections that worked in harmony and created something that is both fully articulate and extremely aesthetic. The connections in question are the neck and waist of Iron Man. In both cases, a small ball joint connector is used, which hides very well and it has the perfect amount of strength to work for the function it’s intended to serve.
Honestly, even though articulation and aesthetics are often opposing one another, it is possible to strike an ideal balance. Ultimately it comes down to the following. Building aesthetically, we focus on covering up things. However, if we can make it so that we’re also supporting a joint, that is even better. As for articulation, the goal is to create as much range of movement as possible. However, if we make these motions more meaningful and limited, then we can more easily meet the aesthetic portion halfway.
Take for instance Iron Man’s hip sockets. It is not important for him to be able to do the splits. So the joint was built to limit the majority of the leg to swivel forwards and back, kind of like how most of us use our hip socket. By making choices like these, we can more easily find areas that are safe to cover up and not get in the way.
APPLYING WHAT YOU LEARN
This model represents the first time I can think of that a LEGO constraction model has really elevated itself. On one hand, it is a toy, but, on the other, it is art. That ability to bridge the gap comes from forcing two opposing build theories to work together.
This is a big reason why many expert-level sets are as popular as they are. Blending the functionality of LEGO Technic with the slick appearance of LEGO System often results in something awesome. As for the constraction space, the challenge is rather high. There is often no room to hide a working joint, but that doesn’t mean that will always be the case.
Every year we see new parts with new functionality and appearance. This gives us more and more options to tackle what used to be impossible builds.
In the end, you don’t want to just ask, how can this move or how will it look? Rather, you need to ask how should this look when moving? That is how you start blending opposing techniques. In the video below, I will talk a bit more about the set and its functions. And if you want to check out the set, it’s available at the LEGO Marvel Super Heroes section of the Online LEGO Shop.
What do you think? How do you like the new LEGO Iron Man Figure? Do you have the set already? How do you think it compares to earlier constraction figures? Feel free to share your thoughts and discuss in the comment section below!
And you might also like to check out the following related posts: