(Written by William)
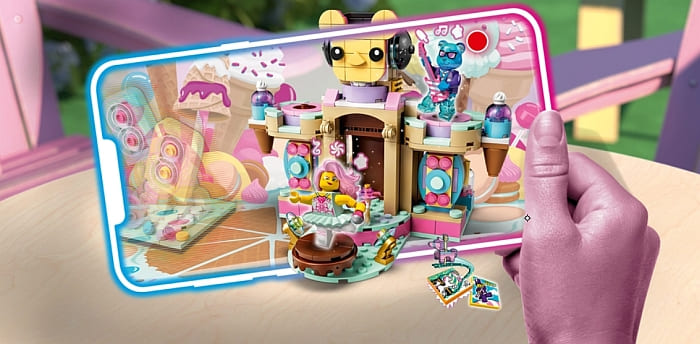
To start out, I must bring up the fact the LEGO VIDIYO line hasn’t been received very well by fans. Many retailers have even discounted various sets in the collection to perhaps avoid having too much to put on clearance later down the line. But I wanted to review at least one set in the collection, and the #43111 LEGO VIDIYO Candy Castle Stage seemed like one of the better choices.
I actually ended up buying all the LEGO VIDIYO Beat Box sets from the first wave because I really liked the minifigures, but the extremely steep prices left me hesitant to sink even more money into the second wave of sets. However, given that the second wave had more substantial sets, I wondered if they felt more reasonably priced. Still, any desire to buy VIDIYO sets from the second wave remained on the back burner simply because so many great sets from other themes were released around the same time.

It’s also worth noting that even LEGO admitted that they needed to halt releasing any further sets in the VIDIYO collection, which further hurt the confidence of LEGO fans and collectors. The good news about this though is that you will likely find the LEGO VIDIYO sets in bargain bins online and at local retailers. One of the questions is how long should we dare to wait before purchasing these sets, even if it is just for the parts?
LEGO VIDIYO CANDY CASTLE STAGE – THE MINIFIGS
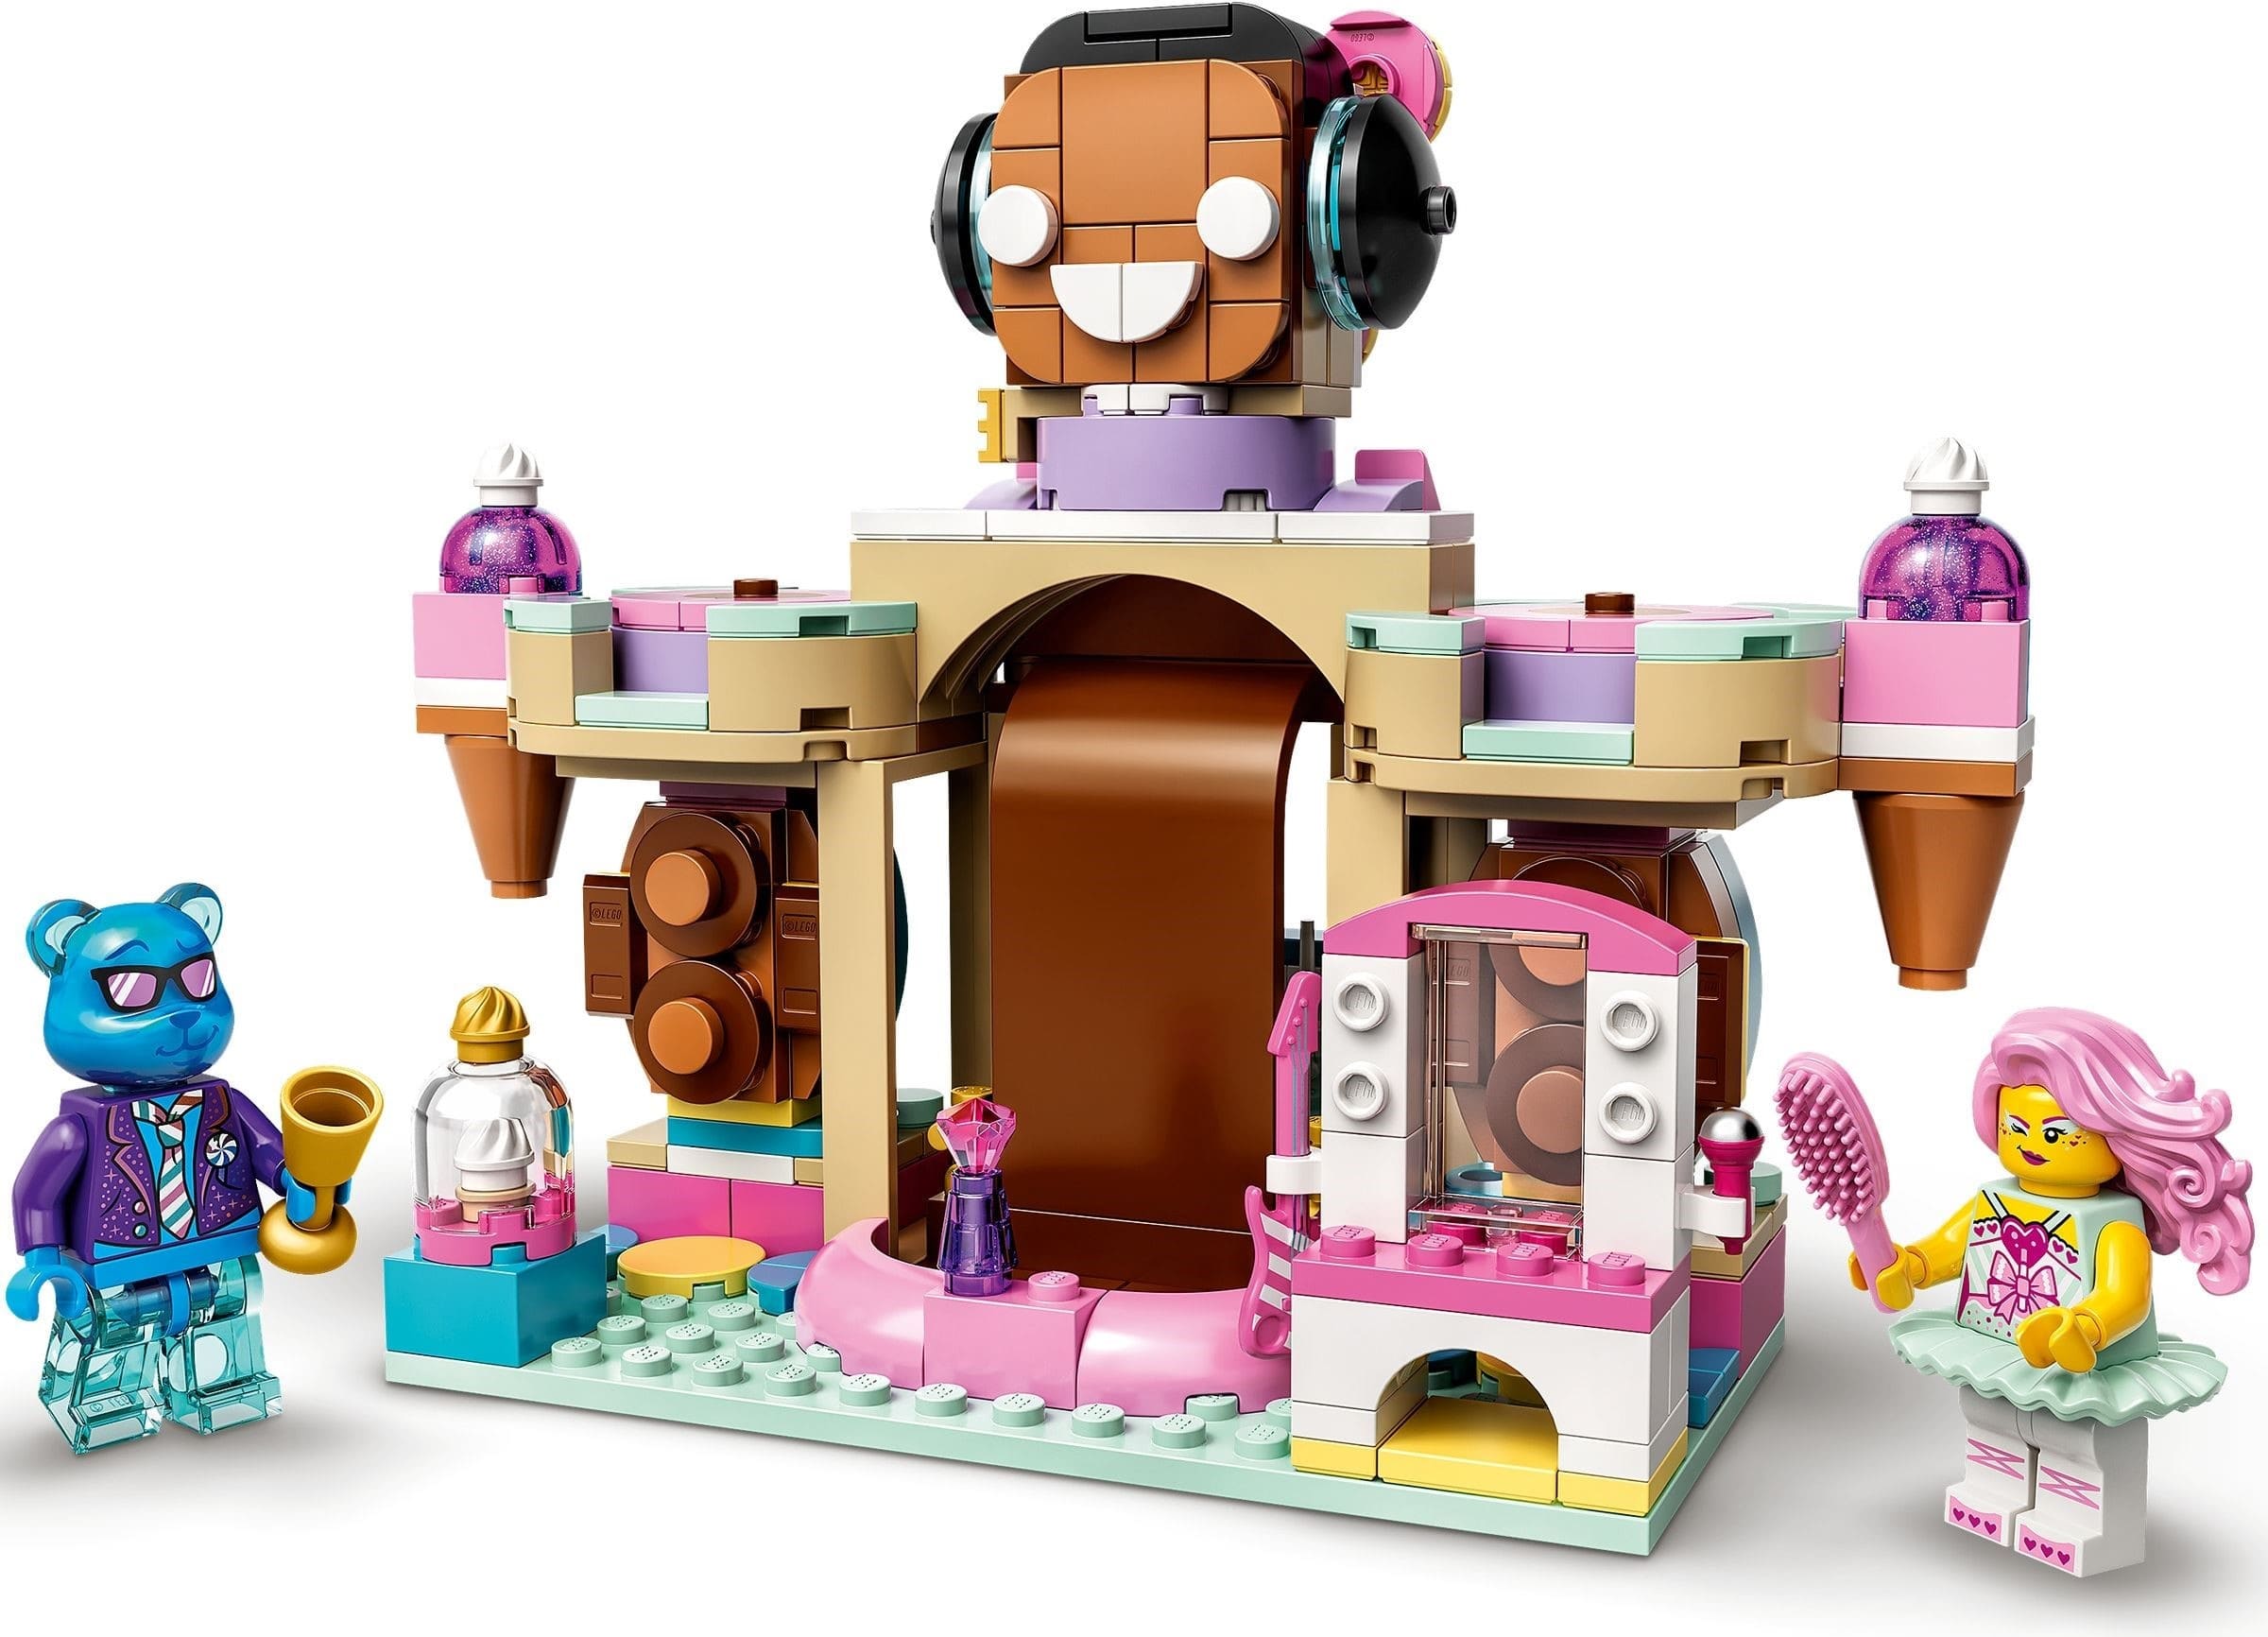
Let’s start with the main reason I and many others got into LEGO VIDIYO in the first place; the characters. The #43111 LEGO VIDIYO Candy Castle Stage does feature two, both in a candy-themed outfit. The theme alone is pretty interesting as it has the potential for some amazingly vibrant colors. For $30 USD retail, I would have expected three minifigures, but LEGO decided to include only two.
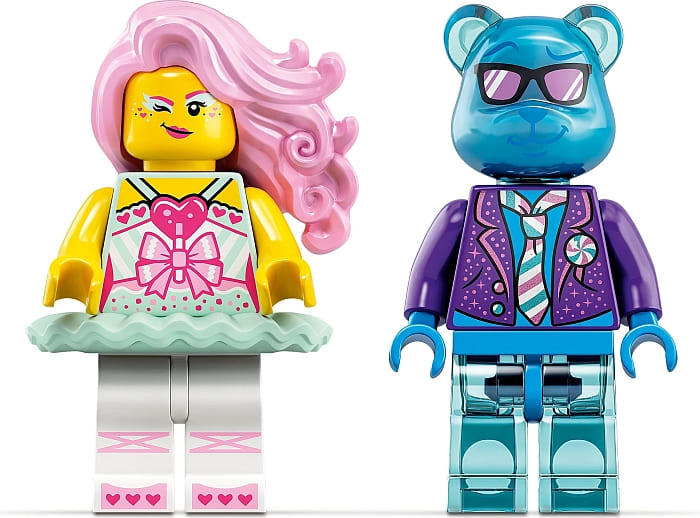
The first character you build is the Candy Ballerina. She has the ruffled skirt that we first saw with the ballerina figure in the LEGO Collectible Minifigure series. Her primary colors are light-aqua accented by two shades of pink. Her torso print features a heart-shaped lollipop wrapped in a bow as a nod to the candy theme. And her hair is amazing all on its own, with pink tresses in a free fly-away styling. Unfortunately, her face is single-sided so you can’t capitalize on the drama her hair inspires. Being the lead singer on the Candy Castle Stage (as well as a ballerina), it makes sense that her accessory is a microphone. All in all, it’s a pretty distinct minifigure that is decently detailed.
And then there is the Blue Beary Guitarist. This minifigure alone made my day. It is a gummy bear that comes to life. From its transparent-blue legs to its dual-moulded head with transparent-blue ears, it is a minifig that might do very well on the secondary market years down the road just because of its uniqueness. Even its jacket printed on the torso is adorable. On the back, there are musical notes, but the bottom of these notes are styled like blueberries. And if that wasn’t enough, the pink and white striped electric guitar helps solidify the candy greatness. If you haven’t, I encourage anyone who loves unique minifigures to give this character a second look.
Generally, I don’t pick up a set for a single minifigure. However, the Blue Beary Guitarist would make me consider it. And if this set goes half off, I might pick up a couple more. The question is, can I do anything with the rest of the set?
LEGO VIDIYO CANDY CASTLE STAGE – THE STAGE
I have some experience with being on stage. Granted, it’s a bit more on the theater side than the musical performance side, but some principles overlap. Namely, nothing is really what it seems on stage. Giant boulders may be nothing more than spray-painted foam and delicious-looking candy could be nothing more than brightly colored paint. With that knowledge in mind, I can say they really captured the stage aspect when it comes to real life.

That is not necessarily the best thing though for a LEGO set. Now if we had a bit more context, like an audience seating section and stage curtains, this wouldn’t be an issue. However, having two decorated stage scenes kind of emphasizes how shallow a set can actually be.
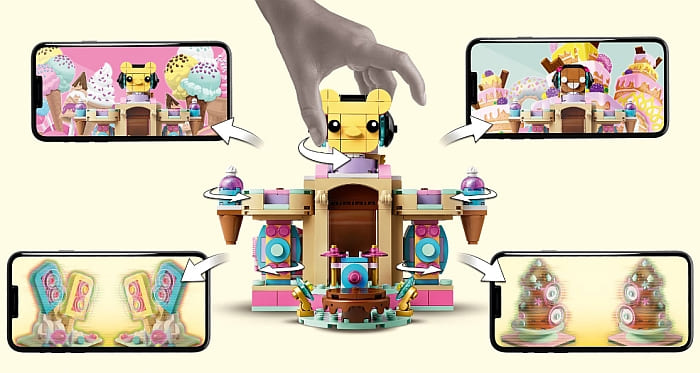
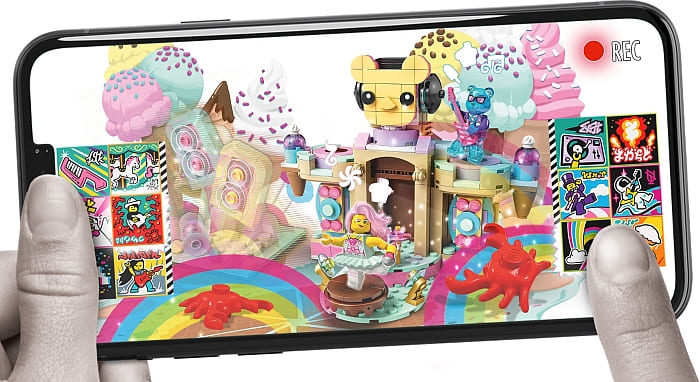
Part of the issue is that like all LEGO VIDIYO sets, its primary function is to interact with the LEGO VIDIYO app. However, not everyone wants to bother with a smart device to enjoy a physical LEGO set.
The instructions show how you can twist a speaker around to get different effects in the app, the ice cream cones can change a few more visual aspects, and even the head at the top of the stage can affect the background. Plus, you can turn the entire stage around to have yet another scene to pose your band members. And that is kind of where the model falls a bit flat.
It is not the fact that the app can be very interesting to engage with, it is more that you almost have to use it to find the majority of the fun in this set. Compare this to the previously released LEGO Hidden Side sets. Those models were fun without the app. The whole process of fighting ghosts was via the app was more of an enhancement. In the #43111 LEGO VIDIYO Candy Castle Stage (and pretty much all the other LEGO VIDIYO sets) the purpose feels flipped. Interacting with the physical model is just a means to enjoy the app more.
This sort of engagement is a bit disconnected in my opinion. It means I have a level of separation from the model as I need to be viewing it through a secondary device. This works for many activities. Sporting events and concerts are nice to watch on a screen, but I know many would feel that it’s not the same as actually being there. Well, this set sort of forces you not to be there in order to enjoy what’s actually there.
I would probably feel different if my smart device watched me play and reacted to how I placed the minifigures or displayed certain colors. In that way, it would have been more of an enhancement. The problem is, that would have gone against the social interactive element that was a key feature that LEGO designers were trying to include. All I can say is that this set and its play-features fell flat for me and these were my reasons.
LEGO VIDIYO CANDY CASTLE STAGE – THE PARTS
I know that many experienced adult LEGO fans barely pay attention to the design of official LEGO sets. All that’s important to them is the part selection in a particular set. After all, they have plenty of their own creations just waiting for the perfect piece to make them possible.
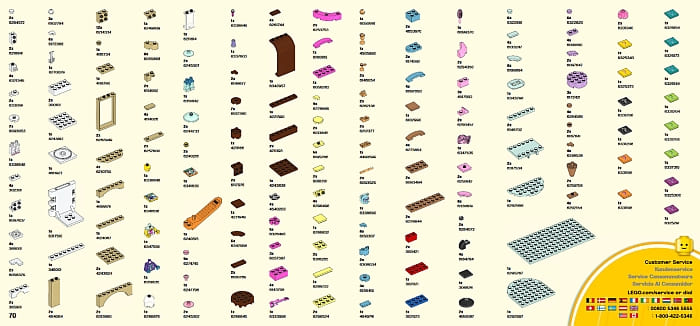
As for part color, I hope you enjoy a wide variety. The #43111 LEGO VIDIYO Candy Castle Stage swings from the earthy brown tones found in chocolate cakes to very vibrant purples, pinks, and blues, that are the go-to’s for ice creams and hard candies. Normally, this is not a match-up that would be common, given the striking difference between the color groups. It would take something as outlandish as a candy-themed rock concert to make any sense. For that reason, if you’re looking for parts, expect to split this set up into two major groups. You’ll have the bright eye-popping and the dark subdued. Even those who have a large selection of parts might find a couple of pieces that are unique. For me, the pink opalescent 2×2 round domes that make up the ice cream cone tops are the most memorable.
As for interesting shapes, there are a couple worth noting. The brown curved wall element that makes up the chocolate waterfall is not too common in that particular color. Though the parts that come to mind are the melted drippy round plate that can fit over a 4×4 round brick or plate and the curved slopes at the base of the chocolate waterfall. I’ve never seen the melted drippy piece before, although it appeared in previously released LEGO Friends sets.
As for the curved elements, I’ve seen them, but they are still fairly rare and new, so that might change given enough time. And this set also comes with the unique hinged interior section found in the LEGO VIDIYO BeatBox sets. This largeish mini-stage is a great place to hold all the printed tiles that the app relies on. It is made up of three parts; the floor and back wall is one piece and the two side walls that can fold in and out are the other two pieces. It’s a part that I doubt will be used outside of LEGO VIDIYO for quite some time if ever again.
Generally, the parts aren’t bad, it is the color palette that will be a big determining factor here if you’re only looking at this set as a parts-pack. Given the fact that this is a dual-sided stage, there is very little in the way of neutral parts that are great for basic building. A good 70-80% of this model is all about decoration, so keep that in mind.
LEGO VIDIYO CANDY CASTLE STATE – FINAL THOUGHTS
With LEGO admitting they need to rethink how the LEGO VIDIYO line, I definitely can’t recommend picking this or any of the other LEGO VIDIYO sets at full price. It is even a tough sell when it comes to the parts, due to how wildly different the colors are.
Though I must admit there is one major saving grace for this model; the minifigures. They are extremely well designed and I will remember them much more easily than anything else I can think of in the various LEGO sets I’ve built. So, my recommendation is that, if you are a collector of interesting minifigures, you might want to find this set on sale at a price you think the minifigs are worth it for you.
As for investors, the same is probably true. You’ll probably not have people interested in the set years down the line, but the minifigs might grab someone’s attention. I can see the majority of people parting out this set in their BrickLink shop just for this reason.
Personally, I’ll probably still try to get every LEGO VIDIYO set before they get retired. I am just that much of a fan of the minifigs and the idea that they are all musical performers. I do realize much of the price comes from supporting a rather complex augmented reality app that I won’t really bother with, but I can see building a larger stage in which I can switch out all the other stages somewhere down the line. However, this is a much bigger investment than I’d expect from even a hardcore LEGO fan. I kind of wish I could give it a better recommendation than this, but sadly that’s not the case. In the video below, I will show you the set in more detail, and also summarize my thoughts on the set.
What do you think? How do you like the LEGO VIDIYO Candy Castle Stage? And what do you think of the other LEGO VIDIYO sets? Do you have any of them already? And how do you like the minifigures in the LEGO VIDIYO collection? Feel free to share your thoughts and discuss in the comment section below!
And you might also like to check out the following related posts: