As we discussed at the beginning of the month, the latest LEGO City sub-theme has to do with wildlife rescue. The sets are based on the LEGO City Adventures television series and feature standard rescue vehicles, medical facilities, and some vegetation, as well as minifigs (including some named characters) in new outfits. But the real highlight of the sets is the brand new animal moulds. So, let’s take a closer look!
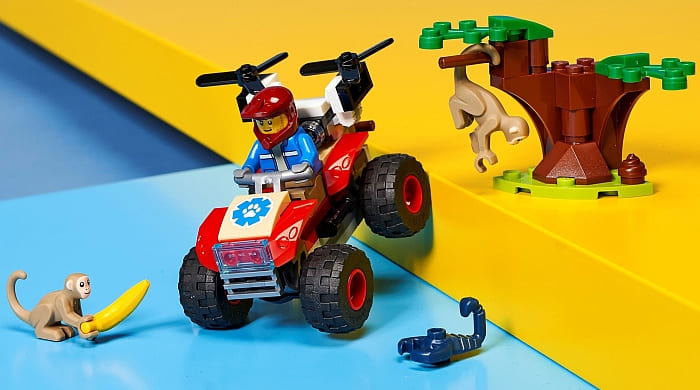
The #60300 LEGO City Wildlife Rescued ATV features a small ATV with tilt-to-turn steering, a detachable drone, plus a small tree. The tree is occupied by two adorable monkeys which is one of the new moulds introduced this summer. And you also get a black scorpion and a minifig with new torso print. The price of this set is $9.99, which is reasonable for what you get. It’s available at the LEGO City section of the Online LEGO Shop.

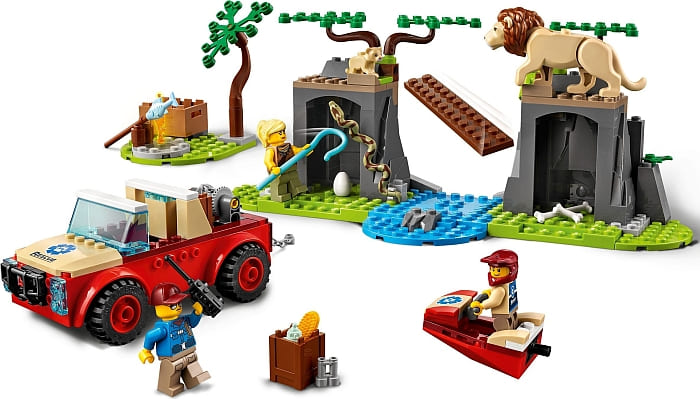
While the previous set is recommended for ages 5 and up, the larger #60301 LEGO City Wildlife Rescue Off-Roader is a larger is recommended for younger builders who are just transitioning over from LEGO DUPLO (this series is also called LEGO Juniors, or more recently 4+). What this means is that although this set features standard size pieces and minifig, it also includes some larger parts so it’s easier for younger kids to assemble the set. The vehicle comes with a unibody frame, and the boulders are single large pieces. The highlight of this set are the adult male lion, the lion cub, and the beautifully patterned snake. One of the three minifigs is a named character from the TV show named Jessica Sharpe. The other two are generic wildlife rescue personnel. This set is $49.99, which seems a little high for what you get. But the lions and the snake are undoubtedly wonderful, and the other pieces are quite useful too. If you want to check it out, it’s available at the LEGO City section of the Online LEGO Shop.
The #60302 LEGO City Wildlife Rescue Operation is one of the largest sets in the series with a brand new adult elephant, baby elephant, two monkeys, and a crocodile. And it also includes a winch helicopter, tracked vehicle, and a savannah setting with landslide function and a veterinary station. The rescue team consists of four characters; a veterinarian, a pilot, and a couple of generic workers. Also note the recently introduced new roadplate element in blue. This set is $89.99, and considering that elephants are some of the most desirable LEGO animals, as well as all the other animals, minifigs, parts and play-features you get, I think it’s worth it. It’s available at the LEGO City section of the Online LEGO Shop.

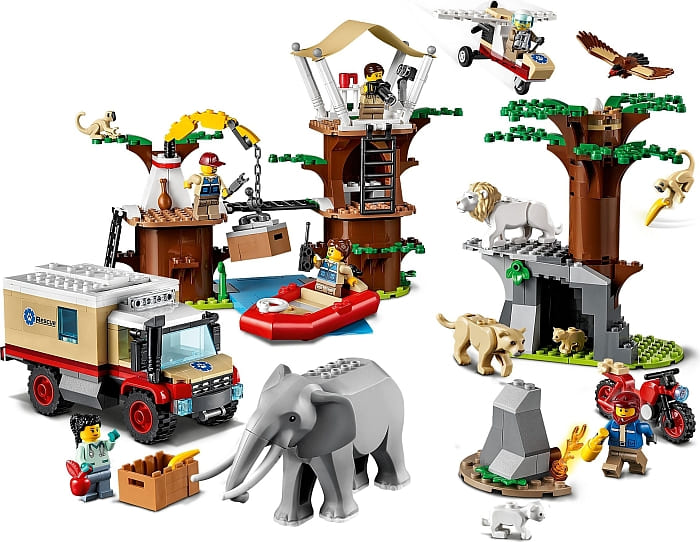
The largest of the sets in the LEGO Wildlife Rescue Operation series is the #60307 LEGO City Wildlife Rescue Camp. It features a well-equipped treehouse-camp with a watchtower, plus a floating dinghy, mobile research lab, motorbike and an ultralight. Amongst the six minifigs, Sleet is a named characters from the TV show. Animals include an adult elephant, a male lion, female lion, a couple of lion cubs, a couple of monkeys, as well as an eagle with outstretched wings. This set features a blue roadplate element as well. The price is $99.99, and the set is available at the LEGO City section of the Online LEGO Shop.
It’s hard to decide which set(s) to get, so in the player below, I have included video-review from JANGBRiCKS. He will walk you through the sets so you can see them in more detail. But honestly, I don’t think you can go wrong with any of these sets. The new animal moulds are amazing!
What do you think? How do you like the LEGO City Wildlife Rescue sets? Are you planning to get any of them? Which is your favorite new animal mould? And what other animals would you like to see in the collection? Feel free to share your thoughts and discuss in the comment section below!

And you might also like to check out the following related posts:
- LEGO City Stuntz: Flywheel-Powered Stunt Bikes
- LEGO City Tuning Garage Review & Modifications
- Integrating Old & New LEGO City Road Plates
- August 2021 – New LEGO Sets & Promotions