(Written by William)
Over the years, we’ve gotten a number of cultural and seasonal LEGO BrickHeadz. especially around holidays. Characters like the Easter Bunny, Santa, Dragon Dance Guy, Lucky Cat, and Lady Liberty are just a few examples of models that take advantage of a region’s cultural concepts and share them on a global stage. Well, there is a new one coming out next month and it immediately got my attention. It is the #40492 LEGO BrickHeadz La Catrina.

Right after Halloween, there is a celebration called Day of the Dead in Mexico. It typically starts near the beginning of November and lasts for a couple of days. Different regions in Mexico will have their own take on the celebration, but most feature a recognizable character in the decorations; La Catrina.
In order to appreciate this model a little more, and to help to understand the reason LEGO had to make this model, let’s have a small history lesson, then we can take a closer look at the set itself, and maybe she’ll find a spot in your own collection!
DAY OF THE DEAD & LA CATRINA
Before we talk about the model, it’ll help if we talk about the actual celebration she represents. Day of the Dead is a time when Mexican households remember and honor their ancestors. Mexicans have a relatively unique view of death compared to most other cultures. For them, it is a given that we’ll all end up as skeletons, so we must embrace it as another phase of our existence. If you have a chance, I recommend checking out the movie Coco, which takes place during the Day of the Dead celebration in early November.

So then, how does La Catrina fit in with the celebration? That is a bit more involved. For centuries, there was a female goddess of death that was recognized in the region. She is meant to be a calming presence that helps escort the recently departed to the afterlife. However, she didn’t always appear as the colorful skeleton lady we see today.
The colorful dress and hat can be contributed to two influential artists. José Guadalupe Posada and Diego Rivera played major roles in bringing her to life. Posada’s contribution came about in the early 1900’s. He was a political cartoonist that was poking fun of those trying to be something they weren’t. Many, at the time, were fascinated with trying to look like the rich European ladies and gentlemen. Posada crafted skeletons in these lavish clothes to make the point that no matter how you dress or how much wealth you flaunt, you’ll still be a skeleton in the end.
Later in the 1940’s Rivera created one of the most popular murals depicting the Day of the Dead. He took inspiration from Posada’s work and gave us the most commonly referred to image of La Catrina.
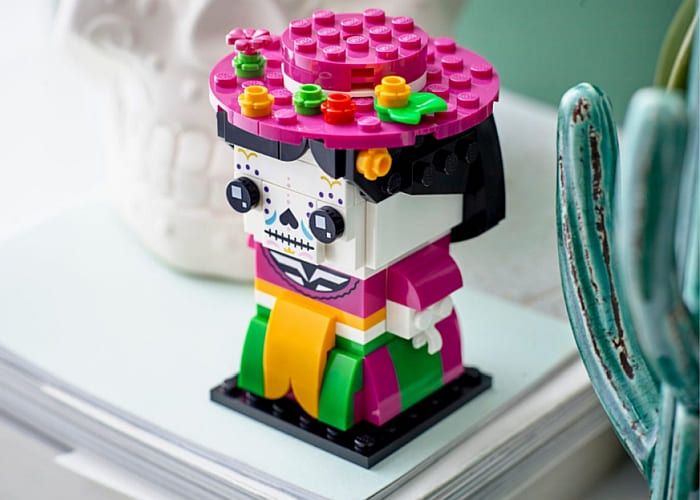
The best way to consider it is, La Catrina is now a mascot for Day of the Dead celebrations. She will nearly always have a colorful dress and a wide brim hat. She will also be decorated in flowers and feathers – most of which are on her hat – as well as elaborate makeup on her face. You can read more about the character and the event on Wikipedia.
LEGO BRICKHEADZ LA CATRINA
I really love it when LEGO BrickHeadz characters have dresses. It immediately means we’ll have to build something different than the body of a standard BrickHeadz. And that is where a lot of the fun comes when building new characters. Just seeing new connections in order to accomplish a particular look is a unique charm that only BrickHeadz offers.
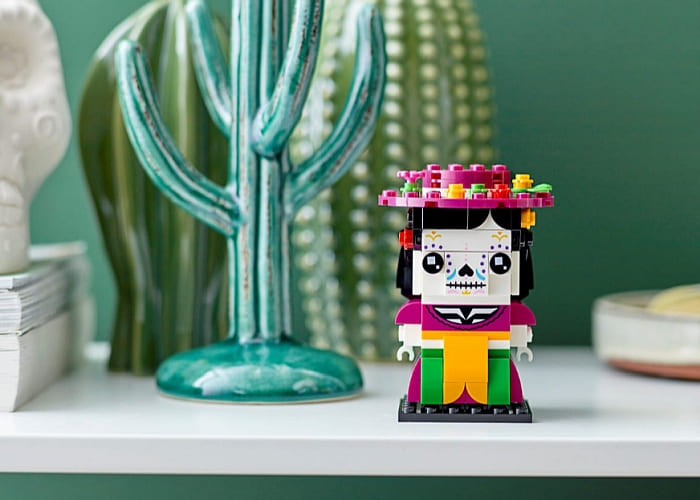
Added to the fun building experience, you also get a wide array of bright cheerful colors, which results in a character that will always stand out. La Catrina also features a couple of printed elements to pack even more details in the model. Her face features printing to recreate the exquisite makeup on the skull. And there is a 1×4 brick that shows off her neckline and helps make the top of the dress look as good as the bottom.
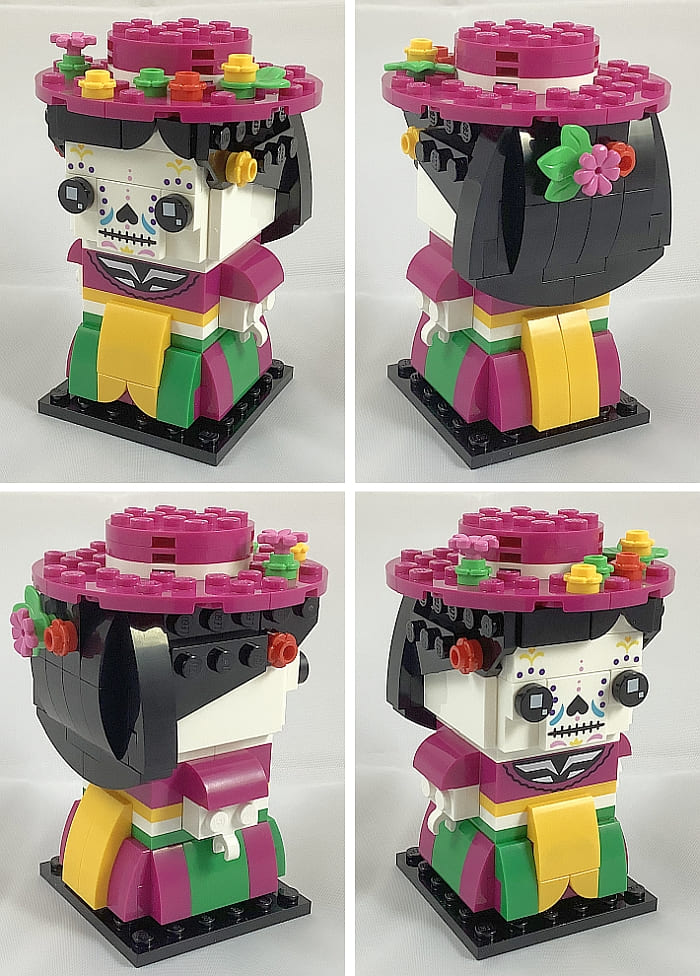
Lined up with other interesting LEGO BrickHeadz characters, La Catrina still manages to stand out. Whether it’s the color of her dress, the appearance of her skull head, or just how her hat and dress give her a different silhouette, she just seems more special. And being tied to such a rich culture, she can back that specialness up with meaning.
FINAL THOUGHTS
Understanding and appreciating other cultures is a great way to enrich our ability to come together. This is fitting considering that it is one of the major points of Day of the Dead. The importance of those who came before, being true to oneself, and the unity that comes from these concepts are the hallmarks of this holiday.
The fact that the LEGO version is done with so much style is absolutely awesome. La Catrina has to be one of the most striking LEGO BrickHeadz characters I’ve ever had the chance to put together. And believe you me, I’ve put together quite a few of these little guys. So having one that is interesting to build and offers me a fresh perspective on how a culture views life and death is definitely pushing the envelope of what I normally expect from a LEGO set. This even makes a great gift for those whose family comes from Mexico. There’s something special about seeing something that represents your own heritage and make you smile. I already have a family member in mind that I know I have to get this set for. In the video below, I will talk about the set a little more.
As for LEGO BrickHeadz collectors, I believe this is one set that will make an impact in your collection. La Catrina may not be as well known as a superhero or Star Wars character, but it is for that reason people will gravitate towards her and ask questions. And when you share what you know, you’ll even bring a little more knowledge in the world.

What do you think? How do you like this unique LEGO BrickHeadz character? And what other unique cultural characters would you like to see in the LEGO BrickHeadz collection? Feel free to share your thoughts and discuss in the comment section below!
And you might also like to check out the following related posts: