LEGO just announced that the largest LEGO set created to date will be available from LEGO retail stores and the Online LEGO Shop starting on Black Friday, November 27th. Below is the press-release with all the details of this massive set; the #10276 LEGO Colosseum.
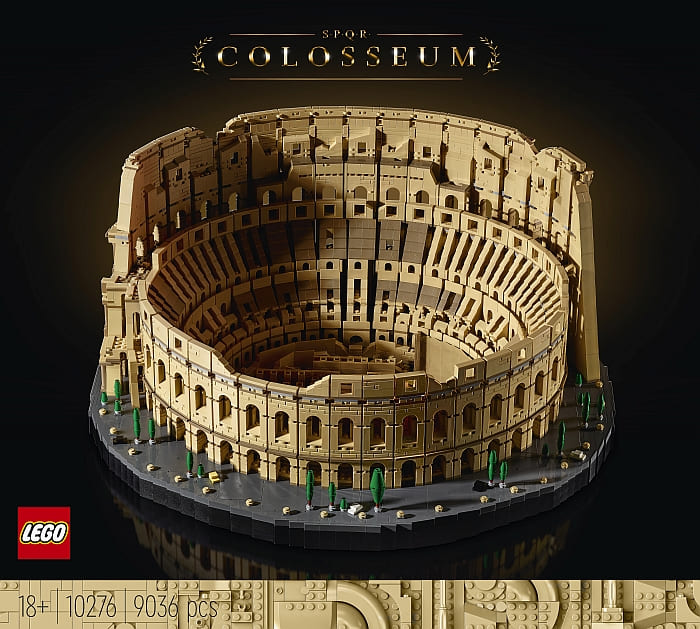
This Black Friday, LEGO fans can take home a piece of history and re-create Rome’s most iconic landmark, with the awe-inspiring new LEGO Colosseum set. Made up of 9,036 pieces, this is not only the largest LEGO brick set launched to date (taking the title from the #75192 LEGO Star Wars Millennium Falcon) it’s also been expertly designed to mimic the incredible architecture of the original Roman amphitheatre, making it a building project to savor and a set to marvel at.
Both LEGO fans and history buffs need to look no further than their living room to experience a taste of Italian history, as this LEGO brick model is a truly authentic LEGO brick recreation of the mighty Colosseum – featuring many true-to-life details to help builders accurately bring this famous building to life. This epic LEGO model features a recreation of the three distinct stories from the Colosseum, with each of these stories adorned with the columns of the Doric, Ionic, and Corinthian orders. These columns have been faithfully recreated in LEGO brick form using a variety of creative building techniques, including decorative volutes that have been created using a recolored LEGO roller skate element that has been turned upside down to create an authentic look.

Every detail of the set has been meticulously crafted to stay true to the real-life Colosseum – including having 80 ‘ribs’ in the spectator stands (the exact same number as the original) and having three different shades of brick to replicate the different columns and aging of the almost 2,000 year old landmark. The build experience has even been expertly created to match the same process as the original, with the “wooden” LEGO arena being the last build to be placed on the LEGO model, as it has been in the 1990s. As well as being a challenging build, this model is truly a breath-taking focal point for any room. The LEGO Colosseum rests on an oval base, allowing this phenomenal 360-degree display piece to be shown off from any angle. Builders can then choose which side of this magnificent LEGO brick recreation of one of Rome’s most visited landmarks they display – whether that’s the southern side of the building, which has been destroyed by various earthquakes and natural disasters over the years, or the more complete northern wall. Colosseum features arches that have been recreated with LEGO brick detailing, allowing a view into the center of the Colosseum from the outside, just like its real-life counterpart.

The set was designed by Rok Zgalin Kobe who commented: “One of the biggest challenges and one of the most important things was to convey the Colosseum’s monumentality in the LEGO form. I felt that the LEGO model should display a special architectural feature of the original – the rows of columns flanking the arches in different styles. To achieve that, the model is constructed using an effect of vertical exaggeration. The cross-section is therefore far steeper than on the real structure. Hopefully, people will be inspired to learn more about the original through the experience of building the LEGO model.”
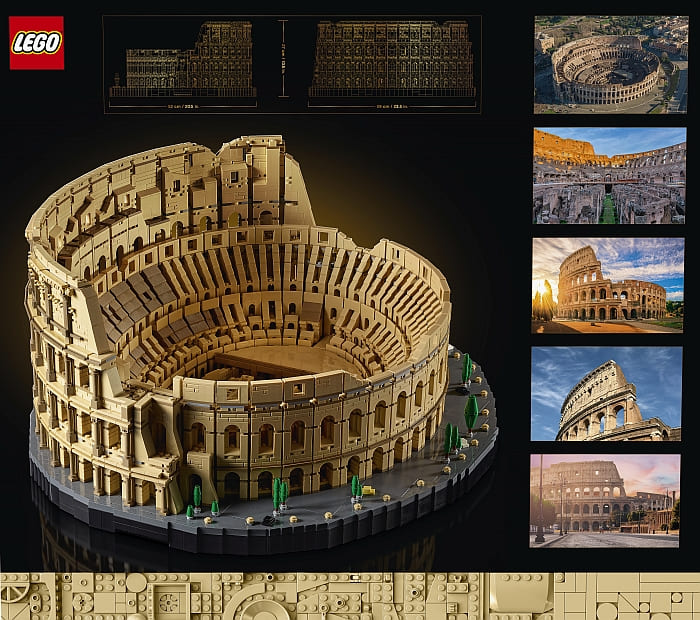
The #10276 LEGO Colosseum measures over 10.5” (27cm) high, 20.5” (52cm) wide, and 23.5” (59cm) deep making this a spectacular centerpiece for any LEGO brick collection. Below are a few more pictures of the set from different angles.


The #10276 LEGO Colosseum will launch on November 27th, Black Friday, as part of the LEGO retail stores and the Online LEGO Shop Black Friday offerings. LEGO VIP members who purchase the exclusive model during the Black Friday Cyber Monday weekend will receive a limited-edition gift with purchase, a Roman Chariot, which can be displayed alongside the Colosseum.

Prices for the Colosseum are as follows: 499.99 EUR/ 449.99 GBP/ 549.99 USD/ 649.99 CAD/749.99 AUD. For more information and details on the set, visit the LEGO Creator Expert section of the Online LEGO Shop.

What do you think? How do you like the LEGO Colosseum? Is this a set you’re planning to get? Feel free to share your thoughts and discuss in the comment section below!
And you might also like to check out the following related posts: