(Written by William)
As I’ve mentioned in previous articles regarding LEGO Ideas, I have, on occasion, started up conversations with other builders on the platform. Part of my efforts to communicate is to drum up support for my own projects, but I get value from the interactions as well. Case in point, I got into a conversation with a builder that goes by the name Orbiter88. They read my bio, saw that I write for theBrickBlogger, and asked if I could write a piece on their creation; The Legendary Concorde. This made me think of an important topic when working on your own LEGO projects; doing research on your subject.
WHY IS RESEARCH IMPORTANT FOR LEGO FANS?
Research deepens our knowledge of a subject. Crucial details will inform us as to what is important. Chances are that if you have a project in mind, someone else had already done something similar – if not the same – as what you’ve built. Therefore, having intimate knowledge of a subject can be what gives you an edge over all others.
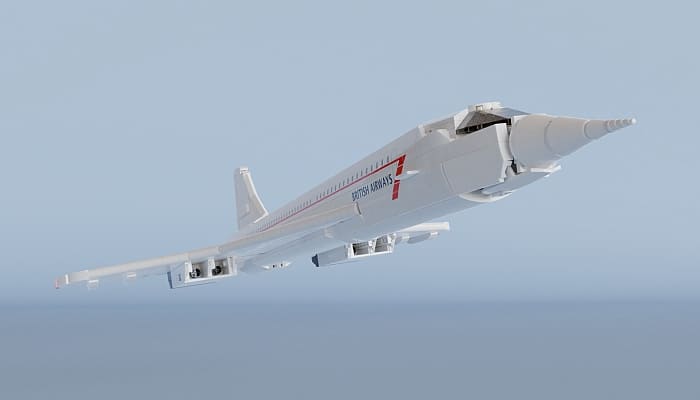
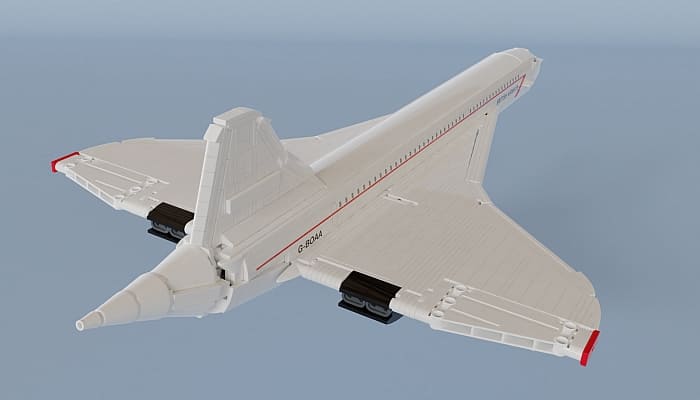
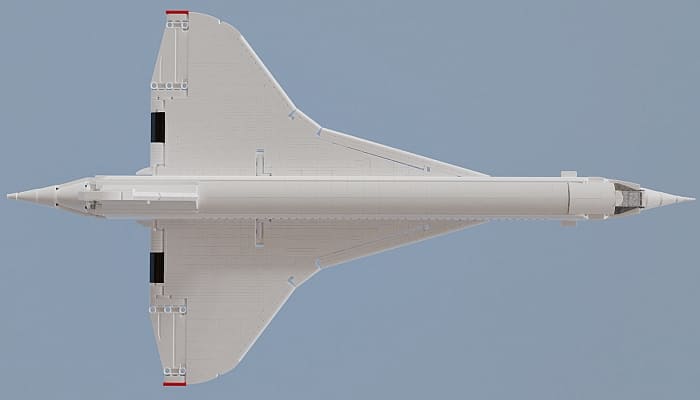
“My admiration for Concorde prompted me to rebuild this aircraft with LEGO. I knew before, that it would be a big challenge as Concorde has curves and shapes to perfectly slip through the air. The construction of the delta wings was maybe the most difficult thing, like it was for the engineers of the actual Concorde. My goal was to avoid sharp edges or rough surfaces. While trying to achieve this, I was struggling with a lot of different techniques and often ended up with unsatisfactory results. But step-by-step a promising solution evolved. And finally – after hours and hours of trial and error – the wing met my expectations.” – Orbiter88
Of course, you may realize that not all information you find on a subject is useful. Ultimately, information is only as good as you can frame it. For example, on Orbiter88’s project, they use a number of quotes from famous people talking about the aircraft. These sound bites by themselves aren’t essential, but they do two things. First, they break up the flow of the dry technical jargon, which makes that portion of their description much easier to read. Second, they supply context as to why this aircraft is so legendary.
APPLYING RESEARCH TO YOUR LEGO PROJECTS
Now that we just had a small example of applied knowledge, we should discuss how it can help you build. In this case, the research pointed to a few characteristics of the aircraft that needed to be absolutely correct in order to match up with the actual plane. This in turn allowed Orbiter88 to focus on those areas to get them just right.
“But the wings was just the beginning. There was a hole plane to add. The next tricky part was the nose. As it is already challenging to manage the fuselage curves, the nose is an outstanding challenges as height and width at the same time undergo a slight change till they meet in the tip of nose. There was a lot of possibilities to destroy the aesthetics of the whole model.” – Orbiter88
LEGO elements have a very unique property when it comes to being a medium for creation. You can easily compartmentalize sections of a model so that you don’t get overwhelmed. And that is exactly what happened here. You can follow Orbiter88’s journey through the building process by reading the description of the project.
Sure, they don’t outline every trial and error they went through, but thanks to the research they did, there was some way for them to measure how well the project was turning out. And honestly, that is the biggest help for many builders.
Creating a model is often subjective when it comes to determining how well the final design looks. As LEGO fans, we sometimes even rag on official set because it didn’t reach our expectations. The fear of how others will react can be a paralyzing barrier for many. If we change that perspective to, “Does this measure up to the research I’ve done?” Then building becomes a much more practical and less emotionally charged task.
A CALL TO ACTION
Thankfully in the times we live in, research is just a few keystrokes away. So, it shouldn’t be too hard to do even a little bit whenever you’re trying to put your best foot forward. I’d recommend taking a creation you’re very proud of and asking yourself, “What don’t I know about this thing?” Then do a little research and see if that inspires you to make your best thing even better!
In order to become better builders, we need to know what we can do to push ourselves further. Normally I talk about very specific building techniques, but this LEGO Ideas project really let me break down another important part of the process. Now, I’m not saying you have to do research on everything you build. I think many might find that exhausting, if not downright un-fun. Rather, it is important to know what you can do – that has nothing to do with building techniques – that can improve your models.
SPECIAL SHOUT-OUT TO THE CONCORDE PROJECT
I want to thank Orbiter88 for reaching out and asking for an article to be written on their project. If you like, check out and support with your vote their The Legendary Concorde model. And maybe even ask some question in the comments. After all, that’s research!

What do you think? Do you research the projects you are working on? Are there any interesting discoveries that you have made? Feel free to share your thoughts and discuss in the comment section below!
And you might also like to check out the following related posts: