We talked about the recently released #21322 LEGO Ideas Pirates of Barracuda Bay a couple of times already (see links at the end of this post) but I thought to discuss the instruction book separately as it’s so awesome. If you are an old LEGO Pirates fan, you will remember that LEGO Classic Pirates had its own elaborate story. The instruction book for the new set recaptures the magic of these adventures by dedicating the first ten pages to retelling the story for younger audiences.
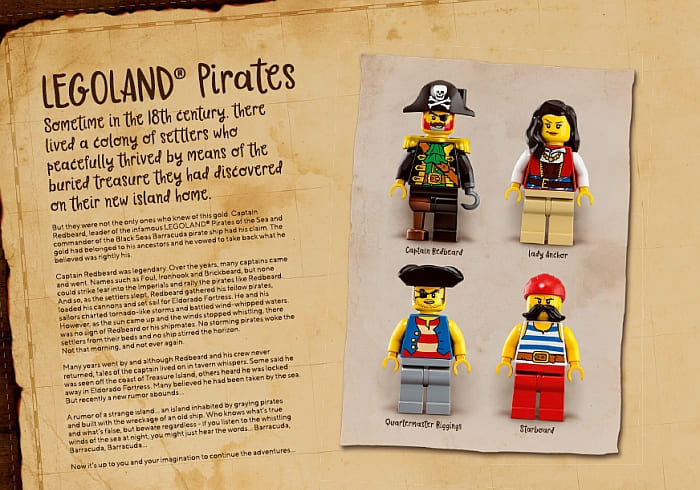
Sometime in the 18th century, there lived a colony of settlers who peacefully thrived by means of the buried treasure they had discovered on their new island home. But they were not the only ones who knew of this gold. Captain Redbeard, leader of the infamous LEGOLAND Pirates of the Sea and commander of the Black Seas Barracuda pirate ship had his claim. The gold had belonged to his ancestors and he vowed to take back what he believed was rightly his. Captain Redbeard was legendary. Over the years, many captains came and went. Names such as Foul, Ironhook and Brickbeard, but none could strike fear into the Imperials and rally the pirates like Redbeard. And so, as the settlers slept, Redbeard gathered his fellow pirates, loaded his cannons, and set sail for Eldorado Fortress. He and his sailors charted tornado-like storms and battled wind-whipped waters. However, as the sun came up and the winds stopped whistling, there was no sign of Redbeard or his shipmates. No storming pirates woke the settlers from their beds and no ship stirred the horizon. Not that morning, and not ever again.
Many years went by and although Redbeard and his crew never returned, tales of the captain lived on in tavern whispers. Some said he was seen off the coast of Treasure Island, others heard he was locked away in Eldorado Fortress. Many believed he had been taken by the sea. But recently a new rumor abounds…
A rumor of a strange island… an island inhabited by graying pirates and built with the wreckage of an old ship. Who knows what’s true and what’s false, but beware regardless – if you listen to the whistling winds of the sea at night, you might just hear the words… Barracuda, Barracuda, Barracuda…
Now it’s up to you and your imagination to continue the adventures…

Such an exciting way to introduce a new LEGO set that stirs up so many fond memories for old LEGO Pirate fans, while also igniting the imagination of young ones.
The next pages interview the three main people behind the set; LEGO fan Pablo Sanchez, the original creator of the set, LEGO Model Designer Milan Madge, and LEGO Graphic Designer Austin Carlson. There are lots of interesting tidbits in these sections as well.

Pablo shares that his love for LEGO bricks was passed down to him as a child from his father. He states the following: “After the Spanish Civil War, my dad worked as a craftsman making dolls. When I came along, he saw LEGO bricks as a chance to give me something he had never had, a chance to make toys and crate a world of play that was just for me. We would play pirates together and that’s where his nickname for me, ‘Little Pirate’ came from.”
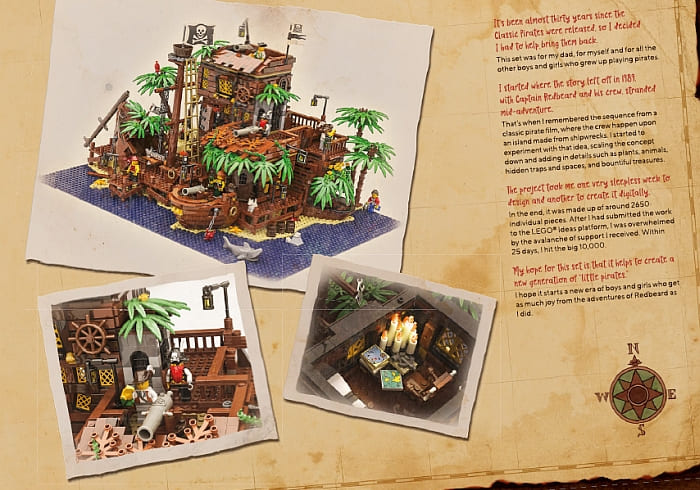
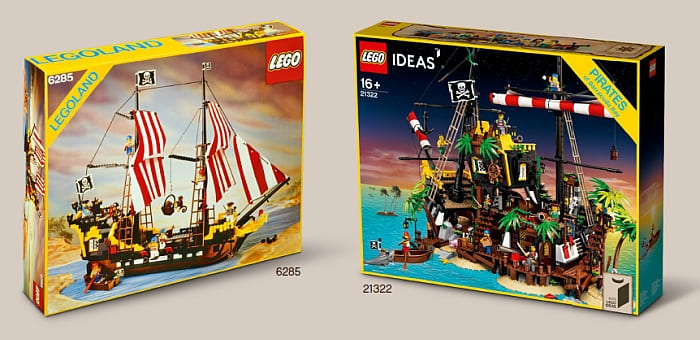
Since it has been almost thirty years since the LEGO Classic Pirates were released, Pablo decided to help bring them back. He started where the story left off in 1989 with Captain Blackbeard and his crew stranded mid-adventure. He experimented with the idea of the pirates surviving on an island made from shipwrecks. Pablo started working on the island, the added more and more details such as plants, animals, hidden traps and spaces, and bountiful treasures, then submitted the project to LEGO Ideas. The project received an overwhelmingly positive response from the LEGO fan community and received the required 10,000 votes in just 25 days.

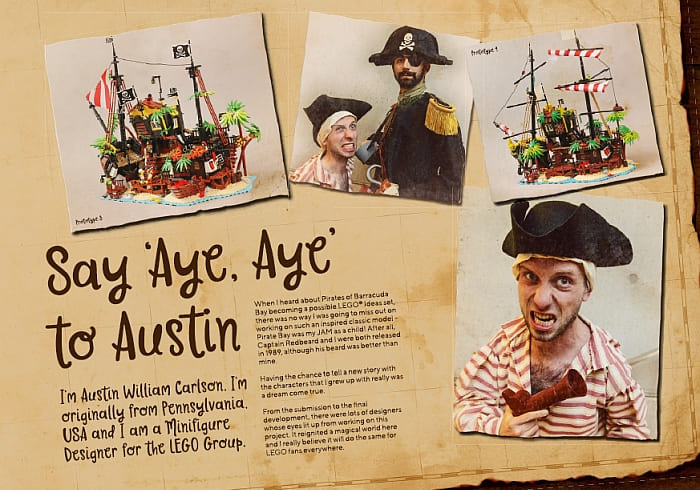
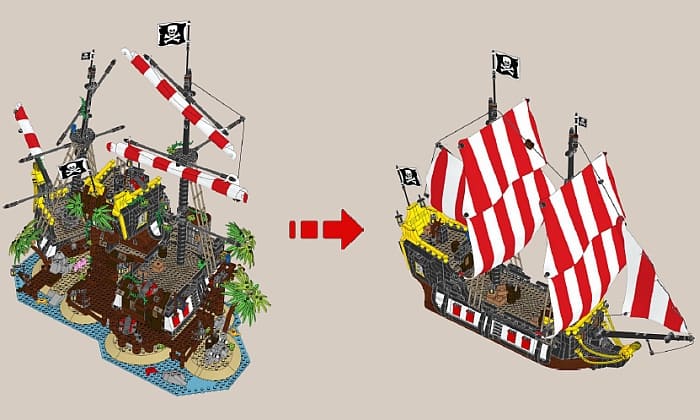
LEGO Model Designer Milan Madge and LEGO Graphic Designer Austin Carlson also shares some interesting details. The aim of the LEGO Ideas design team was to keep the great stories Pablo had created – like the jail cell, the inn, the farm, and the Captain’s cabin – but replace the structures with the remains of Captain Redbeard’s original ship. He said he remembers how happy Pablo was when the design team first showed him the concept. It took the whole project to a new level of awesomeness! Below, you can see a couple of the early prototypes of converting Pablo’s project into the parts of the ship that can be reassembled into a fully functional ship.

The conversion from Pablo’s original project to an official LEGO set, and from Pablo’s shipwreck island to a convertible ship didn’t come without challenges however. First of all, many of the parts, such as the raised baseplates, boat hulls, mast, palm trees and monkeys that Pablo used in his original submission have been out of production for years or even decades. The same goes for the parts from the original Black Seas Barracuda. And the characters had to be upgraded and aged with love and care. Austin Carlson shares that there were lots of LEGO designers who’s eyes lit up from working on this project as many of them are original fans of LEGO Pirates as well.
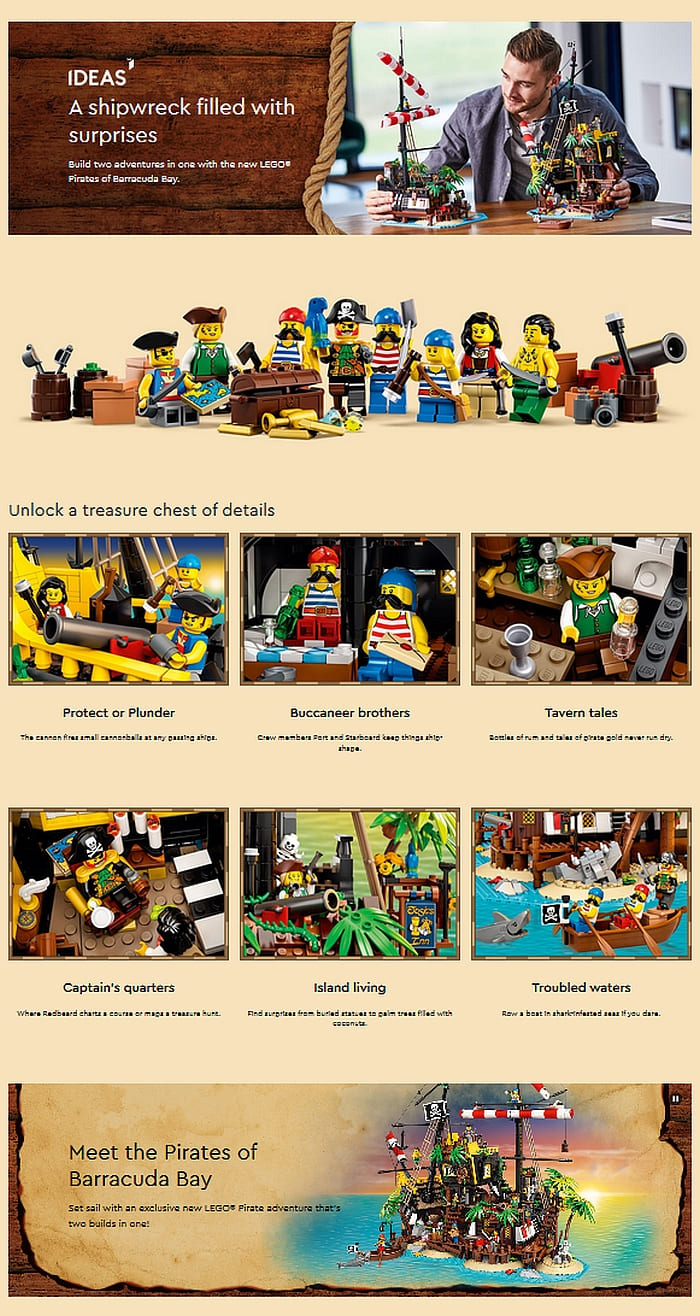
This set will surely please young and old LEGO Pirates fans. There are so many play-features, hidden compartments, historic references, awesome minifigs, and a gorgeous ship! And the price is excellent as well! If you want to get yours, visit the LEGO Ideas section of the Online LEGO Shop.
What do you think? How do you like this new LEGO Ideas Pirate set? Is this a set you’re planning to get? Feel free to share your thoughts and discuss in the comment section below!
And you might also like to check out the following related posts:
- April 2020 – New LEGO Sets & Promotions
- LEGO Ideas Pirates of Barracuda Bay Coming!
- Pirates of Barracuda Bay Designer & Review Videos
➡ LEGO SHOP IN USA: Online LEGO Shop USA
➡ LEGO SHOP IN CANADA: Online LEGO Shop Canada
➡ LEGO SHOP IN UK: Online LEGO Shop UK