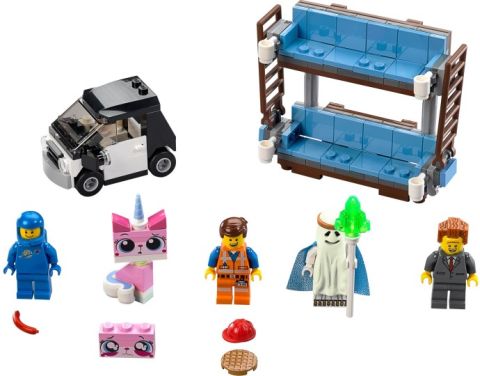
One of the recently released sets from The LEGO Movie 2 is the #70842 LEGO Movie 2 Emmet’s Triple-Decker Couch Mech. Back in the first part of The LEGO Movie, Emmet introduces his iconic invention, the double-decker couch, “so everyone could watch TV together and be buddies”. The double-decker couch appeared in several scenes in the first part of the film, as well as in two LEGO sets; the large #70810 LEGO Movie MetalBeard’s Sea Cow (in 2014), and the small and highly popular #70818 LEGO Movie Double-Decker Couch set (in 2015). Fans of the movie even built their own, life-size double-decker couches for fun!
The original double-decker couch featured four cup-holders with removable cups, and flip-up ladders at either end. The contraption could comfortably accommodate several minifigs on its two decks. The color-combinations and building techniques of the double-decker couch were quite nice as well.
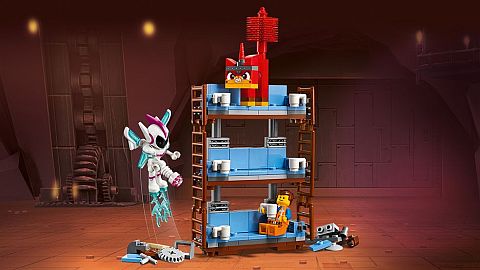
With the second part of The LEGO Movie, Emmet adds a third deck to his famous couch with two extra cup-holders and cups, extended ladders at the sides, and headrests at the two lower decks. Other than these updates, the couch looks almost identical to the original double-decker version with the same color-scheme and similar building techniques. However, the triple-decker touch has one surprise feature that was not present in the previous version; it can transform into an awesome and menacing mech.
In the #70842 LEGO Emmet’s Triple-Decker Couch Mech the transformation between couch and mech happens by taking apart the set and completely rebuilding it. The mech still resembles the triple-decker couch, but the first deck gets shorter and narrower, the second deck is used as a cockpit for Emmet, and the third deck transforms into the shoulders of the mech (and could work as a sitting/standing platform for additional minifigs). The mech also gets highly posable legs and arms. One of the arms has a gripping claw, and the other a spinning gear wheel. The ladders from the sides of the couch transform into wings at the back of the mech.
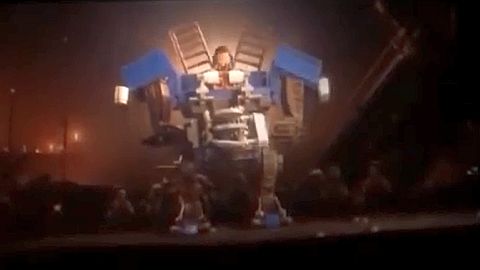
While the double-decker couch was used throughout The LEGO Movie, the triple-decker couch appeared only briefly in The LEGO Movie 2. Just as Sweet Mayhem is about to kidnap Emmet’s friends, Emmet builds a convertible triple-decker couch that can transform into an awesome mech. Unfortunately, it gets immediately destroyed by Sweet Mayhem. Although the triple-decker couch is short lived, from the screen captures we can see that the LEGO set version is quite accurate. Still, I feel that the set could have been done better to make it a more satisfactory play-set. For example, in mech-mode, the lowest deck of the couch is too small to accommodate a minifigure, and the arm with the gripping claw is too flimsy. In addition, the folded up ladders at the back look messy. Although I haven’t had the time to experiment with this yet, I’m fairly confident that with a bit of modification the mech could be made more tidy and functional.
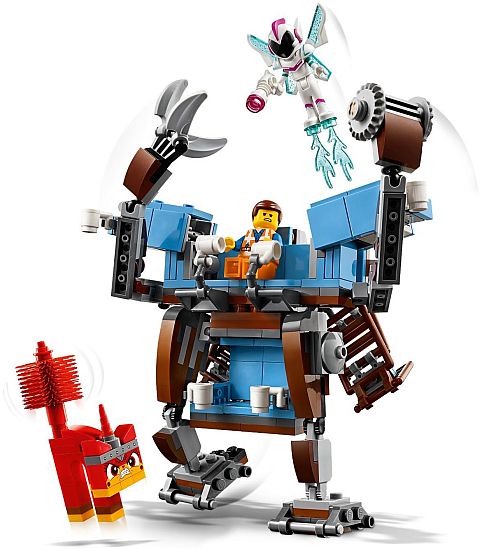
The three characters included in the set are Emmet, Sweet Mayhem, and a new version of Unikitty called Rampage Kitty with angry features and a bushy tail. Only Rampage Kitty is exclusive to this set.

In summary, I would say that the #70842 LEGO Movie 2 Emmet’s Triple-Decker Couch Mech is a decent set, but I don’t think it will be as popular as the #70818 LEGO Movie Double-Decker Couch. The triple-decker couch has a very brief appearance in The LEGO Movie 2, and the idea of a multi-decked couch is no longer fresh. The converting feature is fun and surprising, but the playability and looks could use some improvements. Also, while the #70818 LEGO Movie Double-Decker Couch came with five characters and Emmet’s car, the #70842 LEGO Movie 2 Emmet’s Triple-Decker Couch Mech only has three characters. The price difference can affect desirability as well. The earlier set was only $15, which could easily be an impulse purchase. On the other hand, the new set is $30, which could make LEGO fans pause and consider if they really want it. If you would like to check it out, along with the other new sets related to the second film, visit The LEGO Movie 2 section of the Online LEGO Shop.

I should also mention that The LEGO Movie 2 was released on DVD/Blu-ray a few days ago. Besides the film itself, is also includes special features like outtakes, deleted scenes, making the movie footage, and more. You can purchase it at various retailers and through Amazon: THE LEGO MOVIE 2 ON AMAZON

What do you think? Did you enjoy The LEGO Movie 2? Do you like any of the related LEGO sets? Which one is your favorite? And how do you like Emmet’s Triple-Decker Couch Mech? Do you have it already? Feel free to share your thoughts and own reviews in the comment section below!
And you might also like to check out the following related posts: