(Written by William)
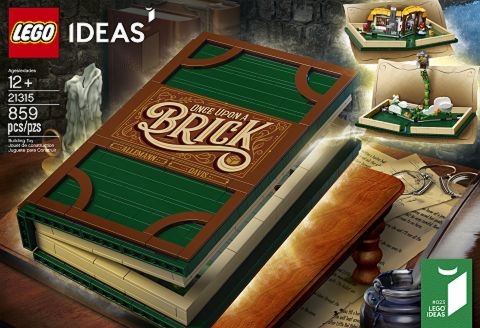
Before discussing the interesting building techniques found in the #21315 LEGO Ideas Pop-Up Book, let me point out that this set has a remarkably good selection of parts; a large quantity of different size dark-green bricks and a good smattering of modified bricks are what stood out for me the most. This is especially important for LEGO fans who like to build their own substantial size custom creations. 🙂
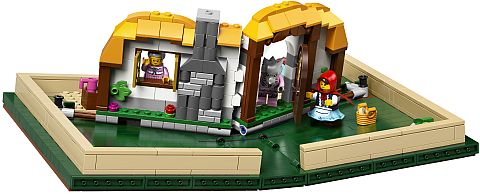
In addition, we also get some of the best looking and most detailed minifigs in a non-licensed set: Little Red Riding Hood, grandma, the big bad wolf in granny’s jammies, the Giant, and even a microfigure Jack. Overall, this set has a lot going for it, even above and beyond the amazing design.

As far as the building experience and building techniques, the brick built book looks great, the fairytale scenes feel inspired, and the pop-up mechanism is downright breathtaking. I can’t gush enough over the sheer ingenuity that went into this set. Which means, as far as techniques go, we have a lot to talk about. So let’s begin…
➡ BUILDING HOUSING FOR A LEGO CREATION
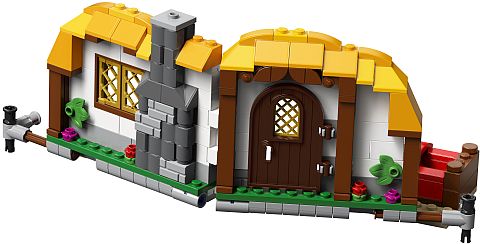
The fairytale stories and the pop-up mechanism of the #21315 LEGO Ideas Pop-Up Book are encased in a housing – which, in this case, is the brick-built book itself. The book included two covers, a spine, and a frame of simulated pages. It’s important to note that the width of the spine will define how tall the simulated pages must be for the book to close properly. In this case, the spine is four studs wide, and since the simulated pages are built sideways, this means that there is ten plates worth of space to cover. This goes way back to our discussion on the 2 and 5 rule; for every 2 studs, there is 5 plates of thickness. With this in mind, the thickness of the pages is split evenly. Each side receives one plate, one brick, and one tile to build up the height of the simulated pages. This adds up to a total of ten plates of thickness, or five plates for each cover.
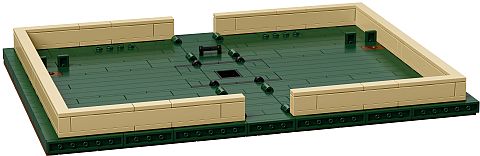
Another feature of the housing that needs to be considered is the various mounting elements that will be needed to affix the fairytale scenes. Here, we get a pinhole in each cover, a bar on the spine, some plates to aid the pinholes, and some random studs along the top edge of the book.
Finally, space needs to be hollowed out in the spine to prevent any folding mechanism from catching. This is why we see a small window frame built into the spine of the book. Although the book looks simple, as you can see, a lot of thought had to go into designing it. It has to work well in itself, and also work as the housing of the pop-up mechanism inside.
➡ DEFINING JOINTS WITH LEGO
Now that we have the housing done, we have to make sure it can open and close properly, like a real book. For this, we need hinges. More specifically, hinges that work based on tension. Ideally, when the book is closed, there should be the least amount of tension, versus when the book is open and can apply more tension.
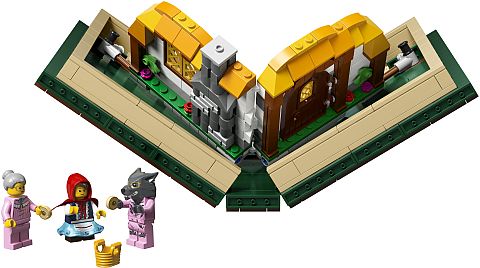
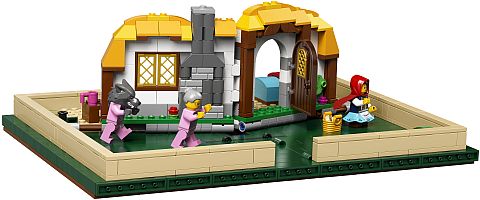
The primary example of this is found in the center of the Little Red Riding Hood scene. The hinges are modified with a slope to only open so far. This, in turn, gives us a defined shape and structure when opened, yet provides a method in which it can be compacted in order to fold up. The result is a very interesting mechanism. When the scene is formed, like the cottage, it has to stop unfolding due to the hinge described above. However, the book is not fully open yet. Therefore, in order to complete the action, the mechanism must either break or follow the path of least resistance. In this case, the joints on the sides of the scene continue pulling, and the only other path for the contraption to move to is to be stood upright. The result is the pop-up action.


The action differs in the Beanstalk fairytale, where the contraption is either fully extended or not. The defining joints in this scene actually help form a three-dimensional structure before the side joints finish exerting tension. Speaking of which, let’s take a look at the unique characteristics of the various expanding joints.

➡ EXPANDING JOINTS WITH LEGO
At this point, we have the housing to provide the tension, the defining joints to build things with tension, but we still need joints to harness the tension. For this, there are two options; the joints can either be rigid or flexible. Typically a more rigid joint is used when more weight is involved, or when there is an added level of complexity. In the case of the Little Red Riding Hood scene, the side joints are the rigid expanding joints. They are locked at a specific angle to act as tracks for the scene to move along within a consistent action.
In the case of the Beanstalk scene, the action is rather simple, so it only requires a basic amount of tension. This is why a simple string is used. A string is probably the most flexible expanding joint you can possibly have, as it can only provide one of the two basic types of motion. By types of motion, I mean things can either be pushed or pulled. Push type motions are usually the most common as they are easier to design. For example, turn a gear and each tooth pushes other teeth it comes across, or move a tire and it will grip and push the floor along under it. As far as pulling motions the most common example is cranes moving objects upwards.

In general, expanding joints are used as decorative elements rather than necessary functional components. They will often look like pistons on mechs or on the backs of heavy machines. In this set, the side joints actually pull the scene from both directions thus harnessing the tension we wish to apply. By having rigid axles in their design, the side joints further limit the ways in which the scene can move. Therefore, they also act as a defining joint. But the real benefit of an expanding joint is that it can utilize and absorb movement. This is probably why they aren’t as common. Things that absorb movement tend to mean whatever you are building moves less, which is often opposite of our intended goal. Nevertheless, what is called for in this set is a way to make something malleable. For that reason, the expanding joint is perfect.
➡ APPLYING WHAT YOU LEARN
Building a housing for a model is an interesting proposition, even if you aren’t planning to make a pop-up book. Ultimately, the goal of housing is to make your creation more portable. What you need to address is how will the housing open, and whether there is enough room for everything inside.
As for defining joints, I feel that this is still a fairly new concept to explore. Most of the time, we make an action element to perform some sort of function. The concept here is that the end function is that something new is built. Some previous example we can see in LEGO sets are awnings on food trucks, and campers that unfold a bit. While they are fairly easy to build, you do need to consider whether a hinge or joint needs to be limited in any way.
Finally, we get expanding joint. The #21315 LEGO Ideas Pop-Up Book is definitely giving us a new perspective on just how handy it is to have a pulling action. I must admit that its absorbing qualities fascinate me. It’s a great technique we can use to soften the abruptness of so many action elements. The trick is designing them. For this reason, I suggest trying to play with string first, if they end up failing because they are too flexible, then figure out how to replace the action the string provides with a bit more structure. It’s not the simplest thing to even think about, but then again, this is one of the most advanced techniques we have ever talked about.
What do you think? How do you like the LEGO Ideas Pop-Up Book? Did you build it already? How do you like the techniques discussed here? And did you notice any other interesting features or techniques? Feel free to share and discuss in the comment section below! 😉
And you might also like to check out the following related posts: