

 LEGO has been regularly releasing cool key-chains for LEGO-fans. They usually have a LEGO brick or a LEGO minifigure hanging from the chain as a charm. The key-chains are of great quality and they are perfect to hang your keys.
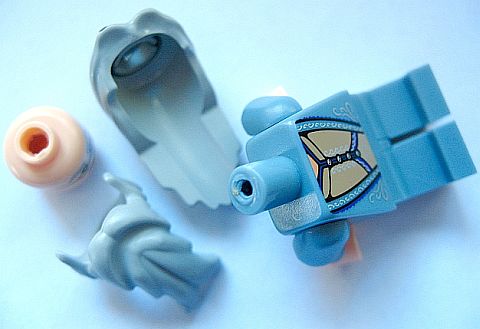
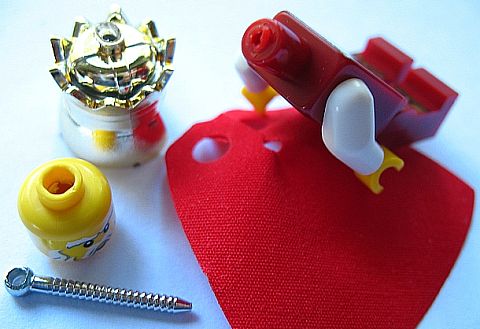
The minifigs hanging from the key-chains are regular minifigures, with the addition of a metal loop at the top of their head to attach to the key-chain. The metal loop is actually the end of a long pin that goes through the minifigs headgear and head, all the way down into the torso.This assures that the key-chain loop is strongly attached, and also that the minifigure doesn’t come apart as people throw about their keys. For the same reason, the minifig’s legs are glued to the torso (the pin doesn’t reach down to the legs).
Some LEGO-fans are happy to keep these minifigs as key-chain charms, but others wish to remove them to use as regular minifigs in their creations. Key-chains, like magnets, are a cheap way to get really nice minifigures!
I will show you some of the methods that can be used to rescue minifigs from their chains. (Before making an attempt at any of these processes please read our Tutorials Disclaimer for your safety here.)
 In any of these methods the first step would be to remove the chain from the loop. This can be easily done with a pair of pliers. Once the chain is removed you can choose which method to follows to remove the remaining metal loop:
1. CUTTING OFF THE METAL LOOP: This is one of the easiest methods to get rid of the metal loop sticking out of the head of the minifig. Simply use cutting-pliers to snip the metal loop off as close to the top of the head as possible.
 At this point you can leave the minifig as it is, or if the metal bothers you, you can use hobby paint to cover the top of the remaining pin to hide the metal.
PROS: The benefit of this method is that it’s simple and doesn’t require any special tools. You will easily have a nicely functioning minifigure.
CONS: Unfortunately with this method the minifigure’s parts are still firmly attached. You cannot take the headgear or head off to change it according to your desire.
 2. REMOVING THE PIN BY FORCE: Attach a heavy-duty paperclip or other strong metal ring to the exposed loop on the minifig’s head. Grab the paperclip with pliers with one hand, and the minifig’s body with the other (it is helpful to use some kind of cloth or other non-slip material to grab the minifig with, so it doesn’t slide out of your hand). Once you get a good grip pull the pin out of the minifig’s head. (An excellent tutorial of this process with step-by-step picture instructions is available by countblokula on his flickr gallery: LEGO Keychain Removal)
PROS: The method is simple enough, and if it works, you will have a pin-free minifig! You can easily take off the headgear and the head to change it! Also, if you use enough force sometimes the bond between the torso and legs get released as well, giving you a separate torso and leg assembly. A nice bonus!
CONS: This method requires using great force to pull the pin out. Although I know people who regularly use this method, I was never able to do it myself. I guess I’m a wimp! LOL! Also, your minifig will have a hole on its head. However this can be filled in with putty or glue and painted to hide the hole, or just change the headgear.
3. USING A SOLDERING IRON: For this method you will need to get a simple, basic soldering iron, available at pretty much any hardware or hobby store for around $5-$10. This is an electric hand-tool commonly used by electricians. The soldering iron has a heated metal tip to melt and weld metal parts together. (Craftsmen may also use it to burn designs into wood or leather.) Here is mine:

Soldering irons are made by several companies, and may have slightly different specs; some have interchangeable heads for different types of processes, some have temperature control, etc. For our purposes we just need the simplest kind. All we have to make sure is that the tip is small enough to fit into the metal loop on the minifig’s head.
 PROCESS:
1. Plug the soldering iron into an electric outlet. Wait until it warms up (couple of minutes.
2. Align the loop on top of the minifig’s head in such a way that it has the most clearance. (You don’t want the soldering iron’s tip to touch and melt the plastic.
3. Carefully insert the heated tip into the loop on top of the minifig’s head.
4. Wait a couple of seconds as the soldering iron’s tip transfers the heat over to the pin in the minifig’s body.
5. The heat will gradually release the pin and you can easily pull it out. This should take no mare then 1-2 second. WARNING! If you don’t pull out the heating pin immediately, it will start melting the plastic, so don’t linger. Pull it out as soon as you feel the pin is being released. And you are done! 😀
WATCH VIDEO:
PROS: This is my favorite method for removing pins. It is simpe and fast!You have a pin-free minifigure with removable head, and headgear within a few seconds with little effort from your part.
CONS: If you have a shaky hand you have to be careful. You don’t want to touch the plastic with the tip of the soldering iron as it is hot and will melt the plastic! An other issue is that when you remove the pin your minifig will have a hole on its head. However this can be filled in with putty or glue and painted to hide the hole, or just change the headgear. The minifig’s legs remain attached to the torso.
Hope you enjoyed this tutorial and feel free to share your thoughts, experiences, or your own tips in the comment section below! 😉


Thank you Anna for yet again a wonderful helpful tip, love it!
Maxx
Oh, thanks, Maxx! Ahem…would you like to write a guest-post about colors? 😉
I might just do that, let me know how and what.
But remember, I only have 2×4 colors:)
pm me.
Maxx, I’m sending you a PM! 😀
Thank you, thank you, thank you! I’m running out this afternoon to find a suitable iron and attempt this. I’ve tried all the other “yank ’em out with pliers” methods and just got frustrated at how difficult it was, let alone unsuccessful.
Morgan, yep, I think you will be quite pleased! 😉
Thanks from me too! I’m already a customizer but I would have never thought of a soldering iron! LOL! It works great! A lot easier that trying to muscle those pins out!
I told my boys about this, and now they want to do it. LOL! What did I get myself into! Where is the best place to get one of these irons?
Any hardware store or home improvement store would have them. You can certainly find them in the big ones like Lowes and Home Depot, but even the smaller tool shops have them.
Although in the post I say that they are around $5-$10, because this is the avarage price I have found, but I actually bought mine for $3 at a local little tool shop. So, yeah, they are cheap! 😉
Great tutorial! And the video is a nice addtion! It makes the process really clear!
I bought my son a couple of Star Wars minifigure keychains which he of course wanted removed fromt their chains!
I used a variation on the soldering iron method – I dropped the figures into a jug of boiling water for about 30 secs – then pulled the chain out with ease.
Darren, are you serious?! That is a great idea! 😆
hi, I remove the pin with a paperclip, if you heat up the metal of the clip with the flame of a firelighter around 10 sec., it smoothly gets out easily. Beware, only for adults…
Stephan, thanks for sharing that! Yes, that works too! Just be careful! Don’t burn yourself! 8)
Yes right!! holding the plyers with a napkin, the flame heats the paperclip and therefore the pin. The other hand pulls on the minifig, keeping it away from the flame and saves it from melting. It saved me the cost of a soldering iron. Again, only for adults, but it is very easy, cheap and neat process. Don’t ask me how I got a third hand for holding the firelighter, actually I held it and the plyers in the same hand.
Btw, most important, love your blog 🙂
LOL, Stephan, I’m trying to imagine your whole process! Very funny! Just don’t burn yourself! 🙂
Use a Candle, then you don’t have to hold the lighter!
I use a combination of your magnet removing method with the brute force method: I drop the minifig with a paperclip in place of the chain into hot water (about 70ºC) for 10 min to soften the plastic and then just pull the pin with pliers, not much force needed.
Luis, yes, that works well also! Thanks for sharing! 😀
Thanks for the suggestions – brute force worked like a charm. I used a potholder for the lego, which had a sticky silicone grip.
You are welcome, Chris! 🙂
Yay, great advice on the soldering iron… Worked a treat, and good note on the very quick release of the pin, no damage to the guy either…., just to remind others just how breif the hot iron must be in contact before the plastic melts… Tip; i kept the whole chain thing on first*, and used the hot irons tip from inside the ring (next one to the pin in the head) to both heat and slightly ease the lot out.
*just incase the kids need the chain put back one day!
That’s a great idea about the chain! I haven’t thought of that! 😀
You should make a tutorial how to fill the hole with putty and what putty is the best one to use. 😀
Hi there first time of doing this but here we go, I found this tutorial interesting and thought I’d use my knowledge:
I use a method of cutting down the pin till I can wiggle the head accessory and the head off.
Then with the protruding pin from the neck I place in a metal vice.
I then get my dad to pull out the pin which gives excellent results.
Now I just have to work out how to remove the legs, thinking of trying the magnet removal method
Phillip, thanks for sharing! Yes, I have tried that too! It works on most of the keychain figs, however I have found that on some of them the glue/solvent that is used to permanently attach the legs also get into the neck area, and therefore I could not wiggle off the head. Unfortunately once you realize that, it is too late to use the soldering-iron method because the loop is now cut off. That is why I switched over to the soldering-iron method completely. It is always reliable. 😉
As far as removing the legs, you can give it a try with the hot-water method. Sometimes it works, sometimes it doesn’t; depending on how much solvent was used to fuse the plastic together. If it was too much, you may still be able to separate the torso from the leg-assembly, but more than likely the internal support of the torso will be damaged too much. In my opinion it is not worth it. 8)
I used the soldering iron and it works! https://5000bricks.shutterfly.com/legokeychainremoval
LOL! Love your funny pictures! 😀
Yeh well i found out that it is harder to make funny pics than vids!
I know what you mean! 😀
I’ve been using a variation on your cutting-the-loop method, with a bit of brute force added in. Cut off the loop, as above; how close you can cut to the base of the loop will vary by the type of headgear you’re working with. In some cases, you can use needle-nose pliers to snap off the tiny bits of loop left behind. Then grab the head and body with different hands and pull. You may need to twist the head back and forth so that the remnant of the loop enlarges the hole very slightly before it can slip off. Sometimes the screw will have deformed the neck post enough that the head is hard to pull off regardless, but I have decent hand strength so I’ve only had to find a tool to pry a head off once.
Once the head and headgear are off, use the cutting pliers to snip off the post as close to the top of the neck post as possible. This method leaves a small, sharp metal point, so you’ll probably want to file it off. (I don’t bother, but I also don’t let my kids play with those figures, and I keep a head on each torso for storage to avoid scratching other parts.)
If a keychain is the only cost-effective way to acquire a given minifigure (like Ahsoka, above) then I don’t mind having a hole in the head and headgear. Plus, in a standard head, the hole is inside the head stud and thus so easily ignored.
Tim, thanks for sharing! I use your method quite often as well. In some of the minifigs I don’t mind leaving the pin inside at all, as I know I’m not planning to take it apart. So yeah, there are several options to deal with the keychain issue, which is a good thing! 😉
to pull the loop out with plyers you have to twist while pulling 🙂 couldnt find a soldring iron so found plyers and tried thanks for the tutorial 🙂
Aidan
Aidan, yeah, if you are strong enough that works too! 😀
Good Tutorial I have a Hobby Shop Near my House! 😀
theory on keychains, really cool figures, get a lighter, paper clip and pliers and another person: take the key ring off the mini-fig, wrap the paper clip around the little circle left (clip should be a least even), one person hold the figure, another with pliers hold the paper clip, hold everything level and horizontal, heat the paper clip with the lighter, have the other person slowly pull, when it starts to give, Yack hard, remove the head and hair/hat, the body is the hard part, but you have a new mini-fig and it’s less that buying an entire set!)
Coz, yes, that works too! Thanks for sharing! 😉
Actually it does not . I tried it and it melted the paperclip before it even heated up the metal loop.
Yeah, that’s something to look out for! Some of the stronger and thicker paperclips do work though. I have tried it myself. But I much prefer the soldering-iron method. A soldering-iron only costs a couple of bucks, it is a lot easier and clearer method, and you only need one person to do it. 😉
When you pull the pin out by force, do you twist or just yank it?
Jonathan, if you are planning to pull out the pin by force, and not by any of the heating methods, you will need to twist it some. If you are using heat you don’t want to twist the pin at all as it could melt the plastic. So the straighter you pull it out the better. 😉
Does it matter which direction I twist it in?
Jonathan, no it doesn’t matter. It is not like a regular screw, but more like a pin with ridges. Hope this helps some! 😉
this tutorial is AWESOME now i’m gonna start buying LEGO keychains
thanx alot -Sensei Wu
p.s. the reason I never bought LEGO keychains before is because I didn’t think your able to take the keychain part, the legs, the head, and the headgear. once again thanx a million 😀
whoops I left out the word off
I’m alot like Sensei Wu, I never bought lego keychains becase I thought you could not take the minifig off the chain!! 🙂
aubseywaubsey, with work tools, you can take apart just about anything!!! 😈
(This post is here so you don’t hurt yourself or the minifig!!!)
Oh Admin, Thanks for the post!!!!!!!!!!! 😀
You are very welcome. 😉
Thank you so much! I was able to yank out the screw. I used needle nose pliers on the pin end and used one of those jar opener pads to hold the fig! I wiggled it slightly, and it popped right out.
Todd, glad you got it out! Once you get one done, you will always know how to liberate other minifigs. 😉
Another interesting post. kudos.
Thanks I think buying a keychain is cheaper that buying the actual figure
Yes, in general, that’s case – especially from licansed themes. 🙂
thankyou, i have removed the keychain part fom many keychains but i have have never triend removing the pin, i look forword to trying this
Have fun with it! One of the most interesting thing I have found after removing the pin is that some keychain minifigs have double faces! 🙄
I love that there are so many methods to remove the keychain part to have a custom minifigure, but I can’t seem to find a single tutorial about how to use the keychain part you’ve removed to turn a minifigure into a keychain. Does anyone have any suggestions about turning a minfigure into a durable keychain? Thanks for your thoughts!
Erin, that’s an interesting question. LEGO minifig keychains have two basic characteristics; one is of course the pin that goes through their head all the way into their torso, and the other is that the bodyparts are glued. You can use any glue recommended for plastics, and you could easily drill a small hole through the head and neck of a minifig with a small drill, then insert the pin. The whole should be slightly smaller than the pin. The pin has ridges, so once inserted it won’t come out easily.
i´ve been having success with using force. the trick is to apply continuos force rather than brute force, i usually put the ring around something than will hold my weight and then just bend knees and let gravity do the work.
Thanks for sharing that. Good suggestion. Will have to give it a try. 🙂
where can I find the screw that goes into the head to make something into a keychain. or where can I buy the chain and screw together?
Thank you,
Maurey
Maurey, I don’t know any place where you could get them separately. Perhaps a hobby store, or hardware store?
https://www.youtube.com/watch?v=npdTo4wJzcA The candle method seems to work as well.
That’s a great idea too! :Thanks for sharing! 😀
Won’t work for minifigs which have pointy headgear like batman or darth maul, though we can get replacements via lego service. Of course, the parts they send aren’t cheap so pick wisely or they’ll get suspicious and simply refer u to a third party site.
I second the candle method. I heat the middle chain instead so it is a further from the minifig. I haven’t try it on darth maul though. I also haven’t bother with “plugging” the hole with putty.
Going further out on the chain is a great idea. I have been using the soldering iron method with great success, but yeah, the candle method works too. I haven’t been plugging the holes either, except on colors where they are very visible. Most are fine as they are.
Thank you for this post.