 (Written by William)
When we build with LEGO, we spend much of our imagination time trying to figure out how something can be done. We are often stopped by the realization that a piece we could have sworn we saw doesn’t really exist. Well, it did in our pizza-induced dreams from the night before.
Thousands of builders have figured out dozens of ways to make the impossible possible and all by using official LEGO pieces in very unofficial ways. The following technique that I’ve used is one such example.
Let’s say you want studs on the ceiling of your building. Since LEGO doesn’t have a piece yet that directly does that, you’re going to need a few things to create what you want.
ELEMENTS NEEDED:
1. A LEGO brick or bricks – any size. (We’ll use a 2×2 for example.)
2. A supply of half pins. (These are the ones with a pin-connector on one end and a single stud on the other.)
3. A LEGO plate or plates – any size. (This should match the bricks’ size or at least be the amount of studs you want inverted.)
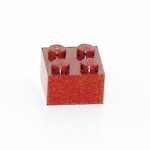 ➡ STEP ONE:
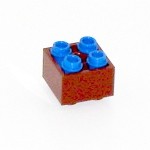
Take the bricks you want to have inverted. This means that the end result will have studs on both top and bottom or side-to-side, depending on how you orient the bricks.
Now take the half pins and place them pin first into the underside of the brick. You should have the studs of the pins facing out.
➡ STEP THREE:
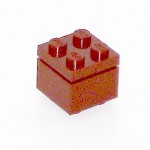 At this point, you could attach whatever you want to hang down, but it is a bit unstable. So for further stability, place a plate over the pin studs. This will give you a much more solid surface to work from.
Attach whatever it is you want to hang down, or sideways, depending on how you’re going to utilized the construction.
ADDITIONAL ADVISE FOR INVERTING STUDS:
You might want to take into consideration the size of this technique. It is roughly four plates thick so may be hard to hide if you are not planning for it ahead of time. Arches or overhangs are one way to hide the inverted construction. Also, it’s a good idea to have the pins connect to all studs of the plate that you use. Add more pins if you’re planning a larger area covered by a plate. The more pins you use, the sturdier the creation will be.
HOW INVERTED STUDS LOOK IN A LEGO CREATION:
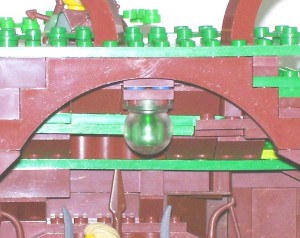
Here’s some pictures of the MOC I used this LEGO building technique in a LEGO creation. I call the creation the Elven Tree Shrine.
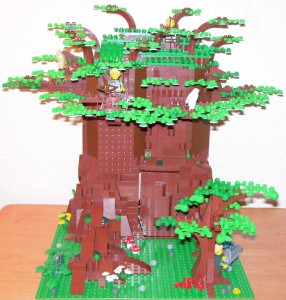
Notice on the interior floors of the shrine how there are globes in the ceiling. Basically, I hid the majority of the brick in the flooring and only left a small portion showing.
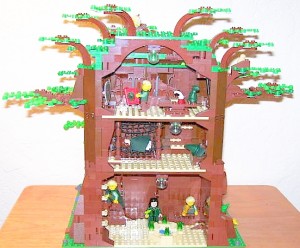
I then used LEGO’s technique of sticking a colored cone in the globe to complete the magical orb light effect. With some advanced thinking, it wouldn’t be hard to use a light-up brick to add even more fun action. 😉
I hope this technique helps you in your own LEGO creations. And if you know of some other ways to reverse studs on LEGO bricks, or other interesting techniques, feel free to share in the comment section below! 😉




Hey William
Cool sculpture, well done.
Do you have any Hi-res images of the tree?
Looks like you have 2 sets-worth of MTT-brown in there!
Cheers
Inger
Here’s a link to our BrickShelf that has more images of the tree: http://www.brickshelf.com/cgi-bin/gallery.cgi?f=455907
Glad you like the tree. What is MTT-brown? I’m still fairly new at being a LEGO fan so some terms I haven’t heard yet.
The BrickShelf images, I believe, are a higher resolution. The images that are posted here are scaled down for loading purposes.
That’s a great technique! I already have some ideas how to use it! Thanks, Will!
No prob! I was actually surprised on my local LUG’s facebook page, someone commented that they had used this technique before. I had never seen it so I’m glad the word is spreading, regardless of who used it first.
Good luck with your designs!
Thanks! My son really liked this one! He tried it out immediately! 🙂
I know every time I learn a new technique, I have to play with it as well. I’m glad his own skills are increasing because of this. 🙂
Thanks for reading and commenting!
I like the technique, but what I really like is the tree! I could live in a place like that! 🙂
Thanks for the compliment on the tree. My wife and I had a number of discussions on what it should be in concept. My wife is a big fan of ElfQuest. Then I took my concepts of castle as well as military considerations, which led to the logical progression of where everything would be built. So that is, sleeping quarters, armory and where all the access points are for entering and exiting the tree.
When it came to actual implementation of the design, it was primarily free-build on my part, where I then implemented all the topics we discussed. This particular MOC will be displayed at the 2011 NMRA Train Show in Sacramento, CA on July 8-10.
Thanks again for reading and commenting.
Awesome tree! If you build it up higher you would have a great Ewok tree from SW!
That’s a definite possibility. Though our current obsession is castle so our MOCs run along the fantasy lines, not Star Wars.
And with it standing roughly a foot tall, it’s a little hard finding a place to put it if I built it any bigger. Which is what I originally intended to do, but I had to stop based on display limitations.
Glad you like it though. Thanks for reading and commenting.
The big tree is of course great, but I really like the little tree at the front. 🙂
I also like that the back is open – great for play!
Every MOC I build, my wife forces me to make things make playable in some shape or form. I also did the small tree out front to give a point of reference and also because it’s how LEGO builds their more detailed trees.
Personally, I like the little apples on it too. And I hope, at some point, to make a whole forest of these apple trees.
Thanks for reading and commenting!
Look at this:
A slightly cleaner version, w/o the gap.
Nice find! Great technique! 😀
That is awesome! Thanks so much for sharing.
If something goes wrong, though, it looks to be a headache to get it all apart. But it’s a really excellent technique to use for a MOC that you don’t plan to take apart and you need that really strong grip.
Yeah I found out about this technique a month or so ago and now I almost always use it once in every one of my Mocs.
Great technique guys, thanks for sharing it, but mostly for making us “see” beyond what we normally get/use
I have a special 2×2 plate piece with studs on both sides.
That is most likely Megabloks. 😉
This technique indeed works,however it is not usable for building walls…
Some time ago I explored another stud inverting technique:
https://www.youtube.com/watch?v=oa_k-8lqvHc
Great! I’ve been looking for a way to hang bats upside down in my MOC cave for a long time. I’ve finally found it thanks to you.
Aniano, have fan with your bats! 😀