

(Written by Geneva – gid617)
In this series we are going over a few basic LEGO techniques and ideas for building a good LEGO MOC (My-Own-Creation). I’ll be taking examples from several LEGO builders to give you a good idea of different styles and possibilities of the techniques covered, though unless otherwise specified, the examples are built by me. We’ve already covered building LEGO Bases and borders (see: Building with LEGO: Bases & Borders), so now let’s tackle minifigure-size landscaping! We’re going to be covering them as an overview and also give you references, as all the different areas of landscaping could easily have each an article to themselves! 🙂
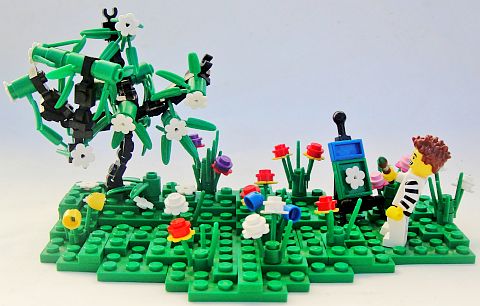
➡ LEGO GRASS, PLANTS & TREES: LEGO itself makes several specially molded vegetation pieces, and we can even expand their use. For grass, the Plant Flower Stem works very well, as demonstrated in Siercon & Coral’s Fairy Forest, which also includes several other very nice LEGO plant techniques. Green LEGO plates and bricks also work, especially if you add some height variations. And I find LEGO bamboo-leaves quite useful too.
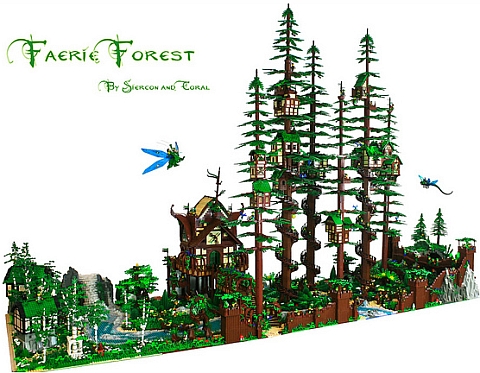
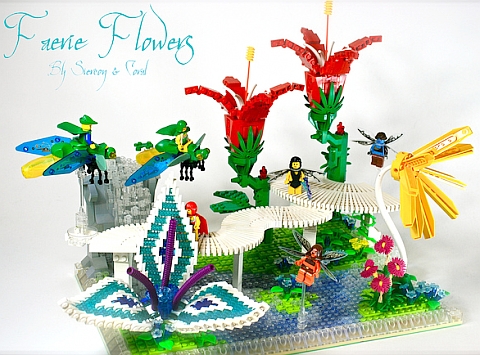
As far as LEGO plants, there are so many varieties and sizes you can make that only your imagination is the limit! For some you can use normal LEGO pieces, and for others you can experiment with green bricks, and even unusual bricks and colors, as seen in the LEGO Fairy Forest mentioned above. (You can see more pictures of the Fairy Forest here.) In general for both grass and most plants the key is to keep regularity and symmetry to a minimum; try to make sure there’s plenty of variation in the landscaping to make it look natural.
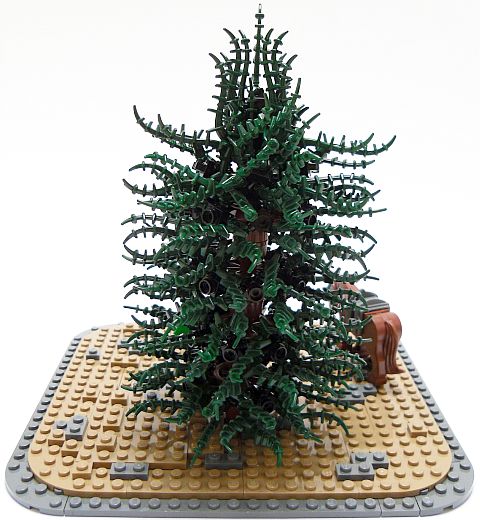
LEGO trees can be a study in themselves (see: How to Make Beautiful LEGO Trees…) as there are so many varieties! For a long time LEGO only produced the two different size plant leaf elements in green, so LEGO fans had to use custom parts if they wanted to add variety (see article mentioned above). Though lately LEGO did introduce some new shades of green and also dark-red and dark-orange! Naturally, the leaf elements are ideal for trees, but there are many other variations you can use. Check out the Falworth fir tree, my own design in the first picture above (not as delicate as it looks!), Legoloverman’s Wasteland, and ‘Ecclesiastes’ intricate tree below.
➡ LEGO WATER & WATERFALLS: As with LEGO vegetation, there are plenty of ways to create LEGO water; blue plates, bricks, 1×1 trans-clear or blue round plates – sometimes with a bit of white or clear for foam (see: LEGO Building Technique: LEGO Water for more examples and techniques). SNOT (Studs-Not-On-Top) water with blue works very well in some settings, and flickr member Robert4168 even used black bricks for a depiction of the Spanish Armada. Other excellent water examples are Siercon & Coral’s Ericson Isle (randomly arranged blue bricks), Mark of Falworth’s The Sea Gate of Dalmanutha (multiple color transparent round 1x1s), Lighthouse Island by Gilcélio (transparent tiles on blue plates), and Seth Christie’s Viking. Below is an excellent use of an amazing amount of 1×1 round plates by Legohaulic.

LEGO Waterfalls also employ a variety of techniques, including trans-clear plates, bricks and cheese-slopes (or a combination of the three). Occasionally blue or light blue is also used in a waterfall but generally they turn out better in clear, with maybe a dash of white, as waterfalls are so foamy! A useful trick in making a good looking LEGO waterfall is building the section immediately behind it with white bricks; that way the white gives a bit clearer look to the fall, and doesn’t darken it the way gray or some other color would. Below is a very impressive waterfall by Asimon481.
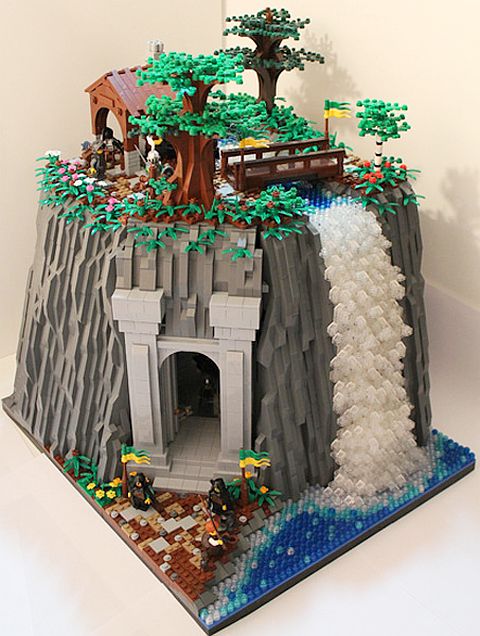
➡ LEGO ROCK, SNOW & SAND: Both rock and snow slopes are very similar in their construction; if you can build one out of LEGO, you can most likely build the other – provided you have the LEGO pieces in the right color. Rock (or rockwork) can be as simple as a variety of slopes stacked along a cliff-side almost at random, or it can be much more complicated; involving intricate SNOT-work, all kinds of small sloping and curving pieces, and even using LEGO Technic pins to slant boulder-sized creations!
Snowscaping along a cliff-side is very similar, though for snow it is best to use less slopes and more curves and tiles. However while rock is always jagged and rough, snow can also be flat; it takes its character from the land it lies on. Though white LEGO plates make tolerably good snow, they’re a bit too bumpy. White tiles work well, but they leave a visible line between tiles. My favorite option for making LEGO snow is using the SNOT-technique of white bricks sideways to form the floor. This way you can easily include details like footsteps! 😀
Similar to snow, LEGO sand can also be made using SNOT-techniques, and depending on the scene, LEGO plates still work fine. The key for sandscaping using plates is to provide a good variety of heights; making the entire sand area one height, or even two or three heights would look quite plain! Mixing tan and dark tan colors also provides variety, and a few dead plant-leaves or brown sticks (minifigure hands work well for this!) can add a nice touch of color! Of course, exactly what you want the sand to look like depends on the rest of the scene as well.
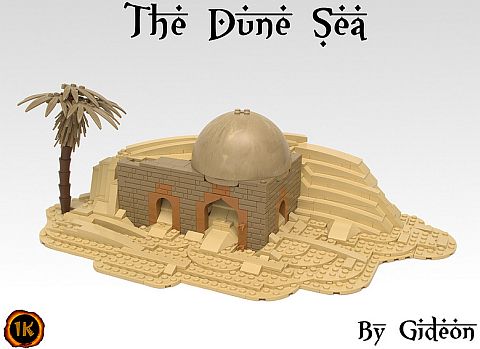
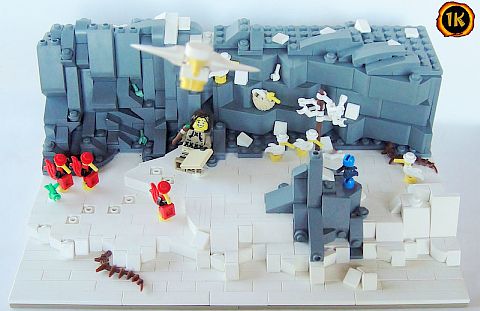
In summary, both sand and rock require plenty of variety; in height, sometimes in angles, and in overall shape. Snow on the other hand can be smooth, unless one is trying to build a snow-covered cliff or something of the sort. Examples of all three environs are abound; Through the Mountain by Legonardo (rock), Etted Caek’s Batharus (sand), I Scream Clone’s The Empire’s Finest Hour (snow), The Dune Sea by Gideon (sand), Eklund!’s New Lancaster (rock), and Glory_Forever’s Saint Rafael’s Monastery (rock). Below is an MOC I built myself, that includes both rock and snow:
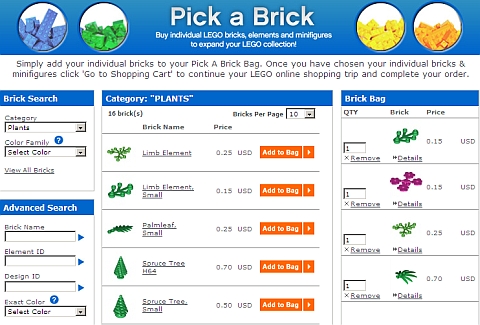
So to wrap this up, let’s summarize; for making LEGO vegetation, LEGO’s specialized pieces work very well, but (especially in the case of flowers) experimenting with odd colors and shapes can also yield some excellent results! Water is typically fairly smooth, so SNOT-techniques, LEGO plates, and transparent 1×1 round plates all work well. LEGO waterfalls are typically made using stacked 1×1 round plates, though there are other varieties. LEGO rockwork is best achieved with a whole bunch of slopes – sometimes built using all kinds of crazy LEGO techniques going every which way! LEGO snow on a cliff is very similar, but if it is on the ground it’s usually best to use SNOT-techniques. LEGO sand can be built with plates or SNOT-techniques; SNOT is better for beaches and plates for a desert. You’ve probably noticed that in virtually all the areas I emphasized variety; plates, slopes, etc. have to be scattered all over or going in all directions, as it’s very rare to find exact symmetry in nature! If you would like to get individual LEGO leaves, flowers and other pieces in quantity, you can check out the Online LEGO Pick-A-Brick Shop.
So what do you think? What techniques do you use for your LEGO landscaping? Have you tried any of the techniques mentioned here? Are you planning to? Or have you come up with something unique and different? Feel free to share in the comment section below! 😉
And you might also want to check out the following related posts:


Great post Geneva definetly one I will be coming back to over time. Also when I first saw alll of the trans blue studs I thought it was a carpet :p.
Thanks! Yeah, in black and white that would look like a carpet!
nice post admin! good info!
BTW my kindle is black and white otherwise I might not have.
nice post, I wondered if someone would do a post like this. Real nice pics.
Also admin I think I might review the eradicator mech from galaxy squad, do I set it out like every other post is? also do you edit the posts if you don’t think they are perfect? and where do I send it?
I’ve been looking at that set so I’ll be interested to hear your opinion in detail. Right then: no you don’t have to lay it out the same but it has to be under 1,000 words and include pictures(attach them to the email) and where you want them to be. You just write out the post on word and email it to admin. You’ll find the address on the how to contribute page under the welcome tab. Admin will make some adjustments if needed but this will not completely change your post in any way. Hope that helped
Oh, I just noticed you already answered. Thanks! 🙂
My pleasure m’lady 😀
Just so you know I have three posts planned its just a matter of writing them 🙂
They’re eglors twin bike review, Jek-14s starfighter review and a little MOC thing where I gave myself an hour and the pieces of 5-6 hero factory heroes to come up with some figures 😉 just a little preview.
They all sounds great! Can’t wait! 😉
Benny, that sounds great! I love that set! You can just write the post as a word document, and attach any pictures you would like to add. You can make notes in the post where you want pictures to go. As far as editing, I usually help with the first post and make sure it looks right. Once you have done one, you will get a sense on what is the standard. With our regular contributors like Geneva, Will, Fikko, I hardly have to edit anything. Sometimes just a little to make sure things look right on the page. You can send articles to my email address. It is listed under the how to contribute section and also under my contributor’s page. 😉
thanks chi-bacca. admin ill start it tomorrow and keep it under 1,000 words. I forgot I have an at-te so maybe I can do that if my post is good
admin I have done the post but I just need the email as when I click on the link on how to contribute it says I don’t have default email thingy installed so will you tell me
It is admin @ thebrickblogger .com. Just take out the spaces. I don’t like to write out my email address because crawlers will pick it up for spamming. 🙁
I doesn’t matter now I got it through my ipod. trusty little ipod touch 5th gen
Thanks!
You can actually go a little over the 1000 words, just not much (I’m pretty sure I went over on this one…).
Admin often changes formatting/word order or something like that to clarify a little, but in general it’s more or less the same. A good way to figure out what you could do better on is to see what was changed from the original post!
It occurs to me that the single most important element of landscapes is repetition, which means you need a lot of the same pieces. By having the same shapes repeated, but slightly altering them at each layer you are able to create a cohesive look that still looks natural instead of man-made. There’s a fine balance between repetition and random brick placement.
I haven’t mastered it 🙂
Yes, I think you nailed it there; repetition, but not exactly the same. Like you say though, that means you have to have quite a few pieces for larger landscapes, which can be quite a handicap!
Hmm yeah I see what you mean. Just look at a typical building. What do you notice? Symmetry. A building without this looks odd and is somewhat displeasing. Look at a completely natural object. Most of the time there will be no symmetry. Alot of people when building, lets say a rock, will use symmetry or repetition without noticing. You have to really focus to not make a natural object look man made. That’s why I stay away from that and stick with vehicles and robots 😀
I love this article! I came across it last night Googling LEGO trees and checked out the realistic tree article. I’ve tried the technique on a MOC of Bag End I’ve been playing with. I really like the results though I still like the classic LEGO tree designs with their flat planes. I’m new to landscaping but I find it infinitely enjoyable and only limited by your imagination and your supply of bricks and elements 🙂
Thanks! I hope the article helps you! 🙂
I haven’t mentioned it yet, but I also found your article very helpful… and timely. I’m just now going through Level 3 of the MBA program, and the second kit also talks about landscaping, and shaping your landscape to match your story. 🙂
That’s great to hear! Most of the tips will probably come in handy for me too as I often have trouble with my landscaping!
Awesome Post! Great tips!
Very informative post! Very good!
-Brick Boy
I honestly consider to a certain point Lego as being an art. You can build amazing things with it.
Totally agree on that…
Yes, a lot of MOCs are very artistic!