

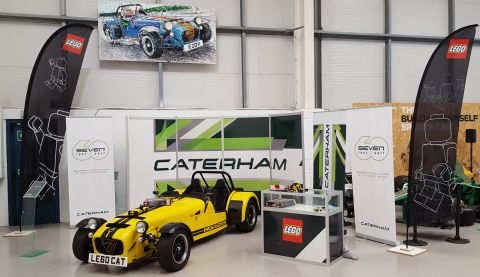
As we have discussed recently, the long-awaited #21307 LEGO Ideas Caterham Seven 620R is going to be released in just a few days (October 1st) You can read the full announcement, see pictures and watch a video-review here: LEGO Ideas Caterham Seven 620R revealed! The project was submitted to LEGO Ideas by LEGO and Caterham fan Carl Geatrix back in 2014. Carl’s model was beautiful, and his enthusiasm contagious, so the project quickly gained many excited followers. Once the manufacturer of the real car (Caterham Cars) got behind the idea, it didn’t take long for it to reach the required 10,000 supporters to get LEGO’s attention. The project was approved, perfected by LEGO’s own designer, and now we have the final model, the #21307 LEGO Ideas Caterham Seven 620R. I got an early copy of the set and had a chance to build it and tinker with it already, so today I thought to share with you my own experiences with this interesting car. 🙂

I’m going to start out with the very helpful introduction from the booklet that comes with the set. In case you are not familiar with the Caterham Seven, this will give you a good idea what kind of vehicle we are dealing with, so here we go: “Created by visionary Formula One designer, Colin Chapman, the Lotus Seven was a road-going sports car based on racing car principles and supplied to the customer as a build-it-yourself kit. A Lotus dealer in the Surrey town of Caterham saw a great potential for the tiny sports car, and in 1973 Caterham Cars bought the rights from Lotus and started to build the third generation ‘Series 3’ version, which remains in production today.”
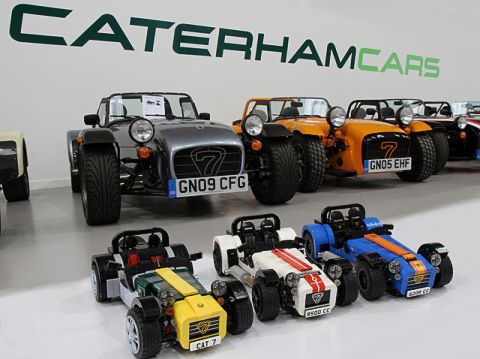
So as you can see, the Caterham was developed as a built-it-yourself car kit, which already makes this car a perfect match for LEGO, another very much build-it-yourself hobby. Because the real-life vehicle was specifically made for tinkerers, there are many different versions and variations. When Carl originally proposed the project on LEGO Ideas, he knew he wanted a Caterham Seven, but wasn’t really settled on the exact model, configuration and color-scheme. I highly recommend checking out Carl’s LEGO Ideas page and flickr gallery for the different versions he built. It is also worth checking out the Caterham website for all the gorgeous cars they offer.

Okay, let’s read the introduction further: “Put side by side, an original Lotus Seven Series 3 from 1968 would look very similar to the cars being built nearly fifty years later. However, under the skin, Caterham has continued to refine and develop the car, ensuring that its overall racing performance is always highly competitive. The most powerful Caterham car to date, the Seven 620R, was revealed in 2013. With a 310BHP supercharged Ford engine developed by Caterham, coupled to a six-speed sequential racing gearbox; the 1261 lbs (572 kg) car accelerates from 0-63 mph (0-100 km) in just 2.8 seconds and has a top speed of 155 mp (250 kph). It also utilizes the latest in material engineering, with lightweight carbon-fiber used for the wings, interior panels, dashboard and seats, whilst the wheels and tires have been developed especially for the car.”
Based on what I knew about the car, and on Carl’s submission on LEGO Ideas, when I heard that LEGO approved the project, I thought they will release a set that will be very much like a build-it-yourself car kit with various customization options, including some interchangeable colors and parts. It seems however that at some point in the design process Carl, the car manufacturer, and LEGO’s own designer Henrik Andersen decided to settle for the Caterham Seven 620R in yellow and black. I find this disappointing. As you will see in my review of the set below, LEGO did put effort into making the car modular with easily removable sections, but I was expecting it to be more like the #21305 LEGO Ideas Maze, with at least some interchangeable and rebuildable areas. After all, the whole concept of this vehicle is that it’s customizable.
The last part of the introduction reads: “It is estimated that there are as many as 1,000 Sevens competing on any given weekend, with championships all over the world from Colombia to Taiwan. The Caterham factory in Dartford, Kent, continues to build 500 cars each year, with well over half of the cars being exported around the world. Although all export cars are now fully built like any other regular road car, customers in the UK still have the option to build their car from a kit, just like the original, and more than 100 do so each year.”

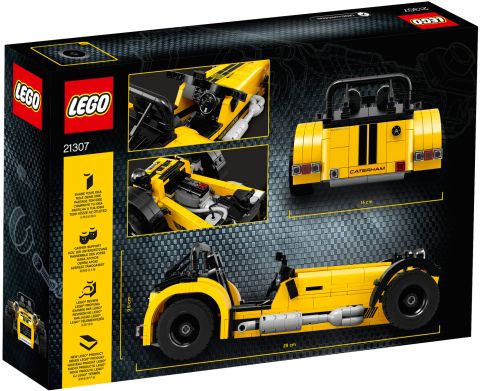
At the back of the booklet there is a bit of info about Carl Geatrix, who put so much energy, passion and enthusiasm into manifesting a LEGO Caterham set, and Henrik Andersen, the LEGO designer who turned Carl’s ideas into solid reality. The rest of the 170+ page booklet contains the instructions for building the #21307 LEGO Ideas Caterham Seven 620R. The box itself is similar to the other LEGO Ideas boxes with a flip-up lid. The size of the box is the same as the #21305 LEGO Ideas Maze, but more shallow.
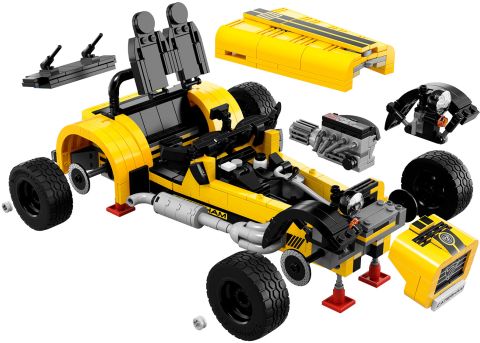
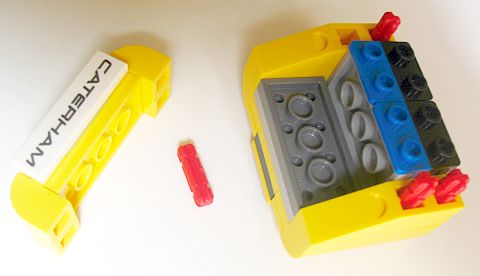
➡ LEGO IDEAS CATERHAM SEVEN – PARTS: The #21307 LEGO Ideas Caterham Seven 620R comes with 771 pieces, in three set of numbered bags. While that’s not a very high piece-count, the set is full of very useful pieces, new pieces, and re-colors of old pieces. Some of the most noteworthy elements are the brand new 2×3 tiles (4 black, and 2 yellow), the resurrected macaroni tubes (2 black and 5 light-gray), the various small clip and bar pieces, inverted 1×2 curved slopes in black, balloon bottom in light-gray, a new 2×4 plate with center hole in light-gray, and the small bar with towball that has been used as a projectile in the LEGO Nexo Knights sets is now available in dark-gray! You also get 3 pink lipsticks. Yes, the Caterham is powered by lipstick! You weren’t expecting that, did you?! 🙄

The set also comes with an insane amount of printed pieces. All decorated pieces you see are printed – there are zero stickers. This includes white and bright-light-orange 1×4 plates with the Caterham logo (one for the front, one for the back of the vehicle), and a 1×4 black tile with silver and red printing for the engine. There are also various sizes of yellow tiles with black stripes that run through the hood all the way to the back, and printed bricks for the side. The nose-cone gets a beautiful Caterham Seven logo, and the back two small printed logos (you get an extra of the 1×1 round plate, which I have added to the steering wheel). The four break-disks are printed as well, which you don’t see at all in the assembled model – you have to remove the wheels to see how nice they are.
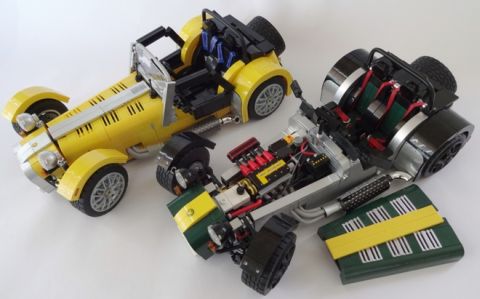
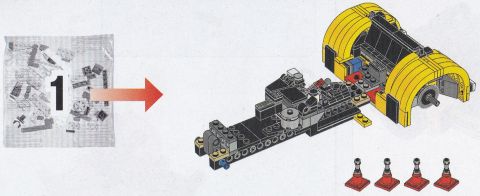
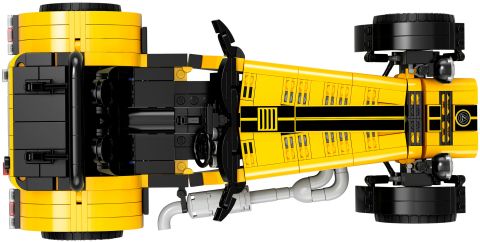
➡ LEGO IDEAS CATERHAM SEVEN – BUILDING EXPERIENCE: From the #1 bags you first build the four red and silver jacks to prop of the vehicle for repair and tinkering (you can store them in the trunk when not in use). You then build the very sturdy chassis for the car with mostly LEGO Technic elements. This assures that the vehicle has a strong frame that doesn’t fall apart. And you also build the fenders for the back wheels. I breezed through this section in a half an hour, and thought the rest of the vehicle will be easy too.
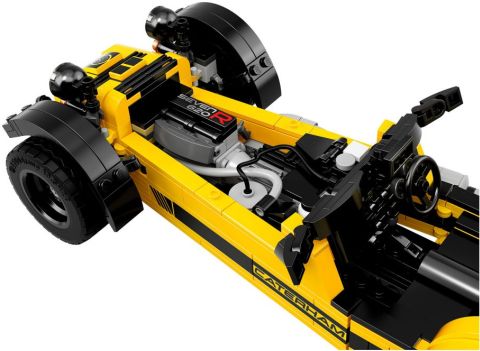
However the #2 bags is where the real fun begins and where you have to slow down to build the more intricate details. The engine is fantastic and fully removable. I think a little bit of color would have made it even better, but based on pictures I have seen, it is very accurate. Then you build the seats, the sides, and that big old exhaust pipe. I don’t want to spoil the experience for you, so I will just say that building all of these sections is very interesting. Even though I had to slow down to get everything right, it was never boring or repetitive. I was very impressed by all the clever solutions and how everything came together.
The design of the front fenders and how they attach to the main body is inspired (“bloody brilliant” as our British friends would say). Because the construction relies on various clips and bars there is a lot of play in the fenders, but once they are attached, and you adjust them just right, they are very sturdy and stay in place. Please note that while on the original LEGO Ideas submission the front wheels were posable (there was no attachment between the steering wheel and the front wheels, but the front wheels could turn), in the final model the front wheels are completely fixed. I believe this was done to make the car more sturdy.
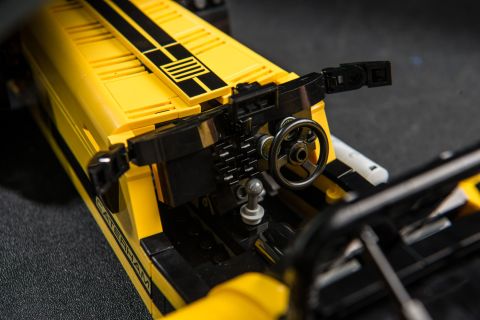
The first thing you build from the #3 bags is nose-cone. While the assembly captures the iconic sloping front of the Caterham perfectly, and in general it looks very nice, it is also extremely problematic. Whenever you touch the car the nose-cone tends to fall off. LEGO did design this section to be removable, as you can see in the picture above. However there are three main problems here. One is that instead of breaking off from the two 1×4 dark-gray modified plates with two studs as intended, the assembly falls off one level below, where there is a slightly slanted red 2×2 hinge-plate. This plate is simply not strong enough to hold the nose-cone. The second problem is that the nose-cone is built using sideways building techniques with pieces that are not solidly connected. Once the nose-cone falls off and you attempt to reattach it to the car, the nose-cone itself starts to crumble in your hands due to the weak connections. And because the parts are assembled from several directions, there is no easy way to just push them together. And here comes the third problem; the nose-cone has four very detailed printed parts, including silver printing. With all that pushing, the oil from your fingers will eventually rub off the print. Silver printing is particularly prone to rubbing off, so this is definitely a problem.
I did find a solution to the nose-cone crumbling by inserting four small red axles into the top and bottom assembly and pushing them together. This stops the nose-cone from falling apart as you keep having to reattach it to the vehicle. This at least stops two of the problems; the nose-cone crumbling, and having to excessively handle the nose-cone and rubbing off the printing. I also intend to fix the problem with the hinge-plate connection, but with the nose-cone being much more solid now, it is not as urgent of a problem.
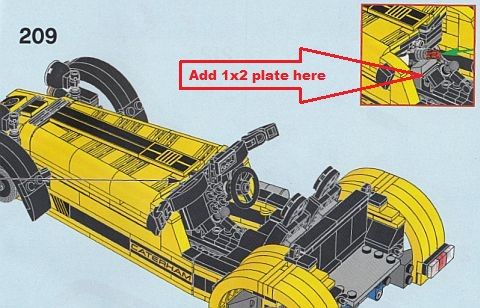
The next thing you build is the hood, which is really nicely done, using some clever techniques, printed tiles, and elegant texturing. Then you build the console – the second problematic area. It is not as annoying as the nose-cone, but still an issue. The console itself is quite solid so no problems there, however it is connected by only a single Technic axle to the engine section. The Technic axle is pushed into one of those ratcheting finger-hinges, which in turn is attached to a hinge-plate. All these connections are strong, so nothing will fall apart, but the finger-hinge can’t really lock into a solid position flush against the hood, and therefore it tends to fall forward. This leaves an unsightly gap between the hood and the console, and also makes the console feel wobbly because it is not resting against the hood.
There is actually a really simple solution to this. As you can see on the picture, underneath the red Technic axle/finger-hinge assembly there is a 1×2 light-gray cheese-slope. You simply need to put a standard 1×2 plate below this cheese-slope to elevate it a little bit. This will prevent the console from falling forward. I’m not sure why this wasn’t included in the first place, but ironically I got two extra dark-gray 1×2 plates with my set.
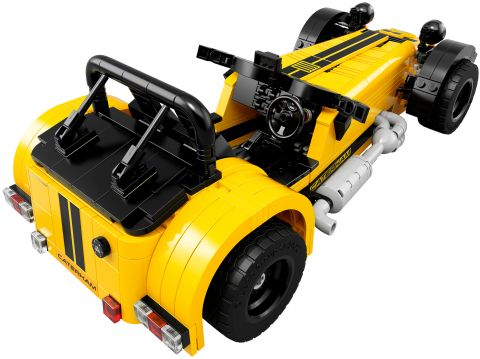
Next you build the roll-over bar, which uses more of those delicious macaroni tubes. I’m very happy with this section. In fact, I’m thrilled with the whole back part of the vehicle. Everything just comes together perfectly and the final result looks really nice. The trunk cover is built separately, and is held in place by friction – a simple and elegant solution that works quite well. Oh, and you also attach the wheels, of course, and you are done!

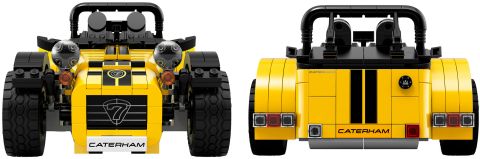
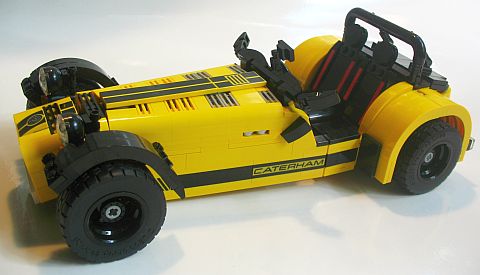
➡ LEGO IDEAS CATERHAM SEVEN – LIKES: The final vehicle is a gorgeous display model, just a tad shorter than the #10252 LEGO Creator Volkswagen Beetle. And as you can see on the pictures above, it is also very accurate compared to the original. The sloping nose-cone, the long narrowing hood, the big exhaust pipe on the side, the large fenders, the roll-over bar, the trunk… this is unmistakably a Caterham Seven 620R, no doubt about it. The printed pieces are all beautiful and are aligned just right. The parts-selection is excellent, and the building techniques are very clever. The nose-cone, the front fenders, the wheels, the hood, the engine, the seats, and the cover of the trunk are all removable to mimic a build-it-yourself car kit. A lovely model in every way.
➡ LEGO IDEAS CATERHAM SEVEN – DISLIKES: The nose-cone, and the console are problematic, but the solutions to both are quite simple, as I mentioned above. There are a few other small things I don’t like and I have adjusted in my vehicle. The steering wheel is unnaturally close to the dashboard, but this can be fixed with just one plate. There are two gaps at the back of the seats, which makes the curved slopes fall off easily, because they are only attached by a single stud. I simply filled this section with standard plates, or you can just use 1×1 round plates if you want to keep the texture created by the gaps. The clutch is in a weird position, almost under the steering wheel, so I made it more centered with a jumper-plate. Interestingly, on one of the promotional images, the clutch is in a different place, attached to the jumper-plate in front of the hand-break (see below).
I know that the LEGO version is an authentic recreation of the yellow and black Caterham Seven 620R, but I really wish a more colorful variant of the real vehicle was chosen, or at least a bit of color was added in some places. Some blue and red inside the engine, and a bit more silver on the outside, would have really made this model shine. The wheels, in particular, would have looked better with silver hubcaps. I’m definitely going to tinker with this car further to make it to my liking. Here is my current version with red stripes on the seats, a bit of silver on the hood, plus some other small changes.
➡ LEGO IDEAS CATERHAM SEVEN – VIDEO-REVIEWS: I’m including a couple of video-review of the set so you can check out in more detail. The first video is by JANGBRiCKS, and the second is by Sariel. Both go into great detail about the set.
➡ LEGO IDEAS CATERHAM SEVEN – PRICE: The price of the #21307 LEGO Ideas Caterham Seven 620R is $79.99. With 771 pieces that’s 10 cents, a piece, so pretty normal for a LEGO set. Comparing the size and price to the #10252 LEGO Creator Volkswagen Beetle (1,167 pieces – $99.99), the #10242 LEGO Creator MINI Cooper (1,077 pieces – $99.99) and the #10248 LEGO Creator Ferrari F40 (1,158 pieces – $99.99), the #21307 LEGO Ideas Caterham Seven 620R is a tad pricier, but it comes with a very large number of unique printed pieces, and this is a limited LEGO Ideas set – so overall I think the price is right.
If you own or planning to own a real-life Caterham, or you just like fast little sports cars, the #21307 LEGO Ideas Caterham Seven 620R is a beautiful and accurate display model. While it has no steering, it does have a good number of removable sections to mimic the customizability of the real vehicle. The LEGO Ideas Caterham is also a great kit for rare and unusual elements, so even if you don’t care for the car itself, you might consider it. I’m thinking that LEGO Classic Space fans would be particularly interested in all those printed bumblebee stripes. It will be available on October first under the LEGO Ideas section of the Online LEGO Shop.

So what do you think? How do you like the LEGO Ideas Caterham Seven 620R? Is this a set you have been waiting for and planning to buy? Do you like the final model, and do you wish that some other colors and features were used from the original LEGO Ideas submission? Feel free to share your thoughts and discuss in the comment section below! 😉
And you might also like to check out the following related posts:
- LEGO Ideas Caterham Seven 620R Revealed!
- LEGO Volkswagen Beetle Review & Thoughts
- Review of the LEGO Creator Ferrari F40
- LEGO MINI Cooper Available Now!
- LEGO MINI Cooper & Classic Space Fusion
- LEGO MINI Cooper Caravan & More!
- LEGO VW Camper Mini in Every Shape & Style!
- LEGO Travel-Trailers & Camper-Vans
- Feelin’ The Sixties with the LEGO VW Camper!


Great review, loved your solution for the front fairing. That is all I have been seeing/reading in the reviews and how flimsy it is.
Yeah, I’m actually not sure how that nose cone passed LEGO’s quality review. It is quite bad. But other than that, it is a great set. I’m still tinkering with it. 🙂
Reminds me of the great Wall-E debacle of 2015;-) I guess Idea sets are less stringent in the QA step?
That’s an interesting observation, hm… you could be right…
Nice review, it’s very informative. I’m tempted to get this, but I may just put it on my Christmas list instead. 🙂
A few notes on the parts: the macaroni piece isn’t exactly “resurrected,” it now has an axle hole where the old version had a peg hole. The mini spring shooters appeared in Dark Stone Grey before this, in the #70596 Samurai X Cave Chaos. And there are only 2 Yellow 2X3 tiles (not 4), which I may add are nice additions to the selection of tiles.
I knew a set like this had to have flimsy sections, so I’m not surprised by the car’s issues. Your fixes are definitely easy to implement, though. I’m glad that the front fenders are sturdy, as they’re one of my favorite parts of the car, despite being rather oversized. Most of my other issues are in agreement with what Sariel points out, including the inaccurate front wheels. Otherwise, I think it’s a pretty awesome car. 🙂
Yeah, it’s two 2×4 tiles. I don’t know why I wrote four. Must have been tired. That’s awesome that the projectile thingy is in a Ninjago set too! It’s an indication that we should be seeing it more often. I really like that piece as it is very versatile for greebling and for hinges. As far as the macaroni piece, you are right, I just didn’t know how else to say that it is the same piece, but also somewhat different. The New Elementary has a really good article about the new pieces in this set. I didn’t want to get into it too deep as my review was getting too long already. And yes, it is a sweet car. I just played with it some more this morning. 😀
I think the mini spring shooter arrow was designed to be versatile, for use as both a ball joint and a projectile. I know we’ll see it again as a projectile, but hopefully LEGO will come out with another joint-related use. 🙂
For the macaroni piece, you could have said that it’s a new design that’s similar in shape to an old piece. I should really start reading New Elementary articles, since it seems they discuss pieces a lot.
BTW, why has my gravatar changed? It used to be a dark blue pattern. It was like that last week, and now it’s this light blue thing. I haven’t changed my e-mail… was there some kind of update to the site? 😕
Yeah, the New Elementary articles are very good. They only have new posts every week or two, so it’s not so hard to keep up. And the articles mostly focus on new parts and techniques, so they are always interesting. As far as your avatar, I’m not sure. If you don’t have your own, they get automatically generated by WordPress. I think they are based on the email address you use, but maybe it is the IP address. Your IP did change a little while ago, so perhaps it has to do with that. You can get your own dedicated avatar at gravatar.com, and it will automatically show up here. That’s what I use. 🙂
Okay, I checked your comment history because I got curious, and all your avatars show up as light blue. I actually can’t see your avatar myself on my dashboard, so I never noticed what color yours was. But if you say yours changed, it was probably an update with WP and not a change on your side. I read that WP avatars are based on your email address, not your IP, so my previous theory was wrong. And I also read that the WP random avatars are actually also generated by gravatar.com, but if you don’t make your own, they will just generate a random image for WP. Why the color changed though, I don’t know. They may have done some change to how the random avatars are generated. Interesting stuff. I always learn something about how WP works. Blogging is sometimes quite mysterious. 😀
Yeah, I looked up a few of my previous comments as well, and they changed too. I only noticed the change today, and I haven’t commented over the past few days, so I’m not sure when it changed. My email address is the same as I’ve always used, so it shouldn’t be that. Technology is strange sometimes. I really liked the dark blue one, I’ve had it since my very first comment here. 🙁
I wonder if it’s possible to look up the geometric shapes on gravatar.com and set my gravatar as the pattern/color I want…. I’ll have to inspect later. 😕
Ahhh… that’s sad that you lost your Avatar! I do suggest that you set up your own, especially since you are regular here, and also a contributor. It is very easy to do. Just go to gravatar.com, upload an image you like (it will help you with positioning and resizing). I think you will get an email to confirm that’s what you want (I did mine a really long time ago, so I may not remember every detail), and it will magically appear here, and also all of your previous comments will change too. So it’s worth doing it. 🙂
Hello please do you have better photo of the changes what you make on clutch? Is not possible see where is handbrake. Thanks.
Martin, the modification of the clutch is really simple. In the instructions, you have a 1×2 hinge brick, with two small pieces on top: a 1×1 black tile, and a 1×1 round plate with hole in the middle. The clutch (the little stick with the nob) goes into this hole.
I kept the 1×2 hinge brick, but removed both the 1×1 tile and the 1×1 round plate/clutch assembly from the top, and replaced them with a 1×2 jumper-plate (a 1×2 plate with one stud in the center). Then attached the 1×1 round plate with clutch on the jumper-plate. This centers the clutch and elevates it by the height of one plate, giving it a more natural position.
I was happy with this arrangement, but if you want, you may even elevate the clutch by one more regular 1×2 plate to bring it forward and out even more. Don’t worry, they won’t be in the way of the hand break. The modification is super easy, but if something is still not clear just let me know. 🙂
Just to clarify, the picture where I talk about the clutch modification is not my image. It is one of LEGO’s own promotional images where they placed the clutch in a different position than in the set instructions. They attached it to the jumper-plate in front of the hand-break. I personally don’t like this solution as much, as it positions the clutch straight up rather than at an angle. However, they also made the clutch centered on a jumper-plate just like I did, which is what I was pointing out. Hope that’s clear.
Hello, thank you. Is possible make photo please? Thanks.
Martin, I could take a photo, but I would have to pull the set out from storage. That won’t happen until at least the weekend. Again, it is a super simple modification. Literally just removing two tiny pieces and replacing it with another one. If something is not clear just let me know.
I buy this set on bricklink and im waiting for delivery so I dont have it with me. I look at instructions nad videos and I get it. Looks very simple thanks. I already buy pieces for other modifications what you made 🙂