

(Written by William)
We have already discussed the #76105 LEGO Marvel Super Heroes The Hulkbuster: Ultron Edition. set to some extent, compared it to the other LEGO Hulkbuster sets, as well as looked at some examples of modifying the set to make it more articulated (see: Comparing the Three LEGO Hulkbuster Versions). Today, we will take a look at the interesting building techniques found in the Hulkbuster: Ultron Edition set. 🙂

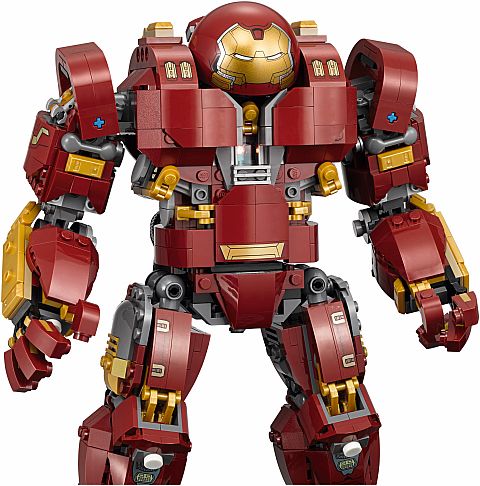
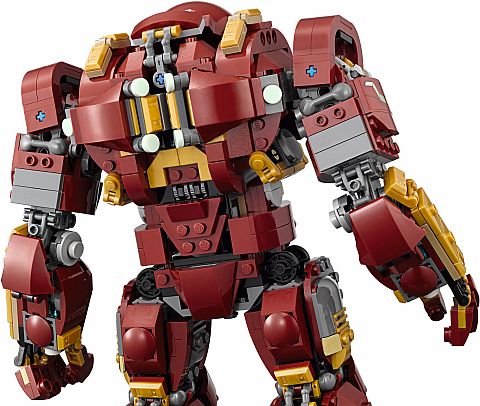
Before we begin looking at techniques, I just wanted to point out how impressive this set is overall. It’s one of the largest mechs LEGO ever released, and it is full of intricate details. The set also looks great on display. While the mech is big and very detailed, building it was a breeze. The parts are thoughtfully divided into nine numbered bags, and the building steps are very clear, so you never feel lost or overwhelmed. Even if you are new to mech building, or you never built something this big, you have nothing to worry about. So let’s take a look at some of the interesting building techniques.
➡ TECHNIQUES WITH LEGO LIGHT-BRICKS
Occasionally, LEGO includes a light-brick in some of their sets. While they are nice to have, how they are incorporated in the sets is usually rather awkward. They will either stick out in some weird way (like in many of the LEGO Creator Winter Village sets), or the design is too bulky (like in the #7572 LEGO Prince of Persia Quest Against Time). However, adding light-bright can be done right. The #10237 LEGO Lord of the Rings Tower of Orthanc incorporated a light-brick rather well, so did the #21117 LEGO Minecraft The Ender Dragon. In addition, the #76105 LEGO Super Heroes The Hulkbuster: Ultron Edition happens to be one of the best examples of including a light-brick, so I wanted to explore why this is.
First of all, keep in mind that LEGO’s light-brick is a directional light, which means it will typically light up the area you point it at. This is different from an omnidirectional light (like your standard light bulb), which provides ambient illumination in all direction. However, you do have some control over the effect the LEGO light-brick provides.
For example, to soften the glow of the light and make it less like a flashlight, you can place other transparent pieces in front of it. With this method, you can even change the color of the light by using colored transparent parts. And you can also control the aperture of the light-brick by adding LEGO Technic bricks with holes (or some other obstruction) to further focus the light.

Whichever method you choose will depend on what you would like the light to do. If you want to disperse the light and make it a little less intense, then transparent bricks are your friend. And, if you need to focus the light to a single point, then building specific holes for the light to go through is what you want. In the case of the Hulkbuster, LEGO designers took advantage of both options.
Next, let’s talk about accessing the light-brick. In some of the best LEGO models, the light-brick is not even connected to any studs. Rather, it is surrounded by tiles and is simply slipped into a hollowed out space that it can slide in and out of. This is an intentional design choice. Unlike other LEGO elements, the light-brick can run out of battery power or the light could burn out. In such cases, you don’t want the light-brick to be inaccessible. The best LEGO models incorporate light-bricks in such a way that they can be accessed and removed easily.
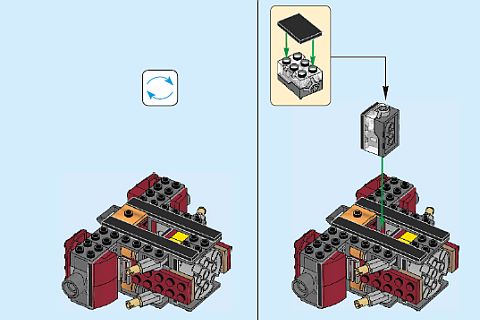
Finally, how to operate the light switch also needs to be addressed. The light-brick itself has a button, however, it may not be the most suitable or convenient to use, depending on where you have the light-brick in your model. Up to this point, I’ve seen three methods interacting with the light-brick’s button in official LEGO sets. The first method is an extension. In the #10237 LEGO Lord of the Rings Tower of Orthanc the chandelier can be pressed up to trigger the light-brick’s button. This is great a great solution since the extended reach also means that your hand won’t be in the way of the light effect. However, building such an extension can take up a lot of room that you may not have in your model.
The second method is more of a gravity fed technique. The light-brick is placed vertically with the button on to, and is held in place by whatever is built around it. All you need to do is place something on top of the button to trigger the light. This is how the #21117 LEGO Minecraft The Ender Dragon set is lit up and in general is a very easy technique. However, the technique is limited to placing the light-brick in a vertical position, and not something you can use if you want to light to shine sideways.

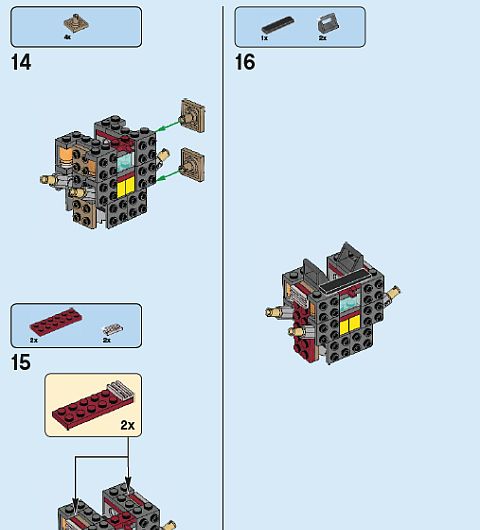
The third method is to build a semi-rigid cover for the light-brick. This is the technique you will find in the #76105 LEGO Super Heroes The Hulkbuster: Ultron Edition set. First, you build a little excess room for the button (in the case of the Hulkbuster this is a bracket which is about half plate thick). The result is that whatever is placed over the button won’t trigger it, but is still close enough to touch it. Then, you add locking finger-hinges. Unlike bars and clips, the locking finger-hinges can maintain a specific orientation and not slip easily, but they are still able to move. When you put everything together, you end up with a trigger cover that only needs the lightest touch to activate.
➡ LEGO RUBBER FEET TECHNIQUES
Generally, LEGO models aren’t things you worry about sliding around. However, the #76105 LEGO Super Heroes The Hulkbuster: Ultron Edition set features a heavy and tall mech suit that stands on a smooth platform. This is kind of a recipe for disaster if you think about it. Fortunately, LEGO designers foresaw this, and they added rubber elements both on the bottom of the Hulkbuster’s feet and on the bottom of the platform it stands on.
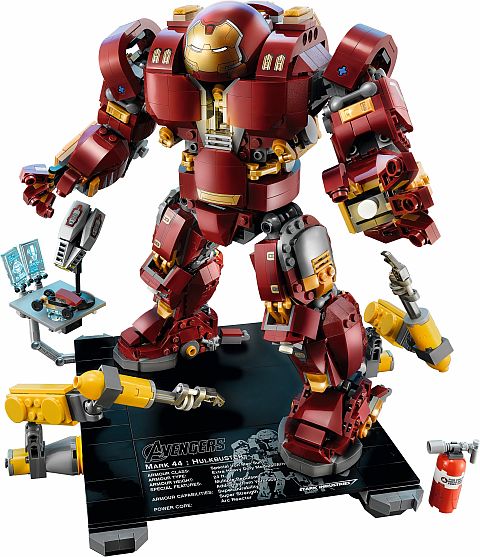
The technique to do this is remarkably simple; just mount a rubber tire sideways and you’re done. While the method is easy, you do need to keep a couple of things in mind. First, the tire will need to stick out far enough to be the first thing that touches the ground. After all, the rubbery non-slip surface of the tire won’t do any good if it can’t touch the surface.

Next, you may want to determine how the tires should operate. In the case of the platform, the tires are the feet, so they just need to be all even and spaced out enough. In the case of the Hulkbuster’s feet the tires are only there to provide just a bit of traction, so you probably don’t want to exceed more than half a plate’s thickness. It would also be helpful to make the bottom of the feet slightly flexible so they can actually touch the ground. The Hulkbuster achieves this with the two back struts of each foot mounted on ball-joints (meaning, they can touch the ground in any position).
An alternate method to this technique – which some may find a bit easier – is to use tires in their normal position. However, in this case, you will need to fix the tires in place so they can’t roll, or at least heavily restrict their movement. A good piece for accomplishing this is the black LEGO Technic pin with friction ridges.
➡ EXPERT LEVEL MECH BUILDING WITH LEGO
I’m not a mech aficionado so I don’t build many of my own mechs, but I did build a good number of them from official LEGO sets. In general, they come in two flavors; beginner level and expert level. The #76105 LEGO Super Heroes The Hulkbuster: Ultron Edition mech is definitely in the expert level category. Let’s compare some of the differences between beginner and expert level mechs, using this set as an example.
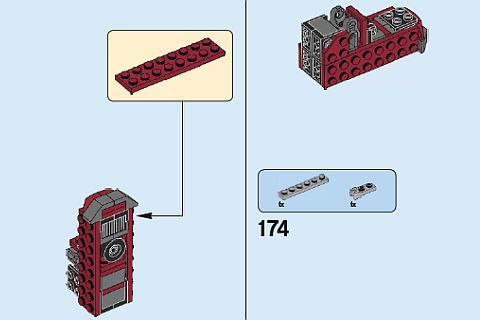
Looking at the torso, beginner level mechs typically use sideways building techniques with the back of the mech as the bottom and the front as the top of the build. This is a relatively simple way to reinforce key areas while keeping the nicest details at the front. In an expert level mech, the bottom of the bricks is typically around the hips with the head and shoulders as the tops. This can lead to a few tricky areas to reinforce, but once you build a few mechs like these, it’s easy to get the hang of it. As for detail work, an expert level mech will leave tons of studs open by the use of modified bricks and brackets.
Moving on to limbs and joints, beginner level mechs usually only focus on making sure that the joints move correctly. This means you often see simple exposed joints, which are easier to build, keeps the limbs lighter, and does not require complex reinforcements. And just like with the torso, you’ll most likely focus much of the fancier details towards one direction with the occasional sideways flair. An expert level mech is more likely to use stud covered blocks with joint connectors on their ends. This is because most of the detailing will come at a later stage. When building the joint, the main concern is to make sure that it is strong enough to handle the weight and size of the mech. This is where LEGO designers often choose redundant joints or even fixed angled limbs that only look like they can bend.
From here on out, a beginner level mech is most likely done, and you’re already playing with it. For an expert level mech, the functional needs of the model should be done at this stage, and the detailing can begin. Detailing an expert level mech is much like sculpting with layers added to the exposed studs on the already built skeleton. It may be hard to see what I’m talking about when you are building the #76105 LEGO Super Heroes The Hulkbuster: Ultron Edition set, as much of the detailing is added while working on each body part. However, if you are interested in how to design such a mech in the first place, try to see the underlying skeletal structure.
➡ WRAPPING WITH LEGO
Fancy machines can have some pretty slick lines. This may not be the easiest thing to recreate with LEGO parts, as they don’t hug curves very well. However, this set has a ton of curves and some really great lines that aren’t just made with specialty slopes. Don’t get me wrong, there are lots of special slopes here too, but some of the curves you find are actually brick built.
The technique I refer to is what I call wrapping. It’s a fairly simple process that involves two small sections that are connected by a hinged section. For the most part, the hinge is nothing more than a bar and clip. It’s important that the elements are small, since clip and bar connections are not known for holding a lot of weight. Plus this technique is more for accenting rather than creating something solid.
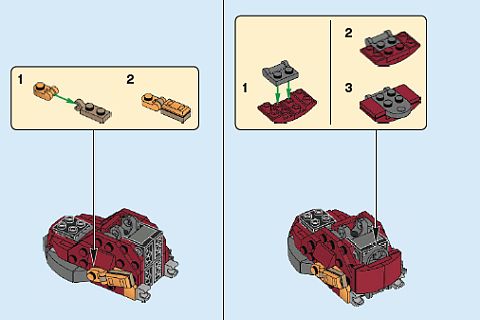
The next step is to attach one of the two ends to some part of your model. This is often a studded section. If you want a more extreme angle, you can just attach it to a single stud. Again, this is a good reason why you should keep the two connected parts fairly small, or at least lightweight. Then with the remaining section that is hanging off, just bend the hinge and wrap it around wherever you wish! The Hulkbuster uses a lot of wrapping techniques to give it a seamless and rounded look; over the shoulders, under the armpits, above the waist, and on the feet. Study these sections and you will appreciate more how effective this technique really is.
➡ APPLYING WHAT YOU LEARN
Personally, I have only built one of my own models using a light-brick, and I didn’t find the process easy. Part of the issue was that I wanted to put it in a creation that was too small for the light-brick. Then, I made it hard to take the light-brick out, and if that wasn’t enough, I tried to indirectly shine the light. The end result was okay, but I think I would have been much happier if I would have known the techniques discussed here. Control the aperture, control the button, and if you can get to the light-brick easily, all the better.
As for rubber feet, I recommend using them when two conditions are present. First, if you are building a model that is meant to be picked up, and second, if the base of the model can’t be too large. If you have both these conditions, you may consider if rubber feet would help.
I really like mechs, but I always felt intimidated by them. Mostly this has to with not knowing where to start. Plus, I don’t want to be stuck building beginner level mechs, even though I probably should. I hope that by pointing out the skeletal structure of the Hulkbuster will help all of us create much more sophisticated mechs.
And finally, the #76105 LEGO Super Heroes The Hulkbuster: Ultron Edition set has shown me how effective wrapping can be. The last time I did something similar, I tried it on a large scale with a greenhouse. And yes, it worked and looked pretty good, but that approach has less practical implications. The way it is used in the Hulkbuster is really the way to play with and expand the technique.

What do you think? How do you like the Hulkbuster: Ultron Edition? And what do you think of the techniques we discussed here? Have you tried building your own mech before? What challenges did you run into, and what worked for you? Feel free to share your thoughts and discuss in the comment section below! 😉
And you might also like to check out the following related posts:


Very interesting review and lots of techniques to study. The skeletal building could be used for a mech customizer set, similar to the Brickheadz Go Brick Me. I wish Lego would make smaller lightbricks so they are not so big and awkward.
Oh, yes! Smaller light-bricks would be amazing! Wireless too! One can dream! 😀
Weren’t there third party companies making wireless light bricks?
You’re probably thinking of i-Brix. They had a Kickstarter campaign raising fund for making wireless lights. The campaign was successful, and they are now working out the details to bring the product to production. I’m in touch with Dustin (the creator) and he just told me yesterday that they finally got FCC approval. The next step is to line up all of the parts for manufacturing. I believe BrickStuff is also working on the possibility of releasing wireless lights, but they have to jump through the same hoops and loops as i-Brix. So yes, something is in the making, but nothing on the market yet.
That technique with the rubber tires is interesting. From your experience, how effective is it at keeping the Hulkbuster stationary on the stand?
I will have to ask William to answer that, as I don’t have the set.
These large mechs are amazing. The Hulkbuster is not my favorite, I prefer the Ninjago Movie mechs, but I’m very glad that Lego really got into mech building.
Yeah, we got lots of mechs recently, didn’t we? Some are better than the others, but they are always great fun! 😀
One great thing about lego’s mechs is that they offer lots of opportunities for customization. This way they are more interesting than houses, cars, or some other sets that are more based on reality. It’s great to see so many mechs in the last few years!
Very true. Mechs are some of my favorites as well, and I often spend months customizing each one.