

(Written by William)
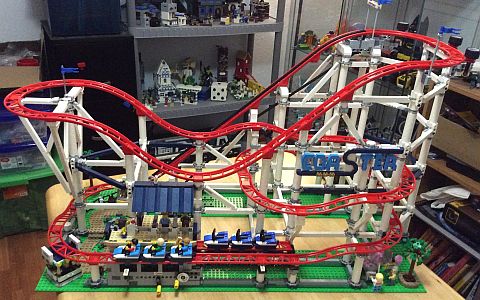
Ever since the LEGO Creator Fairground sets looked like they were going to make up a regular series, I was eagerly looking forward to each new addition, and I was also secretly hoping for a roller coaster. To fuel my hopes, the background graphics of the previous LEGO Creator Fairground sets featured an amazing roller coaster, so you could say that the #10261 LEGO Creator Roller Coaster had years of hype and dreams to live up to. 🙂

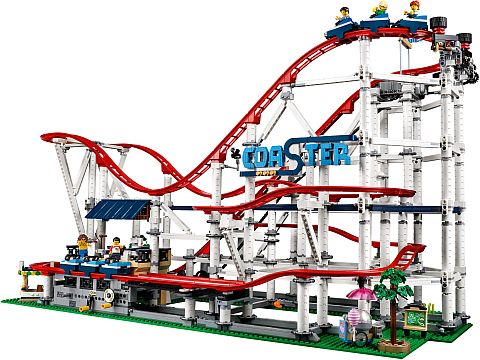
After building the set, I’m happy to say that the #10261 LEGO Creator Roller Coaster more than delivers. Not only it’s massive in size, but it’s a blast to play with, and it also demonstrates building techniques I haven’t even considered. All in all, building this set was an interesting and engaging experience full of delightful surprises. And, the end result is a very impressive and dynamic display piece. In fact, this is now my favorite LEGO set, even above the #75192 LEGO Star Wars UCS Millennium Falcon. That’s how good the LEGO Creator Roller Coaster is!
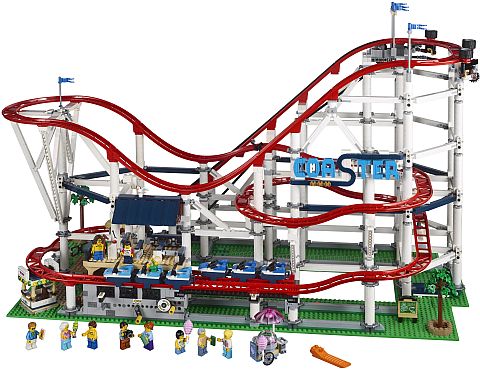
The only thing that might bother some LEGO fans while building the set is the number of pillars you have to put together. But just looking at the box, you should know what you’re in for. I would also note that the set does a fantastic job drawing the eye away from some of the more mechanical aspects of the model, while giving you fun details, like the park map, lost hat, and the many “NO” signs. This was also the first time I noticed that the park employees are wearing LEGO-branded clothing, so with all the LEGO Creator Fairground sets released so far, we are literally building a LEGOLAND amusement park! Now, let’s talk about building techniques…
➡ BUILDING STAB LE VS. STURDY WITH LEGO
Normally, when we build something sturdy, we also mean stable. Creating something that doesn’t fall apart and has both qualities is a good thing. However, there is a slight distinction between the two, and the LEGO Creator Roller Coaster gives us an example of how to use one quality and not the other.
To be clear, I refer to something as sturdy when it won’t fall apart. A sturdy model can also support a lot of weight, and it’s designed to resist (or absorb) certain types of impact such as lots of play or repetitive motion. In order to achieve this, most of the times the model has to be stable as well. When I refer to something as being stable, I’m pointing out that it has a strong support structure that will prevent it from falling over. Or, it has a durable framework that keeps it rigid and maintains its shape well. The LEGO Creator Roller Coaster is a great example of how something can be stable without needing to be sturdy.
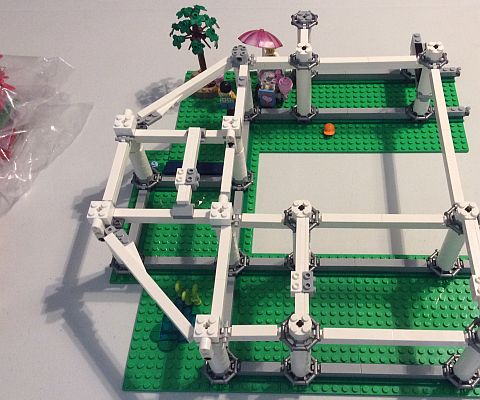
As you can tell, the LEGO Creator Roller Coaster has a very open design, and pillars are used to keep the tracks up. If any of the tracks get misaligned, the model simply won’t work, so the design definitely needs to be stable, However, considering that the coaster and tracks aren’t heavy, we can go easy on the sturdy quality a bit.
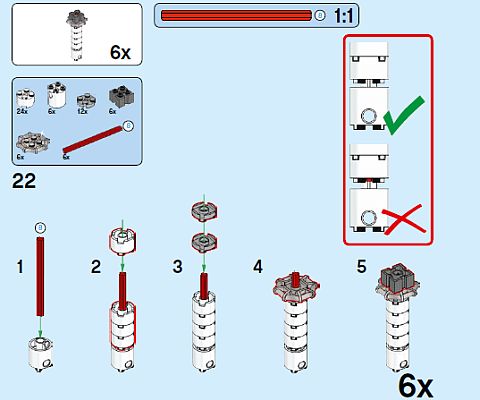
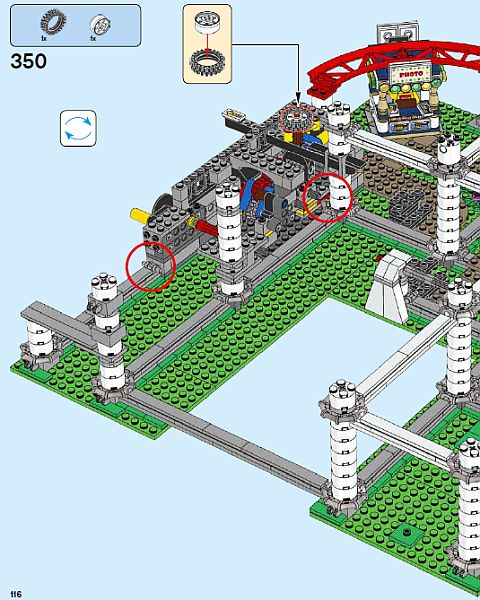
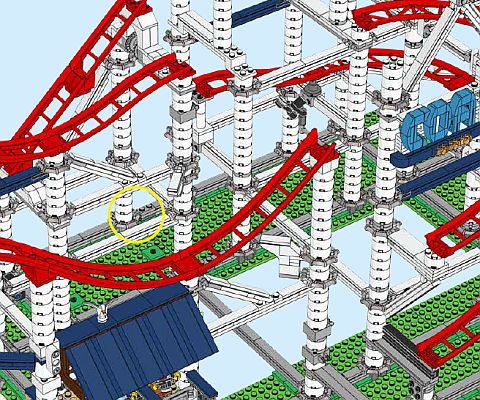
To accomplish this, several techniques are used, the first of which is coring. We saw this technique in sets previously reviewed, but as a brief reminder, the concept of coring is to gain additional stability by having a piece that can run through the core of others. In the case of the LEGO Creator Roller Coaster, LEGO Technic axles are going through a lot of the round bricks to build stable pillars.
Another technique is to use struts to interconnect pillars. This concept is pretty simple; by connecting more pillars you are creating more legs for the model to stand on. The easy rule about legs is that the more you build and connect, the more stable your model will be.
Finally, to increase stability, the LEGO Creator Roller Coaster mixes connection types. (You can also increase stability by connecting in different directions, but here we mostly have different types.) There are basic stud connections, LEGO Technic pin connections, ball-joint connections, and clip and bar connections – just to name the most obvious. By varying the types of connections, each lends its unique benefits while minimizing their weaknesses.
For example, let’s take a look at shoes. If they tie, there is a chance they can become untied. If there is Velcro, there is a chance that can become undone. Now imagine a pair of shoes that can be tied, Velcroed, buckled, snapped, zipped up, and magnetically locked. Those would be some really irritating shoes to put on and take off, but chances are you wouldn’t have to worry about them coming loose. This is because each additional fastener brings with it an inherent benefit and can rely on the other methods to help prevent what it may be vulnerable to.
Speaking of vulnerable, as stable as the LEGO Creator Roller Coaster is, I wouldn’t call it sturdy. This set is not made to handle a large amount of weight, nor is it ideal for moving around in its completed form. However, LEGO designers did address this second issue, which we’ll be discussing shortly. All in all, this is a stable, not sturdy model, which is perfect for what it is designed to do.
➡ CREATING A LEGO MECHANISM WITH TRACTION
By traction, I’m referring to having pieces connect with one another just by rubbing against each other. Essentially, the very thing a good set of tires do. Speaking of which, tires are the main feature of this technique!
We have previously talked about using tires in various unconventional ways. For example, in the #76105 LEGO Super Heroes Ultron Edition Hulkbuster, tires provide traction just by resting on their sides. And in the #10257 LEGO Creator Carousel tires power simple rotating mechanisms. In the LEGO Creator Roller Coaster, we see a technique with tires that’s a little more complex; helping to power motion rather than capitalizing on motion as a by-product.
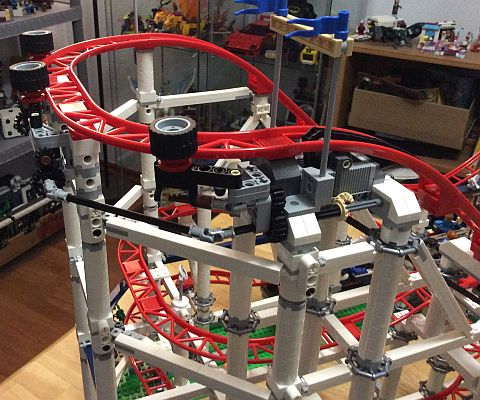
In the LEGO Creator Roller Coaster, there is a section of track that is relatively flat, so something is needed to push the cars along. In the LEGO Creator Roller Coaster designer video, it is mentioned that several techniques were considered until settling on a technique that relied on traction. The last time I saw this technique used was in the #10247 LEGO Creator Ferris Wheel, where it helps to move the giant wheel. When I built that set, I didn’t fully understand the technique or the pieces that were essential to make it work, but after seeing it again, I’m more clear on how it’s done.
The first thing you’re going to need is some sort of tire. Tires are soft, so they don’t scratch up anything, and they grip due to their material and texture. In summary, tires are ideal for traction, especially because most LEGO tires have threads, which helps with traction even more.
The tire you choose will then be attached to some sort of axle. This is how the tire can receive force from a given power source. However, there is an important part to the axle you need to consider; since there will be some give to the mechanism, the axle will need to be able to flex. This is why you add linked bushes; they allow angled axle rotation as well as moving axles to still be connected to their fixed counterparts. Keep in mind that you won’t necessarily need the immediate axle to flex. The flexing only comes into play to help deal with whatever movement you ultimately allow the tire to have.
The next component you’ll need is a shock or spring to absorb unusual textures the tire may run across. Typically this is created with a rubber band and some sort of working hinge or piston. The hinge or piston provides possible movement while the rubber band gives the much-needed resistance.
Finally, the last thing I would recommend adding is a stop to limit the movement of the hinge or piston in some way. This allows you to keep tension on the rubber band without it causing any issues. In the case of the LEGO Creator Roller Coaster, right under each tire is a second wheel hub that rests against the coaster’s track to keep the tire in the correct place.
So to recap, here’s the mechanism; a tire is connected to an axle that can flex, which is then connected to a limited moving piece that has tension, and there is a stopper (or two) to keep things aligned. All that is left is to figure out how you want to turn the moving axle and you are good to go!
Interestingly, later in the building process, you will find a slightly different approach to a traction mechanism. All the same elements are there, except that instead of the tension element being a rubber band, LEGO designers used a rubber LEGO Technic connector. This does two things; it still provides flexible motion, but it also keeps what it is connected to centered. Centering the mechanism means that it doesn’t automatically press against the object you wish to push. Therefore, we have to introduce one new element; a human operator! That’s right, in order for this version of the mechanism to work it is required that the operator provides the tension in order to complete the needed requirements mentioned above.
➡ SINGLE DIRECTION GEARING WITH LEGO
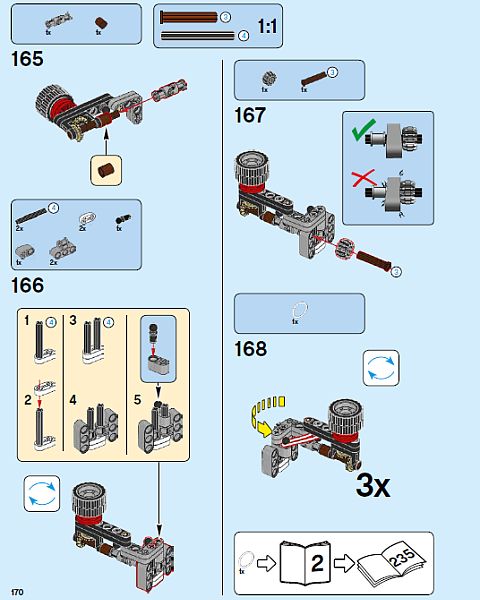
I’m the first to admit that I’m not the best when it comes to working with gears, however, I’ve always wondered if there was some way to make it so that, no matter how you rotate a crank, gears will only respond when they are moving in the right direction. Thankfully, the LEGO Creator Roller Coaster gives us a perfect and really simple example.
First, you start with a gear that will turn with a crank. Then, you place a gear that you want to turn next, but make sure it doesn’t touch the first gear. Now let’s place a gear on lift-arms that connect to the first gear. It’s important that the lift-arms are free-moving and, when the gear that is attached to these lift-arms is in the right position, it can form a bridge to the second gear.
Before moving on, let’s talk a bit more about these lift-arms and gear. Because the lift-arms are free-moving, they will move with the gear due to general pressure exerted by the first gear. So, if the first gear moves clockwise, it will also move the lift-arms clockwise. This is because the lift-arms put up no resistance to that type of movement. The other gear will still turn, but it is the lift-arm movement that’s important.
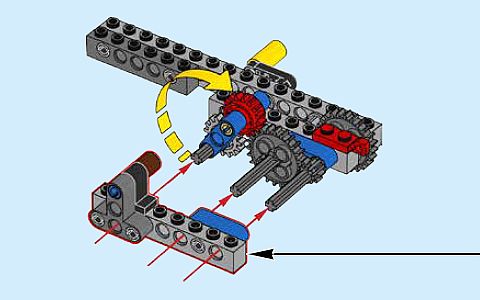
Now back to the build; once you’ve made the bridge to the second gear, you will need some sort of stopper to prevent the lift-arms moving too far back. Ideally, you want the stopper to be just far enough for the gear bridge to disengage. Once you have that, you’re done! Turn the crank one way, and you complete the bridge and activate the gears. Turn it the other way, and the bridge disconnects causing absolutely no movement. And this is how you make a mechanism that has single direction gearing!
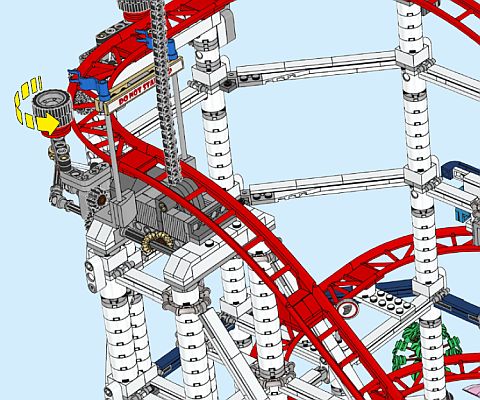
➡ BUILDING A LEGO CHAIN DRIVE
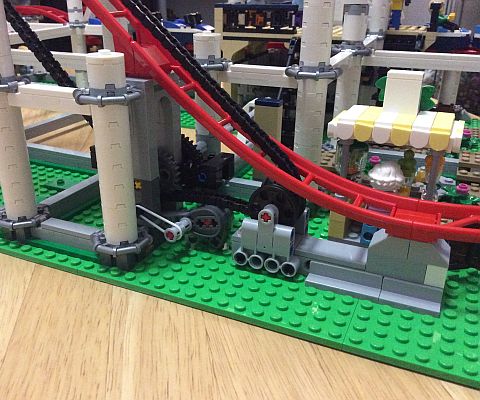
Throughout the building process of the LEGO Creator Roller Coaster, you get glimpses of where the chain will go, but some parts of it just seem like a mystery. Especially the cams (they look like teardrops). But once you attach the chain mechanism, you will see that it’s rather plain. However, even though the basic function and hooking up of the chain are simple, the mechanism does have a couple of oddities that may be worth mentioning.

First up is the top gear section. Here, you’ll build a gear surrounded by two reels, really close to a sideways minifigure head. The only purpose of the minifigure head is to make feeding the chain through a tight fit. You’ll actually need to turn the wheels to move the gear, which needs to grab the chain in order to get it past this point. The reason for this design choice is rather clever; 200+ links is a lot of chain to play with. If the chain was loose, it could get tangled, slip, or otherwise be a pain to deal with. The pinching action acts as if you had a free hand holding the chain and making things run a bit easier. Just the thoughtfulness of this foresight in building is rather remarkable.
The other part of the chain-drive that is interesting is down at the bottom. Here, you have all the basic gears and an oddly shaped lever. Once again, the cam pieces make an appearance, but this time they are pointed down. It isn’t until the end of the building process where you place a rubber band on this part, which pulls it up. The goal is to place just a slight amount of pressure on the chain while still allowing it to run without snagging. The purpose of adding just a bit of tension is to allow the roller coaster cars to more dependably catch onto the chain. Turns out, a straight chain is much more useful than one with a lot of slack. Tightness also prevents the chain from bunching, which could slip it off its gears.
➡ MODULARITY OF LARGE LEGO MODELS
I mentioned earlier that I will talk about the modular capabilities of this set. Keep in mind that modular doesn’t mean mobile. Although the LEGO Creator Roller Coaster is built in a modular fashion, once it is finished and put together, it’s not something you would really consider taking apart.
The LEGO Creator Roller Coaster belongs to a rare class of LEGO sets that is built in modules, which are then connected with a mess of other parts. To give you an example, once you are at the end of bag #10 and start bag #11 (the final bag) you’ll need to attach the left and right sides of the roller coaster together. You start with some finger-hinges and clips at the bottom. Next, you move on to some horizontal crossbeams. Then, a whole double track section is added. This is followed by three different track sections, and finally the chain. Honestly, the chain alone would discourage me from ever taking this set apart, as they aren’t friendly to fat fingers.
Building in modules is all about how to put together a very large model It’s a daunting task to try to make something the size of the LEGO Creator Roller Coaster as a single built structure. Thankfully, with clever planning, you don’t have to solve every one of your issues in one go. Building in a modular fashion means that, at some point, things will connect, but you can devote real time and focus to a smaller section.
I’ve built a few large LEGO creations in the past, and I can say from experience, that your model will look better when you can break up the building process. In smaller portions, you can focus on and incorporate more details, rather than trying to figure out how you are going to span a really large gap. Ultimately, the larger of a model you build, the more likely it will have large plain areas. This is not always bad, but your model can be more impressive if you focus on smaller modules at a time.
➡ APPLYING WHAT YOU LEARN
We covered a lot of techniques while talking about this set, so let’s try to summarize. When you are building something big, stability is a must and durability can be a nice bonus. But, if you’re looking for stable, try varying the types of connections you use. Studs, LEGO Technic pins, clips with bars, and finger-hinges are just some options to mix and match to make your project more stable.
When it comes to traction, it is probably the least likely option you’ll think of when wanting to build something with motion. But this technique has one key feature most other techniques don’t have; forgiveness. It is one of those mechanisms where you can be close, but not perfect, and it will still work. It never really makes a solid connection, but it doesn’t have to. It forgives the sloppy builder by being dependable and rather uncomplicated in how it makes things move. Granted, you do need a lot of parts to make it work the best, but it’s worth the effort. Even the LEGO designers of this set thought so.
Probably the coolest technique I learned from the LEGO Creator Roller Coaster is single direction gearing. It is simple to build and has a good array of uses for builders. It is one of those techniques you can use to ensure your machine runs smoothly, and can’t be run backward, which may jam the mechanisms. Granted, it may take a bit more space, but you only really need it in one or two places to see it work properly.
Let’s face it, most of us have very little experience with chains in LEGO models (unless you’re a LEGO Technic fan). So, it is nice to see some simple but interesting elements to add to a chain design. Dealing with a long chain may mean a tight feed is required, and finding a way to add slight tension to the chain may help in its operation. I will say, discovering this technique is making me take a second look at some of the LEGO Technic sets I haven’t considered buying before.
Finally, there is modularity. In the past, I’ve built a skyscraper, a football stadium, and a convention center, all of which had a fairly big presence. In building those, I found the more I could break down a model into smaller elements, the better it looked. However, the LEGO Creator Roller Coaster brought a new aspect of modular building for me to consider; making a non-mobile modular set. Ideally, this would be for a centerpiece rather than something I’d take to display at one of the LEGO conventions, but I can imagine at some point down the line I may just want to build something truly massive and this is the technique I’d use to get it done.
What do you think? How do you like the LEGO Creator Roller Coaster? Do you have the set already? What was your experience with the building process? And How do you like the techniques discussed here? Feel free to share your thoughts and discuss in the comment section below! 😉
And you might also like to check out the following related posts:


The wheeled traction system to push the cars along is probably one of the most interesting builds I have seen. Thanks for breaking it down how it works.
Seeing all the wheels chained together is especially interesting. Definitely gives a bit more possibilities when the traction system can be expanded.
I would like to build this set just to see the techniques, but it’s so big, I won’t have anywhere to put it. I had the understanding that the set was fully modular. Thanks for clearing up that it isn’t.
This was something I was expecting as well. Unfortunately there is nothing that lends itself to an easy modular/mobile system.
Now that’s not to say you can’t, but it would require a much larger time investment on the fan’s part to figure out what could get moved around
I think what was originally meant is that the tracks themselves are simple to use. Each has a one-by-two plate connection point on either and and will just need to rest against another piece of track. With that said, by the time you line everything up, give the structure enough stability, make sure it looks good, and can still work? You’ve lost any easy modular setup that might come from just sticking tracks together.
I would love to play around with that chain drive mechanism. Are there any other sets that use the technique?
I understand how the columns are strengthened by technic axles, and how the connections between them also help, but how are they locked into the baseplates?
Seems to be by regular clutch, judging from the images.
I will let Will respond to that, but it seems like the columns are also braced together at the bottom.
I keep looking at this set. I would have never imagined that such a complex construction is ever going to be available in a retail set. I don’t know what else could top this. I agree with William, this is even better than the Falcon!
My set went together well. I used the technic motorized system to run it. At first it everything ran smoothly. After several runs, the tracks kept pulling apart under the chain. I cannot keep the tracks all together now, whether or not the system is running. The coaster cars get stuck going up as soon as one join loosens, when I tighten the loose join, another one loosens. Short of gluing the pieces together, I can’t figure out a fix. Help.
Bonita, I alerted William about your question. He should be able to let you know if he ran into any similar issues and maybe give some suggestions on how to fix them.
Hmm, the most likely candidate for this problem is whatever surface you have the set on.
I’ve had similar issues with my roller coaster only to discover that my table had a dip in it which caused stress on the parts which in turn caused gaps.
To check if this is your issue you may need to get a level and check the surface of your table, platform, or whatever you have the set on. If that is the issue you can try strengthening the flatness of the table by adding a board. This can then be adjusted by adding something to the underside of the board to make it perfectly level.
The other issue I’ve had is if one side of my table is just slightly higher then the coaster won’t travel smoothly on the track and just stop.
From what you are describing you might have a high spot in the center of your set which is causing the pulling apart of pieces. Once you double check your surface you will then probably need to re-press the set.
Starting with the ground level you’ll want to add pressure to all the supports to make sure the connection points are as tight as possible. This will be a tedious process since it will probably be undetectable where all the gaps are. But if enough exist it can also add up to a problem for the upper most parts, which in this case is the track.
Of course, that surface needs to come first since if you don’t find out what caused the initial separation it’ll just keep happening. Honestly, this is a common problem for larger models. The stress of a large frame has bigger impacts than compared to smaller sets. Many times I will go through and do a bit of maintenance on a set.
Another preventative measure that can be taken is to make sure your set is in a temperature controlled area. Major changes to the model due to hot and cold temps can also cause separation.
And lastly, if you have a level surface, re-pressing doesn’t help, and your display is in a temperature safe area, it may require a complete rebuild. It’s not fun by any stretch of the imagination, but it can be the most certain way to make sure all your connections are tight.
I hope any of this can help. Just to let you know, recently the chain on my coaster snapped and all my track is till in good shape. So it doesn’t take much for shifts and expanding parts to really mess with this set.
Thank you. My coaster is on a large sheet of foam core board and it’s possible when I pressed down on connections, I may have made dips in the surface. I will try all your suggestions and let you know what works.
Good luck!
It is too bad that foam core is so flexible and yielding. It is a nice cheap way to make a clean surface.
I use a solid wood table and I can still have issues. You may want to see if you can get say a sheet of clear plexiglass since it should be fairly rigid and not too expensive. Chances are you may have a local company that can custom cut a piece. That’s if you’re having trouble getting a leveled surface.
And if you really want to go fancy you can see what table toppers are out on the market.
Again, best of luck!
Thank you so much for your advice. I was getting very frustrated.
Your advice was spot-on. I moved it to my computer desk with a Formica surface, re-pressed all the connections, and it runs great. I’ll look into getting a thick sheet of plexiglass cut for it because I’ll have to move it for my big LEGO Christmas village and carnival display. Then I have to box it up and store it.
Bonita, really glad to hear Will’s advice worked for you! Thanks for the update! 🙂
Hey! Glad that worked! 😀
As these sets get larger they are going beyond the horizontal building strength for most standard parts.
The nice thing with cut plexiglass is that it’s typically easier to store and you can put any color of cloth or board under or on top of it and it looks good either way.
Cut glass also works but man is it heavy and I’d always be afraid of that thing shattering.
And that sounds like a great display!
Happy building!
Help…why do my wheels go one way and the chain go the other way ON THE ROLLERCOASTER
Lesly, I forwarded your question to William as I don’t have the coaster myself. He should be able to respond.
I’m guessing when you say “wheels” you are talking about the wheels at the top that push the coaster along.
First the chain is most likely not the issue. If it is pulling the coaster up the incline then it is working properly. Plus it is what will move the wheels. The culperate is most likely you placed a gear in the wrong spot. For instance if the gear is say put on the right of another instead of the left it can turn in the opposite direction.
If that’s the case then here’s two things to look at:
Check were all your tire mechanisms tie into where the chain meets them. This may take some disassembling. Pay close attention to where the gears are in relationship with one another.
Your other option is to examine how you built the gears for the tire mechanisms. Each should have a couple of gears. One of these could be in the wrong place each time you built the tire.
These are the only two places where you could have reversed the rotation of the tires.
The gear connections will be where one is facing one direction and the other is facing a different direction and are forming 90 degree angles.
Problem with mechanism: as the chain move up the first hill, the tires move clockwise which pushes the cars backwards. The tires need to rotate counter-clockwise to push the cars forward around the curve..How can this be corrected?
Thank you
I have the the 10261 Lego coaster and the drive wheels that push the cars are running in reverse and can’t seem to figure out how to change the rotation to push the cars. Thoughts?
Let me alert William about your question…
It sounds like one of the gears that connects in perpendicularly to the next is on the wrong side of the gear that it is supposed to be. That is the only reason why you’d have your tire assembly turning in the wrong direction.
They purposely designed the crank to only turn in one direction so it shouldn’t be on that side which means one of the gears closer to your tire is probably the culpret.
I do recall that the instructions for that last bit of the mechanism wasn’t as clear as it could be. Especially since at one point you have to drop a gear in place and hope it lines up when adding in the axle later. In fact I think it is somewhere in that part of the assembly the mistake might be since there was room to make mistakes.
Hi, just finished my coaster and the cars keep slipping on the lift chain terribly! I’m sure it’s just something I’ve done wrong but I’m at a loss as to what it is! I wish I could send you a video of the issue! It’s such a bummer to build this kit only for it not to work in the end…
.
Sounds like you might have too much slack in your chain.
If that’s the case, there will be two things to look at.
First, you’ll want to possibly remove links from the drive chain. When I built my coaster the links LEGO said to use were different than what I actually used. I ended up using less than what they recommended in order to have the proper amount of tension.
Also, it is important to point out that LEGO does provide more links than what you will need since each link is a delicate piece and can break. I recommend dettaching one section and see how many links you can comfortably take out without the fear of breaking it.
Second, this also relates to chain tension. At the base of the incline right under where the chain begins is an odd looking structure that uses rubber bands. It is essentially some liftarms with a couple of cams which are the odd teardrop shaped pieces. Built correctly this should be pressing up against your chain to help take out any slack. If it is not pressing up again the chain then it is built incorrectly.
Other small minor things you can do to help is to re-press all setions of track and pillars together as well as making sure every link in your chain is facing the same way. In other words, the little hook sections are all on the same side of the chain. I’m not sure that will make a difference, but I’ve always made sure the links are connected the same way and I haven’t had issues with the chains I’ve used.
But generally, it sounds like you need to tighten up the chain.