

(Written by William)
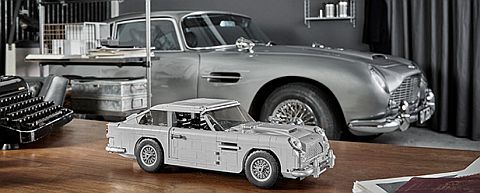
When the #10262 LEGO Creator Aston Martin DB5 was first revealed, I didn’t hear too much in the way of flattery. Many LEGO fans felt that the vehicle was too blocky, white others thought it was pricey compared to similar cars in the LEGO Creator Expert line. The negative opinions put this set lower on my wanted list. And after my lukewarm experience with the #10258 LEGO Creator London Bus, I shied away even more from trying another recently released LEGO Creator Expert vehicle. However, I was in for a big surprise when I finally had a chance to build the LEGO Creator James Bond Aston Martin! 🙂

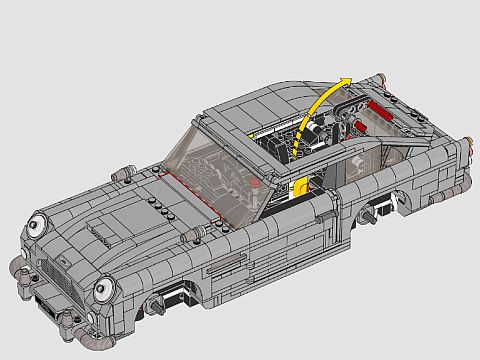
Just like the James Bond moniker suggests, this set really feels like a spy. It’s a fairly unassuming vehicle on the outside; nice and clean lines, but it doesn’t really stand out as anything unique. However, when you discover what’s under the skin, you will be amazed! The set feels more like it was engineered rather than built due to its exacting specifications. I’ve never felt so out of my element while building this set. There were many times I thought I knew what I was building, only to find out how completely wrong I was. This is a truly complex set, and it definitely earns the 16+ age rating. Therefore, instead of breaking down individual mechanics like I normally do in this Brick Breakdown series, I want to talk about how a system of mechanics can come together and create something special.
➡ BUILDING A SYSTEM TRIGGER WITH LEGO
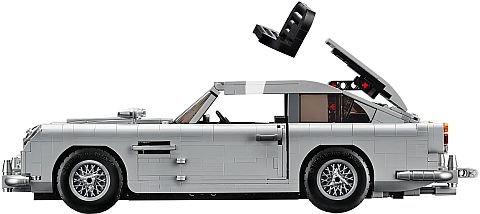
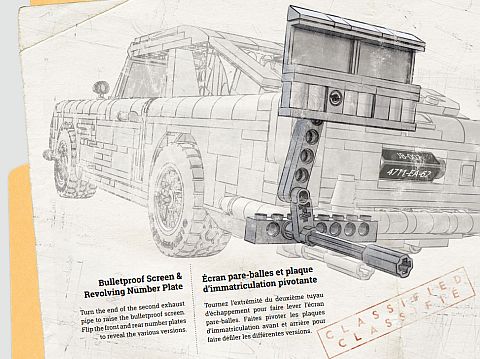
This set has an amazing array of surprises. From flipping license plates, to machineguns in the front, to a bullet shield in back, this set just keeps giving. But the most intricate of all the mechanisms has to be the ejector seat. We will use this as an example for building a triggering system.

First, we start with the trigger itself. This is the part of the system that the end user will interact with. There are actually two places you can start from when building a trigger. Either you can figure out what it needs to interact with, or how the user interacts with it? Let’s start with the latter, just so we have somewhere to begin.
When building a trigger it’s important to consider how it looks from the outside and fits in the overall model. You can have the trigger hidden, or plainly visible. This second option is more common in official LEGO sets. Another consideration when building a trigger is to make sure users can easily access it. In the case of the Aston Martin, the center of the back bumper is where you will access the trigger. On the underside of the bumper, a space was cleared out so your fingers have plenty of room to tug on the bumper. Additionally, the round end of the bumper rotates which makes the trigger easy to release.
Moving on to the other end of the trigger where it interacts with the rest of the play-feature, you need to figure out what is needed to operate the middle portion of the system. Most of the time, this is all about figuring out how to reinforce this part of the trigger, since it usually goes through the most use. The ideal is sturdy yet flexible. This part of the trigger is usually buried inside the model, so you don’t have easy access to it.
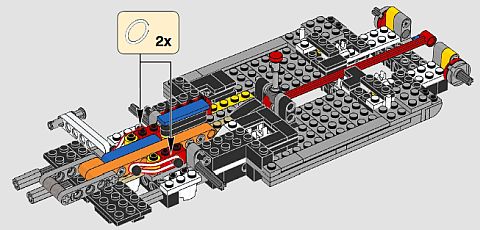
The final part of a trigger system that is important to figure out is how the trigger resets itself. In this model, a couple of rubber bands are used. There are also LEGO Technic beams installed to create a smooth surface to make sure the trigger doesn’t catch. The other most common forms of reset involve using gravity or a manual reset. For instance, the gear shift operates the machineguns in front. It requires a manual shift between two states as its form of reset.
➡ TRANSLATING SYSTEM MOVEMENT WITH LEGO
Once you trigger a system, it’s time to translate the movement you have to the movement you want. This could involve redirecting the motion, splitting up the motion, or just changing the motion from rotational to linear. This last example can be found in the rear bullet shield. You twist one of the tailpipes and the shield can then move up or down.
As for the other motions mentioned above, the ejector seat does both rather distinctly. When it comes to redirection, it not only pulls the roof back, but it also launches the seat. Each of these mechanisms use a series of levers that change the forward and back of the trigger to something a bit more tilted. And for the splitting, it uses the release of the trigger as a second action. When you pull back on the trigger, all the levers make it so that the top section moves backwards, thereby controlling whatever is on top of it.
After the trigger is fully pulled back, you release it and it acts like a hammer. This new action slams into another set of levers which forces the chair straight up the guide axle located inside of it. You can see the mechanism in action at about the 10-minute mark in the video-review by JANGBRiCKS included below.
This translation was so unexpected that it took me a couple of minutes to realize just how it was supposed to work. I thought the reset for the trigger was to make everything look nice. I didn’t understand that the force of the rubber bands were necessary to work the additional mechanism that was split from the first. Now, you don’t have to be this dramatic with how your system splits movement, but it was a real treat just trying to figure out what was supposed to happen.
➡ THE RESULT OF A WELL-BUILT SYSTEM WITH LEGO
The end result of any action seems like a natural place to finish the discussion. However, it is this part of systems that usually comes first in a design. You need to know what you want to accomplish before you can really build it. Systems don’t happen by accident. So if you need to eject a seat from a car, you have two major challenges mechanically. First, you need to figure out how to propel a seat out of a car. Next, you need to figure out how to get the roof out of the way. It’s only by understanding your needs that you can figure out what to build.

The real takeaway is that systems are best built in reverse order. First, figure out what you want the system to do, then how to do it, and finally how to trigger it all. It’s probably due to this inverted approach that only a select group of LEGO fans can build really great systems. And the ones who do are respected the world over for their fantastic designs.
➡ APPLYING WHAT YOU LEARN
There are tons of mechanisms out there to explore and try to recreate in LEGO, and there are also excellent examples built by the LEGO fan community. Finding new ways to build mechanical components will always improve your skills as a builder. And chaining complex mechanisms together will open up a whole new world of building with LEGO. Just remember that getting to this level is a process, so it’s best to break things down into more manageable tasks. If nothing else, use this as a checklist to help building your own systems.
Start by figuring out what result you want to achieve. After that, you can explore what is needed to get there. This might even mean some experimenting is in order, as you may not find any examples by other LEGO fans for the action you want to achieve. Finally, the trigger can help you make the whole thing work. A good tip for working out all these steps is to build skeletal frameworks to mount your mechanisms upon. This will save lots of time, as you don’t have to worry about other features of the project. Instead of focusing on too many things at once, you can just focus on the mechanism and figure out what size and type of space it needs.

What do you think? Do you have the LEGO Creator James Bond Aston Martin? How do you like all the hidden play-features and gadgets? Have you ever built anything similar in your own LEGO projects? Feel free to share your thoughts and discuss in the comment section below! 😉
And you might also like to check out the following related posts:


Will, you are making me reconsider this set. I didn’t like the shape initially, but now I see it as not so bad. Those gadgets make it look very tempting. And I’m curious how they were built.
I highly recommend picking it up. I definitely don’t feel like a novice builder by any stretch, but this set really made me question my experience.
As it stands, I’d put this set as my 3rd favorite set of all time. It’s only behind the Roller Coaster and Parisian Restaurant.
The action elements feel less like “Play” and more like “Functional” elements which is usually something really only seen in LEGO Technic. So having it in a System based set feels really special. Of course, it is no surprise that many of the mechanisms are designed with Technic parts.
But I am planning to take this to my next LUG meeting and hopefully convincing a few people there to take a second look.
Wow! Third favorite! That’s really high praise for the set! Thanks for sharing! 🙂
The ejector seat looks intriguing. I really like those images you got in the article. Are they from the instructions? Or from somewhere else? Lego should include images like that in all mechanical sets, so it’s easier to understand what’s going on. Some of it (like the ejector seat) looks mind-boggling. What is the process to learn how to build something like this?
Yes, surprisingly for each of the major working elements LEGO included these graphics in the instructions.
It was almost necessary in this case since many of the elements kept having me scratch my head even when they were 90 percent done.
Very cool set. Perfect for a spy. I’m just not so much into James Bond. It’s too British for my taste. But the build is very cool. Might consider it just to learn the techniques. Does it have a lot of unique parts? It might be a good idea to just download the instructions and try to build it.
There were a few Technic pieces I wasn’t familiar with. That’s not saying a whole lot since I haven’t extensively bought Technic sets.
Otherwise, the windshields are fairly specific, a flexible hose in the engine is a bit uncommon, the printed tiles that make up the grill is something I hadn’t seen before. They do use some 1x1x3 bricks for the license plates, but that is extremely a non-factor if you’re not stickering.
There is a 6×6 tile for the roof that gets removed. Otherwise there are quite a few 1×2 curved top slopes which may be a little tough to get in the quantity you need. Oh, and the round shields behing the headlights. But overall, I can’t say this thing is loaded with rare pieces. For the most part there might just be some uncommon elements.
I have this, I really think it’s dog ugly against my mustang. I’m regularly trawling the Internet looking for an alternative build for the rear end and roof.
From the wheels to the start of the windows all round the car is fine but the minute the glass starts then the roof it goes horribly horribly wrong, the creator of the real db5 would be disgusted.
I don’t care for the ejector seat and rear Sheila’s, please someone offer me a solution so I can take this disfigured thing out of the drawer I have hidden it in.
Shields no Sheila’s
Hm… sorry to hear that you don’t like the Aston Martin. A lot of LEGO fans feel like it doesn’t look the best on the outside, so you’re not alone. If I do find an alternate build for the back and the roof, I will link it here. At this moment, I can’t think of any good alterations. 😐