

(Written by William)
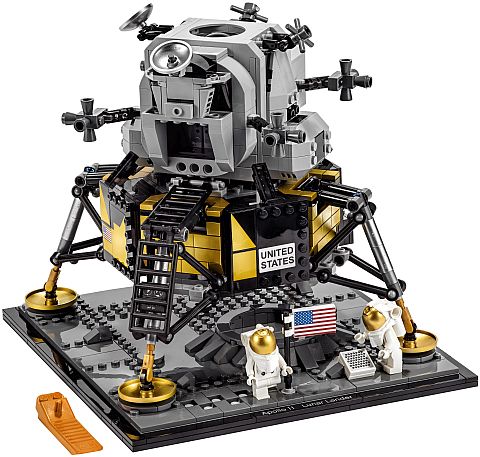
To celebrate the 50th anniversary of the first manned mission to the Moon, LEGO recently released the #10266 LEGO Creator NASA Apollo 11 Lunar Lander. We discussed the set already in previous articles (see links at the end of this post), so today we will focus on the unique building techniques. However, before we begin, I thought to share some general thoughts I had about the set after building it.

I really enjoyed the clever little details, like the footsteps leading to the flag. Additionally, the instructions are crammed with historical facts. For example, when building the red and white tanks, you learn that one is fuel while the other is an oxidizer so that the fuel could actually burn. Then, in the next steps, the tanks are covered up and become virtually hidden from sight. Apart from offering a great building experience, the set also has a good deal of play potential. The whole unit lifts off quite easily from its platform, and the return capsule can detach from the landing base. In addition, there is even enough room to fit the two astronauts inside the capsule. In the video below, I share some other overall thought about the set, and below that, we will discuss some of the interesting building techniques.
FOOT CUPPING WITH LEGO
The first time I saw something like this wasn’t in a LEGO set. Rather it was an accessory for furniture. If you wanted to stop a chair with caster wheels from rolling, you could fit them into a cup contraption to hold the wheels in place. We don’t often deal with unruly wheels when building with LEGO, but this technique still presents an interesting building opportunity.
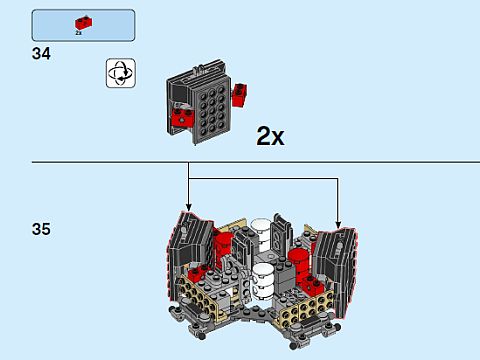
The opportunity in question would involve the idea of using rounded components as feet. In this set, the tops of dishes are used as feet. I believe this was done because they gave the right rounded look. Problem is the stud on top of the dish and the rounding of the part itself makes terrible feet. The solution to this is insanely simple; just create round rings that can cup the rounded surface of the dish. That’s it, there is no crazy advanced counting or measuring involved. If you want to use this technique, you may need to invest in some of the curved macaroni-shaped parts to get a clean circle, but even that is a personal choice.
The upside to this technique is that you can accommodate very specially designed parts in fun ways. The adaptors are also a breeze to create. The downside is that you may be stuck with having to keep those foot cups around. Also, consider that this is not a technique that has you connect anything together. The foot cups are more like adaptors that can give you more flexibility in which pieces you want to use.
LEGO BALL-JOINTS AS ANGLED CONNECTORS
Ever since LEGO introduced the small ball-joints with the LEGO Mixels line, we’ve been seeing some fascinating ways we can use them. The creation of smaller mech suits, monsters, bugs, and a variety of more organic designs have exploded because of this new connection type. However, these super flexible joints can also make some fantastic rigid connections as well.
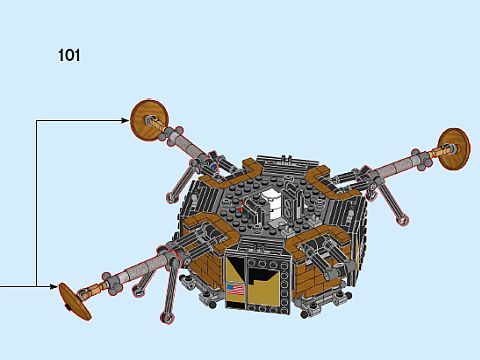
Take the base of the Lander as an example. It is built off of an octagonal plate. In other words, an eight sided plate. It is a snap to build off the cardinal directions from this plate, but if you get too far out, how do you bridge the gaps on the angled sides? I’ve seen all manner of ways that this can be done. Some creations restart in the middle, turn the internal core and build out to fill in the gaps. Others will precariously turn brackets and other things on hollow studs to create a building surface. Then still others will use hinges to create a flexible point of connection off the sides that were built out. Among these strategies, I’ve found that the hinge method is the one I prefer. It is secure and tends not to take up a lot of room or parts. The down side to it is that hinges are often designed to turn on a very exact angle. This means, if your design does not fit a particular angle then it just won’t work.
Enter the new ball-joint for the save. All the turning is handled at the ball and socket connection so it has an extremely tight radius that it can cover. Added to this, in the #10266 LEGO Creator NASA Apollo 11 Lunar Lander, LEGO designers used the ball with bar piece. By sticking the bar into a LEGO Technic brick with axle hole, they have essentially created a joint that can give or eat up slack as needed.
However, all these benefits do come at a price. You may have to work out the right way to have a socket since there are still a couple of directions they aren’t great at. And when placing one of these built hinges, you may have to do some extra adjusting to get them to fit right. Thankfully, these issues aren’t horrendous to work around, but they can be a little frustrating to a new builder. After all, you don’t have an endless range for adjustments. You will still need to measure out the distance you want to cover and get as close as possible to the areas you want to connect to. Barring these complications, this is one of the slickest ways to hinge I’ve seen in quite some time. And, if you throw in some overhanging brackets and plates, you’ll end up with an extremely polished design.
APPLYING WHAT YOU LEARN
When building with LEGO, we often try our hardest to come up with the perfect connection. This can often prove to be non-existent or really expensive to build. By understanding the concept of cupping the feet of something, we are given a new perspective. Maybe we don’t even need a full connection to make something look perfect. Perhaps, all we need is a really good idea for an adaptor.
As for using ball-joints as angled connectors, I don’t think we’ve even scratched the surface of what this technique is capable of. This model has an interesting angle, sure, but it is still on a very linear plane. What if we use these joints at different heights? What if we chain them together? The possibilities are very promising. However, I do recommend starting with this example since this will give you a good basis on how to start. Beyond that, happy experimenting!
What do you think? Do you have the #10266 LEGO Creator NASA Apollo 11 Lunar Lander? Have you built it yet? What do you think of the techniques we discussed here? Are there any other techniques in the set that you really enjoyed? Feel free to share your thoughts and discuss in the comment section below!
And you might also like to check out the following related posts:


The foot cupping is an interesting technique. Connectionless techniques are interesting in general. It’s very satisfying when you realize how pieces fit together and into each other without studs.
The small ball joints were really a game changer. I just wish they appeared in other colors.
I want to explore the angled connection with those ball joints. It seems to have a lot of possibilities. I always liked working with hinges, and the ball joints are even more versatile. I agree with Mark though. We need them in more colors.
Same here. I’m intrigued by those triangle connections. We have so many parts now that can accept the ball joints and I really need to familiarize myself with them. It’s like a whole other building system.