(Written by Geneva – gid617)
Have you ever wished that you had a LEGO brick with studs on both sides? Or a brick with anti-studs on both sides? That happens to me a lot, and I thought I’d share with you some of the techniques I use most frequently to connect studs to studs or vice versa.

We’ll start off by trying to get studs on both sides. This is useful when you want to be able to add details to both sides of a creation, or when you’re building a sideways landscape and need studs going the opposite direction for the other half of your creation.
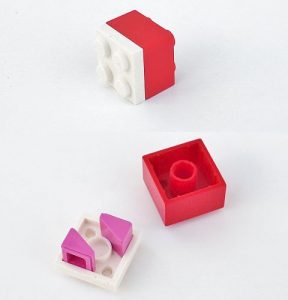
One of my favorite ways to flip studs is the cheese-slope method. This is a very smooth solution, great for times when you don’t have room to hide a complicated inversion method. Since you’re using a brick and a plate, it’s elegant from all four sides. It’s important to put the cheese-slopes in the plate first, otherwise they might get pushed all the way inside the brick. If that happens to you, don’t sweat, it’s usually pretty easy to pry the cheese-slopes out with a pocket knife or the back end of a LEGO wrench. This technique also works with larger bricks, such as 2×3 or 2×4 bricks.
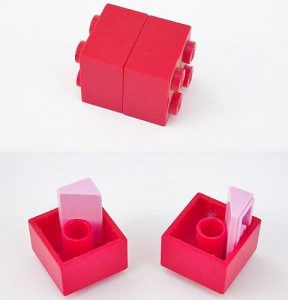
A bit of a variant on the previous technique, the second solution uses double cheese-slopes. The advantage is that the cheese sticks out of the bricks, so you don’t have to worry about it getting stuck.
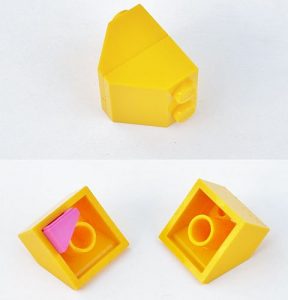
Another variant, just to show the potential of the technique: a single cheese-slope in between slopes (see below on the left). Remarkably sturdy, and if you didn’t know better, you’d probably think I’d glued the slopes together. That’s how smooth the connection looks!
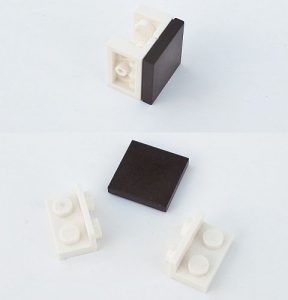
The technique on the right is mathematically quite complicated. If you just need to flip something over and the height is not important, it might be useful, but the two studs sticking out on the top make it less versatile. Still, these bracket pieces are good to keep in mind when you’re flipping studs.
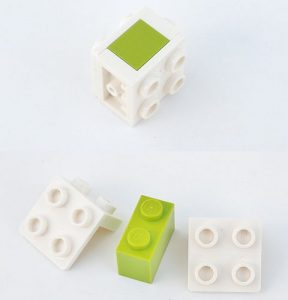
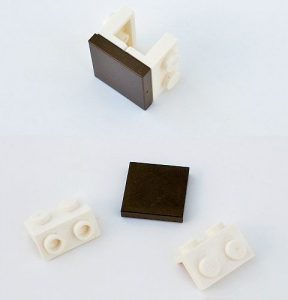
Next, we’re back with the brackets. The solution on the left is five the plates high, with a connecting 2×2 tile that could be hid in the back of your creation.
The technique on the right is one I just recently ran across. It’s simple, sturdy, and only one brick wide, so it’s great for those times when you haven’t got much wiggle room.
On the left below, we’re looking at a very interesting technique, kind of limited application, but a very thin way to flip studs. I think this may be considered an “illegal technique”. Illegal techniques are building techniques that LEGO’s own designers are not allowed to use because they stress LEGO pieces. So, you won’t see illegal techniques in an official LEGO set, (although the list of such techniques does change from time to time, especially when moulds are slightly changed). Some illegal techniques are regularly used by LEGO fans as the stress they put on parts is minimal.
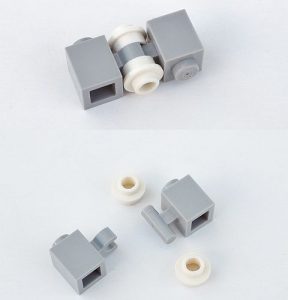
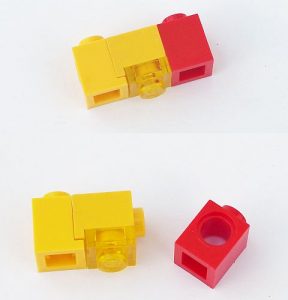
The technique on the right is another “illegal technique”. Not only is it illegal (a stud in a LEGO Technic pinhole creates stress), but for some reason this technique doesn’t line up quite right mathematically. Notice the tiny gap between the 1×1 plate and the base of the headlight brick. However, it works well in ordinary situations and if you use bricks that are the same color of your creation, you can probably incorporate it pretty seamlessly.
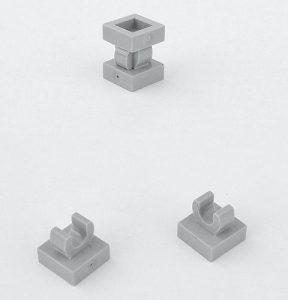
One last technique for double-sided studs is this clip method. Another “illegal technique”, this measures three studs long and is one plate thin, though the clips in the middle do impose some limitations. Of course, you could also use a clip along with a plate with bar, which would no longer stress the elements but is liable to bend.
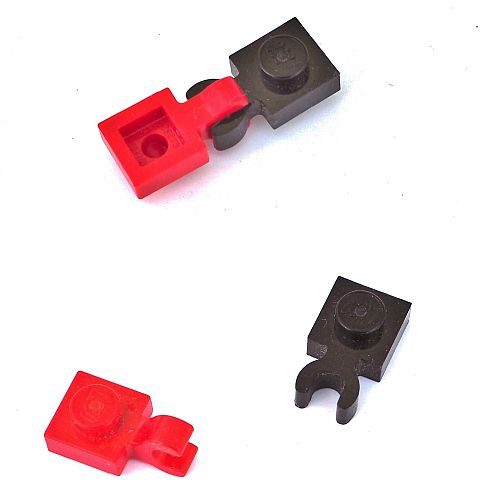
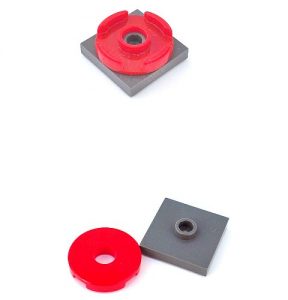
Now let’s discuss stud-to-stud connections! These are great whenever you want to stick something onto your baseplate upside-down. Maybe an upside-down tree, or tracks using anti-studs, you name it. We’ll start with a tiny connection. If you avoid pushing these two pieces completely together, you can measure for a one-brick high connection. If you do push them together, they’ll be hard to take apart afterwards. Friendly warning.
A touch higher than a brick, the second technique is elegant and has been used on its side to build medieval streets.
Another technique I stumbled upon recently is one on the left below. Height-wise it’s a bit inconvenient (1 brick + 1 plate + the lip of a headlight brick), but it’s pretty neat and maybe someday you’ll need to flip studs with just that height space in between.
Moving on to some larger techniques, the technique on the right is the counterpart of our previous five-plate high bracket solution.
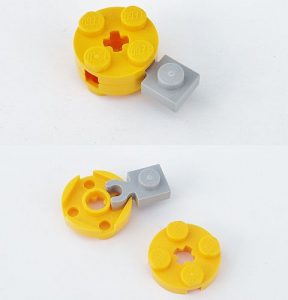
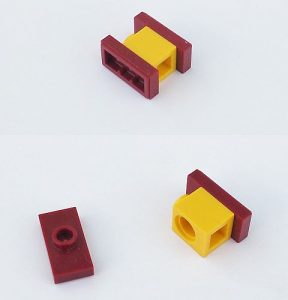
The technique on the left below involves a sideways brick in the middle. It’s another “illegal technique”, and it can be used with several variations such as 1×1 plates instead of jumpers on either side.
And, we’ve saved the best for last: the technique on the right is probably my favorite way to flip studs. It’s compact, very sturdy, and can easily be built in lots of different colors.
What do you think? How do you like the techniques we discussed here? Have you used any of them before? Are any of them new to you? Are there any other favorite techniques you have for rotating LEGO bricks 180 degrees? Any questions on how to use them? Don’t hesitate to share your thoughts in the comment section below!
And you might also like to check out the following related posts:
- Reversing Studs on LEGO Bricks & Plates (video tutorials)
- LEGO Building Technique: Inverting Studs (with LEGO Technic pins)






Wait…. what?! My mind is blown!!
Wow. Some of these are incredibly creative. And the one with the clips even looks decorative.
Thanks! The clip one is cool, but because it’s a touch higher than one brick high, it’s not as useful as it looks.
Megabloks has reverse stud plates. 1x1s and 2×2. Another way I have seen reversing studs is with Frodo’s ring. And Technic tubes are also good.
heresy!
Is there a place to buy and sell mega parts like bricklink? I would love to get some of those reverse stud plates
I also believe Cobi has released a few similar parts. I prefer Cobi to Mega Bloks, since Cobi uses actual ABS plastic.
(And possibly Oxford, as well.)
Btw, Lego apparently just acquired Bricklink for an undisclosed sum.
BrickOwl would still be an independent alternative…
Yes, those are some good alternatives. Frodo’s ring is something I’ve used now and then but it’s not quite wide enough for two studs, so the connection isn’t super sturdy. Technic tubes are great though!
You have some very interesting techniques there. That last one is perfection. I also like the one with the 1×1 gray bricks and white 1×1 studs. It’s very clever.
Thanks! I was quite excited when I found the 1×1 grey bricks one. Haven’t actually used it in a build yet but it will probably be replacing the double headlight bricks illegal technique one in the future for me.
I like the technique with the 1×1 technic brick and the two jumper plates. It not only reverses the direction of the studs, but you can angle the two sides differently. It could be useful.
Good point! And actually, you could angle the two sides differently with the last technique too.
By the way, I recall reading about a trick where you put a lever between the bottoms of two regular plates. Might not be legal, though.
https://www.bricklink.com/v2/catalog/catalogitem.page?P=4593#T=P
Yeah, I tried that a long time ago and it was too much for my patience level. XD
Thank you for sharing these techniques. I’m not an advanced builder to build in all kinds of directions, but they may still be useful. My question is, why doesn’t lego release a piece with studs on both sides? It seems it could be useful.
If I recall correctly, they found it confused kids while they were prototype testing or something like that.
Hmm, that’s interesting, don’t see why it would be confusing per se. At least not why it would be more confusing than those tiles with studs on top which are forever tricking me… 😉
But anyway at this point with all these clever solutions up my sleeve seeing a double sided official brick wouldn’t be unmixed pleasure for me. 😛
Hi, are you able to give names of each piece so I can purchase them somewhere?