

(Written by William)
Another bike from LEGO? Yes please! Having built the #10269 LEGO Creator Harley-Davidson Fat Boy (link to review at the end of this post), I wasn’t sure what LEGO could offer in the #42107 LEGO Technic Ducati Panigale V4R. It’s a different building system, but it turns out, the Ducati offers quite a lot!
For starters, the Ducati is close to the same scale as the Harley, but at $70 I find it a bit more affordable (the Harley is $100). The Ducati also features working pistons. The front and back wheels have shocks to make this bike handle rough terrain. And if that weren’t enough, it has shifting gears! This last feature really got my interest.

Of course, if you are like me, and are more used to standard LEGO System style building, you will feel a bit overwhelmed at times. Much of this comes from the different building principles of LEGO Technic. Overall, I was very impressed with the set. Plus, unlike other LEGO Technic models, I didn’t feel this one looked half bad. In the video below, I share a few more general thoughts about the set, then we will get into talking about some of the interesting building techniques that make the magic happen!
LEGO TECHNIC DUCATI – SHIFTING GEARS
It’s safe to say, the feature I was dying to examine was how the shifting gear mechanism functioned. How was it done? Was a new piece involved? What did it even mean to shift gears? I had a few questions that only hands-on experience could answer to my satisfaction.
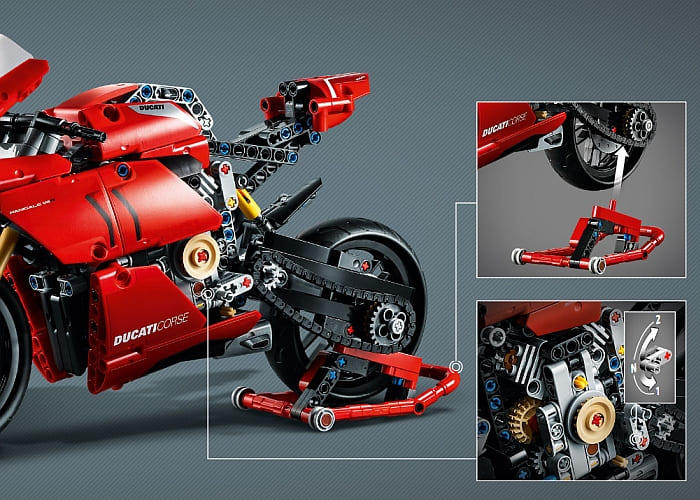
Turns out, the shifting gear mechanism was built off the same principles seen in the #10273 LEGO Creator Haunted House fairground model that we talked about before (see links at the end of this post). The lever that could release the tension of the chain is present here, and it also utilizes a piece I’ve never seen before.
The piece that was new to me is round with an axle hole in the center. Around this circular piece is a lopsided circle. Think of the rings of Saturn and you can get an idea of the general shape. The BrickLink database calls this piece Changeover Rotary Catch, and so far it only appeared in five sets (all LEGO Technic).
The image I chose from the instructions has the above-mentioned odd piece on the left of the two round elements. As this piece turns, the lopsided edge will push things from side to side. This is where the piece on the right comes into play. It has a distinct groove that the lopsided edge fits into. Most of the time, we see this grooved piece used as the center of a wheel. Turns out, when pressed into a specific type of gear it can engage that gear and start turning it.
The gears used in this instance have pin-holes instead of axle-holes. This means they can spin free without really affecting anything if not engaged properly. And that’s all there is to it. By sandwiching these special gears around the hub piece on the right, you can choose which gear to have operating.
To see the rest of what this contraption does gets a little complicated and really hard to see. One gear connects to different sized gears that make it rotate at a different speed. You can also position the hub in between the two gears so it doesn’t engage either. This is essentially like putting the bike in neutral.
The whole point of shifting gears is to make the four internal pistons move either at a slower speed or a faster speed. Sadly, just like in the Harley-Davidson bike, that action element is virtually impossible to see when the model is finished.
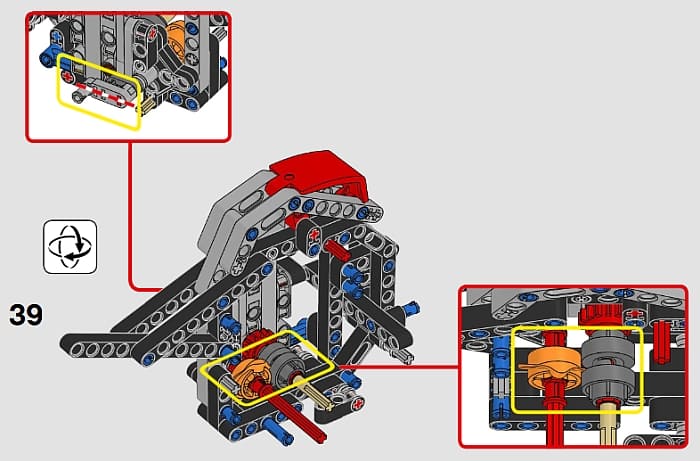
LEGO TECHNIC DUCATI – ROTATIONAL TOGGLE
So now that we discovered how the gear shifting works, the next feature is how to keep things locked in those various states? We’ve seen a version of this technique in the #60228 LEGO City Deep Space Rocket and Launch Control, but not done using rotation.
When reviewing that set (see links at the end of this post), we looked at defining specific increments. We had a piece that provided tension, an arm that acted on this tension, and regular occurring rounded elements for the arm to interact with. Believe it or not, all those elements exist in this model, they’re just expressed slightly differently.
The tension in this case is not being pushed onto the arm. Instead, a rubber band is used to pull on the arm to keep it at a specific angle. The arm that helps keep track of the increments or states is the “L” shaped lift-arm. By being able to swivel in the center, we can treat it like a teeter totter. The flexibility of the rubber band means it can move, but will generally hold a desired position. As for the rounded elements that give us measured increments, we use a LEGO Technic piece I typically seen used as an oversized gear. It has an axle hole, which gives us our rotation properties, and four ball-joints at ninety degree intervals from one another.
Put all together, you simply add a bit of pressure to overcome the rubber band’s tension and it operates! This will give you a creation that can have four distinct positions thanks to the four ways the lift-arm can rest on the rounded ball joints. In this model, the options are limited to three, since the switch on the other side of the bike would run into other pieces if you tried putting it in the fourth position.
LEGO TECHNIC DUCATI – TWO POINT CONNECTION
I must admit, when it comes to LEGO Technic models I’m still a novice builder. However, LEGO has been making Technic sets that have features I can’t ignore. For instance, I needed to know how pneumatics worked so I picked up the #42080 LEGO Technic Forest Harvester (see links at the end of this post). As for the Ducati, the gear shifting intrigued me to no end. And I’m also learning various basic LEGO Technic building techniques in the process.

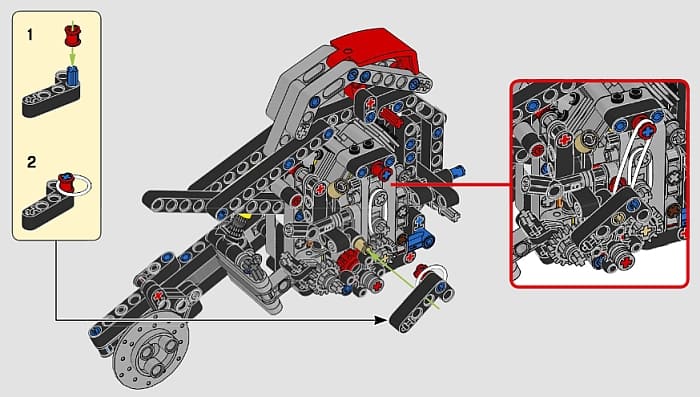
This time around I noticed that when you are building a LEGO Technic frame, you want two points of connection. The first point will let you rotate the beam or creation you have in any direction you desire. The second point of connection locks that angle into place.
I consider this technique as basic as interlocking bricks. Stack bricks together and you get lots of height. Interlock them together and you get stability. For LEGO Technic, stability is much less of an issue. Point of fact, they are also much harder to take apart than normal LEGO System pieces. So, it tracks that you will have different considerations for your most basic of designs.
With the harvester, I learned that LEGO Technic is better thought of as being built from side to side and you more often will use an odd number of parts in order to build symmetry. And, the Ducati model taught me that two points of contact is the recommended bare minimum for framing your model. This is not to say you won’t ever use more connection points. I’m also not covering the instances where a single connection point is used. Rather, I’m talking about the bones of your model. The section that gives your creation an underlying shape. For this, two points of contact seems like an unspoken standard.
APPLYING WHAT YOU LEARN
Finding out new things that are possible with LEGO elements can go a long way in improving your own building skills. You never know when an idea may come from a new functional application. In truth, shifting gears is only a small feature that turns rotational movement into something that can shift left to right and back again. Since most of the mechanical contraptions you see in real life are based on rotational motion, this technique is something that can potentially be a game changer for some.
Speaking of rotational movement, it can also be limited. By choosing the right methods you can force control onto the creations you make. The results of these applications feel much more polished and refined.
Of course, this means you will need to be a bit familiar with foundational structures of LEGO Technic to get the most benefit out of the more intricate mechanisms. The positioning of LEGO Technic framing is all based around a two connection point minimum. One pin will be the pivot point, while the other will secure the piece in place. Keep in mind, you may have to do a bit more to stabilize your design. For instance, connection points in a series, one right after the other, is the typical technique for creating structural hard points, whereas distant connections are more suited for precise positioning. You’ll need to play around with some pieces to get the hang of all of this. And don’t feel bad if you’re a bit lost. There was multiple times building the Ducati I felt out of my depth, but it was all for the better! If you’re interested in the set, it’s available at the LEGO Technic section of the Online LEGO Shop.

What do you think? Do you have any LEGO motorbikes? Did you find the building techniques interesting? And what do you think of the techniques we discussed here? Feel free to share your thoughts and discuss in the comment section below!
And you might also like to check out the following related posts:


I have first seen the gear shifting mechanism in the Land Rover. Fascinating stuff. It’s amazing they could fit it in the bike!
When I got into technic that’s what surprized me the most that everything is measured in uneven numbers. I wonder why that is.
My guess is that they wanted to build off of LEGO System and needed to find spaces to put functional mechanisms. The easiest way to do this was to either go between spaces.
Additionally, there are many times you only need one of something, like a single gear or single crank. So functionally that would lean towards odd numbered design choices.
Finally, off-setting is a major part in making room for things like gears and moving parts.
Adding all these things up, I think they found they kept needing odd numbered elements. It’s just a guess though.
I’m curious which bike do you prefer. The one purely technic, or the creator one built with both technic and system bricks.
If I could only choose one, I’d probably still go with the Harley-Davidson.
It still has a lot of Technic features so I’m only missing out on the gear shifting and extra shocks.
Though if you are on a budget the cheaper price of the Ducati can’t be ignored.
I really want to check out that gear shifting mechanism. I didn’t realize this bike had it. Now it looks much more interesting!
Don’t blame you.
The gear shifting alone took this set from a “mildly interested” to a “top of my list” set.
I have to thank Matt from The Bricks King podcast for pointing this out when we talked about it some time back. If it wasn’t for his interest in the bike and looking into it, I know I wouldn’t have known about the gear shifting.
I’m intriduged by that rotational toggle and the gear shifts. I don’t really care for bikes, but this seems to be the cheapest set with such advanced techniques.
Yeah, as far as I can tell that is the case.
Certain functional elements are usually how I choose which Technic sets I try.
It’s interesting that you say that building with technic is building sideways. I never thought of it that way, but it’s very true. Everything is connected with pins and very strong. I suppose two widths is the narrowest they can do and still able to connect parts.
Yes, Technic is very strong. For small models, the width of one brick is enough, but if you need a longer length, two is the minimum.
I like the bike but the stand need a redesign. It won’t hold my bike up so It constantly falls over.