

(Written by William)
LEGO elements, especially bricks and plates, are often viewed as being incredibly square. They create great straight lines, but when it comes to angles, you often need to hunt down a specialized facet brick or wedge plate for the job. Well, what if I told you there are ways to angle your most basic elements easily?
The answer to this building challenge has to do with right triangles. These are triangles that have one 90-degree internal angle. These are the same triangles associated with the Pythagorean Theorem. I know what you’re thinking, “You mean geometry is important in real life?” Sure is! And it applies to LEGO building, so it’s extra important!
Fortunately, I won’t require you to pull out a dusty old math text. I’ll show you some simple applications of these triangles so you can get straight into building.
PYTHAGOREAN TRIPLES
Remember that theorem I mentioned before? Well, it gives an equation that can let us figure out the length of the third leg of any right triangle if we have the lengths of the other two. That’s neat and all, but what we are interested in is the Primitive Pythagorean Triples. These are sets of three numbers that are whole and can be applied directly to LEGO building.
The reason for this is that the LEGO system is built on exact measurements. This feature allows us to use LEGO elements themselves as measuring tools. There’s a reason why we refer to a brick as 1×8, since we use each stud as a measurement unit.
There are a lot of Primitive Pythagorean Triples, but I want to focus on some of the smallest since they will be the easiest to use with LEGO bricks. They are: (3, 4, 5), (5, 12, 13), and (8, 15, 17). The two smaller numbers in each set are the shorter legs of the triangle. The big number is the hypotenuse, or the angled leg of the triangle. It is the hypotenuse that is what interests us.
So, let’s apply it and see what happens. Take a baseplate and start in one corner. Count three studs along one side and place a round plate. Then go back to the same corner and count four studs along the other side and place another round plate. You need round plates since you can’t have the studs on the baseplate run into the piece you’re adding diagonally. Now try to put a plate that is five studs long and attach it to the two round plates. You’ll find that you can’t, what gives?

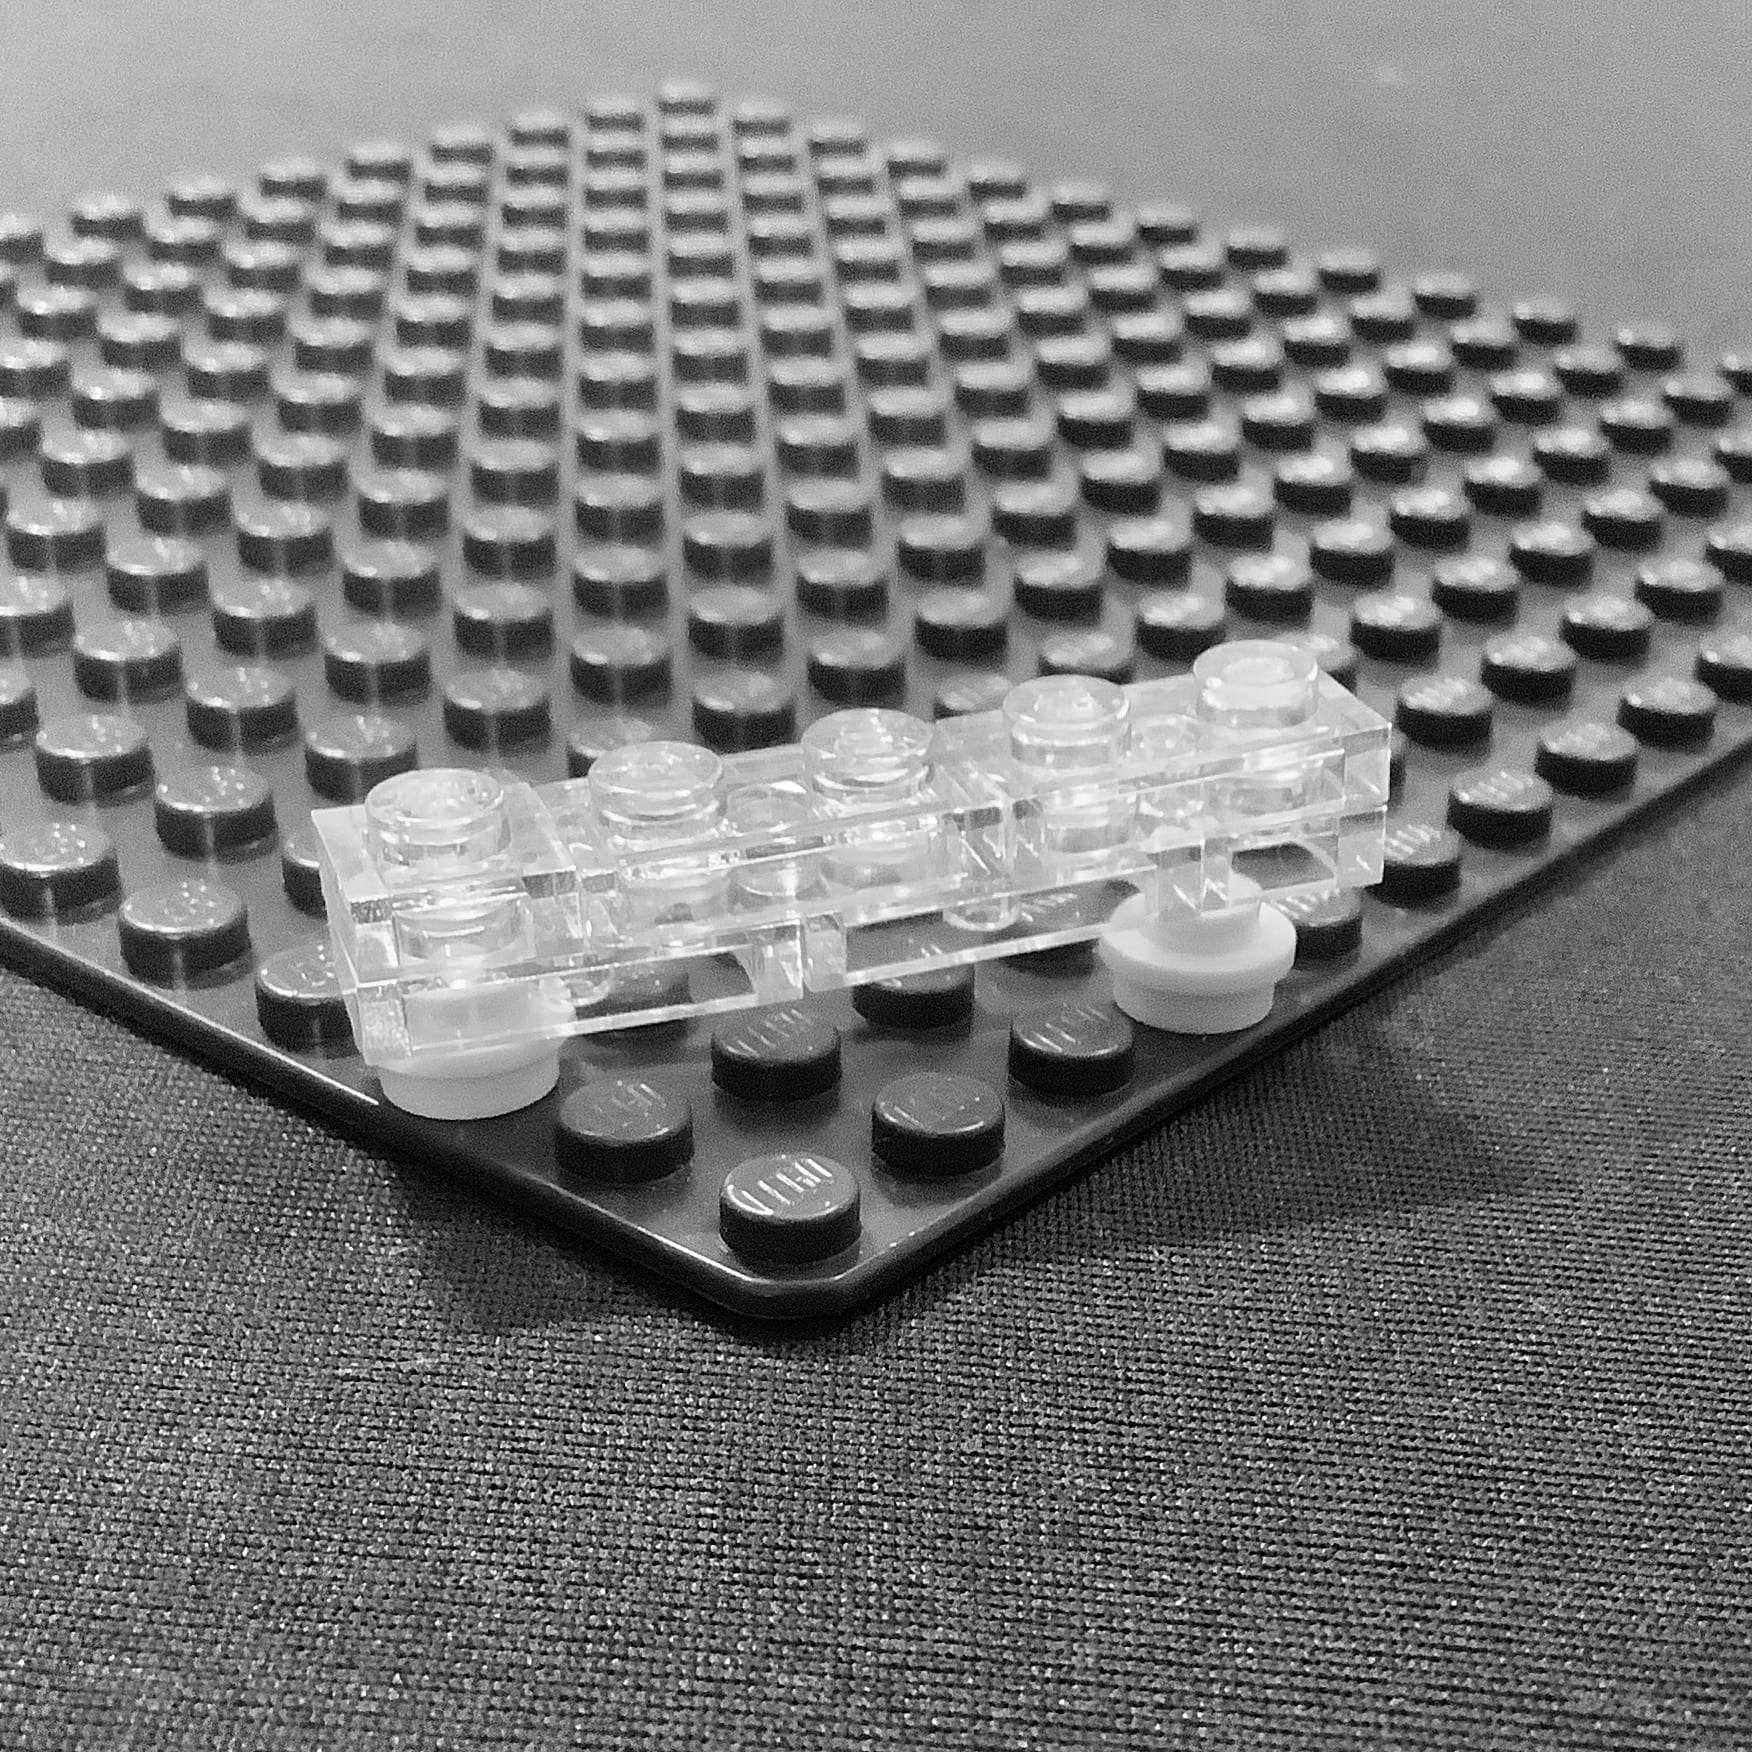
Remember how I said LEGO is built around a very specific system? Turns out you need to take into account the width of each stud as well as the space between studs. So, let’s try that again but instead of counting studs, we’ll count the spaces between studs.
Starting in the corner, we count three spaces between studs along one side. This puts us on the fourth stud so we add a round plate. Going back to the corner, we count four spaces between studs along the other side and place a round plate on the fifth stud. Now we attach a six-long piece over those plates and find it works! This works with any of the Primitive Pythagorean Triples. Just inflate all the numbers by one and it works.
Another trick is that these triples can be expanded. If you multiply all the numbers of a triple by the same number, the triple will still work. So, you might be thinking, okay I’ll take my new 4, 5, 6 and multiply it by three, giving me 12, 15, and 18. This won’t work. You actually need to work with the original triple first before inflating by one.
So, if we take 3, 4, 5, and multiply by three, we get 9, 12, and 15. Now we can inflate by one to straighten out our measurements and get 10, 13, and 16. This works. Additionally, you can put round plates under your 16-long piece under the 6th and 11th stud, since those are the other multiples of the 3, 4, 5 triple.
But what if you want to go a bit more freeform with your building? Let’s move on to another technique you can use.
USING THE HYPOTENUSE
Triangles have three points. This is where we like to have stud connections. The points will define what a triangle will look like. Fortunately, LEGO is naturally designed to make right triangles and, thanks to the concept of the Pythagorean Theorem, we know they are dependable. Given that information, we can now do something pretty cool.
Start in the corner of a baseplate. The stud in the corner is the first point of our triangle. Now count along one side any number of studs. For my example, I’ll choose 5. Now go back to the corner and count along the other side any number of studs. I’ll choose 9, just to keep things manageable. Counting the spaces between studs we get 4 and 8, which are not part of any triple. This gives us a hypotenuse we can’t easily measure.
Now I’ll grab something that makes the mirror opposite of the triangle I just outlined. Basically, I flip the numbers. The side that was 5 long is now 9 and the side that was 9 is now 5. Once I’ve done that, I just line up the hypotenuse sides and connect!
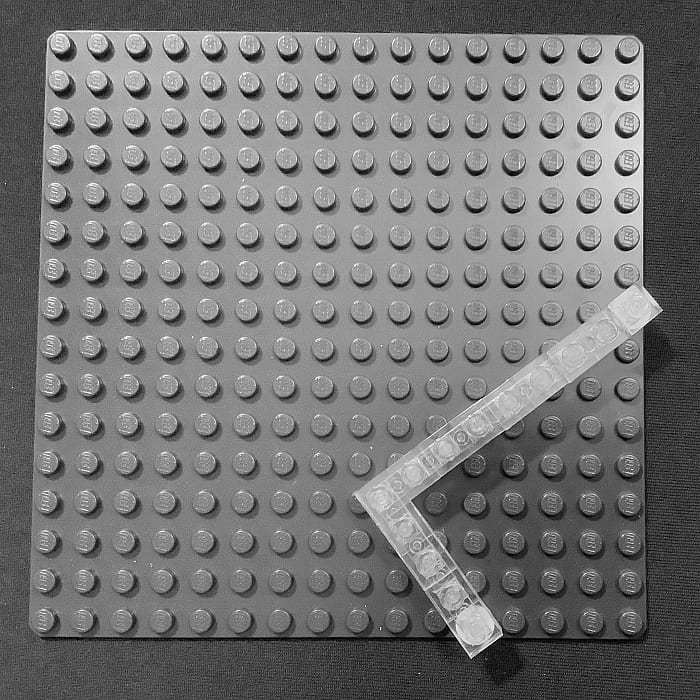
You can do this with any right triangle shape. Just make sure to have a mirror image of the first triangle if you want an angle. Otherwise, they just make a square. Same goes for if you make the short legs the same measurement, for instance 3 and 3. Putting another 3 and 3 triangle over it won’t angle anything.
The downside to this technique is that it relies only on two connection points, so it can be a bit fragile. Consider reinforcing the ends with rounded 1×2 plates to add back in some stability.
And that’s it! You have all the freedom to make whatever angle you like. If you like very subtle angles, make one of your triangle sides 2 studs, then the longer you make the other leg, the shallower the angle will be.
APPLYING WHAT YOU LEARN
We often say LEGO is great for building something square. That is especially true since right triangles have a very square component to them. That 90-degree angle allows us to expand into the world of odd directions.
Ideally though, if you are building something that requires a high degree of stability, I recommend using the Pythagorean Triples. It doesn’t give you the high level of control as the straight Hypotenuse method, but you’ll have an easier time making solid connections. And if your goal is a more decorative one, then creating inverted triangles and lining up their hypotenuses is the way to go. It is super flexible when it comes to design, but don’t expect it to hold together perfectly.
What do you think? Have you worked with triangles while building with LEGO? What tricks you use to get them right? And what do you think of the methods we discussed here? Feel free to share your thoughts and discuss in the comment section below!


You must have read my mind! I just had something like this to do the other day where I wanted to have a 1×6 plate at an angle. I was just using trial and error until the studs matched up, but I thought that there must be some formula for this. Thanks!
Yeah, it had been bugging me as well. So when I had a conversation with a friend about triangles this kind of all fell into my lap.
What if it is a larger plate you’re trying to angle? Like not a 1x but a 4x wide? I suppose the same applies to the corners?
Larger plates can be handled in a couple of ways. You can either just focus on a single column or row of the larger plate to do the connection or use the reverse triangle method.
The reverse triangle method doesn’t really care if the plate is 4, 6, or 8 studs wide, just so long as you do the exact inverted dimensions when creating your angle.
I thought about it a bit. Counting the spaces between studs works better than counting the studs themselves because the points of the triangle are not measured from the edge of a stud. Instead, since the pivot point of the connection between LEGO plates is at the center of a stud, the points of the triangle must also be at the centers of studs. So, the proper unit of measurement is the distance between the centers of two adjacent studs – which is equivalent to your method of counting the spaces between studs. Then the Pythagorean triples always work as expected.
The inflation method’s unit of measurement, essentially a 1×1 plate, is offset from the other method by half a stud, which makes distances seem 1 unit longer. Thus, in your first example, your triangle sides appear 3x4x5, but they are really only 2x3x4.
Anyways, interesting article. I hadn’t considered the hypotenuse strategy before, but it looks useful. I tend to use trial-and-error when trying to build with angles, but I really should start using my math skills instead.
You’re exactly right. I decided to frame it with a bit of inflation since it is almost second nature for builders to count studs first.
If you break down the width of a 1×1 plate what you get is 1/2 plate thickness from the edge to the stud, 1 1/2 plate thickness of the stud itself, and of course the 1/2 plate thickness on the other side of the stud.
As you pointed out, but I didn’t cover, when connecting and forming your triangle you’re not using the outsides of the studs at the end. which comes out to be 1 plate’s thickness. Which happens to be the space distance between studs.
It’s as you say, I am not building a 3, 4, 5 triangle in my very first attempt because I have measurement bias. I was just so used to counting studs for all my measurements that it took me most of a night to figure out what was going wrong and why. Then I had the added task of how to describe this to others so I didn’t lose them in the explanation. Hence the inflation method. It is nothing more than a way to correct people’s measurements so they can still count studs.
Glad you spotted that! I wasn’t sure I could explain the exact problem to just anybody without some eyes glazing over. ;D
Good article. What about if you need a triangle sideways? Like for example, you have a wall, and you want to add a slightly sideways decoration on it. Like a sign, or something like that.
I have this question too. What about walls? The sideways studs on walls are differently than on a plate.
I also wanted to say that you can make other angles if you use 1×1 round studs with hole in the middle. You can place them at the bottom in between the studs instead of below the studs. I hope that makes sense.
Round plates can definitely get you into trouble. Having the ability to sit in between four studs gives them an added layer of mathiness to work out in your head.
For those who want a slick look there are the 1×2 and 2×2 jumper plates that can also give this effect as well!
Building sideways will work the same, it is just a bit more involved making sure everything lines up.
Lining up the studs will be your first challenge. Take for instance a 1×1 brick with one stud on one side. The stud on its side is near the top edge which means you have a half plate thickness gap at the mottom. You can see this gap if you place a 1×1 square plate on the side of the brick.
All this becomes a lot easier if you use either the 1x1x1 2/3 brick with two studs on one side or the 1x2x1 2/3 with four studs on one side sine you can stack them and easily see how sideways studs line up.
But generally, let’s say you did the math and you just wanted to use 1×1 bricks with one stud even though there is the half plate gap that makes things tricky. And you were going for the basic 3,4, 5 triangle. With inflation it comes out to 4, 5, 6 if you just want to count studs and not the spaces between studs.
That means you’ll place a 1×1 brick with side stud and then count over to the fourth stud, this gives us our four studs with two studs between where we are and our initial brick. Our second 1×1 brick will then need to be raided 10 plates worth of height. So add three bricks and a plate. Then put your second 1×1 brick with one stud on that stack.
The The studs on these two bricks are now able to hold a plate that is six studs long just like you get with a normal baseplate.
Sideways bricks always add in an extra level of measurement sincey use what I call the 2, 5 rule. Two studs sideways is equal to 5 plates of thickness in order to line up. And brackets add in additional levels of thickness to work out.
So I guess the long way about this is, triangles do work sideways but expect to be doing a little extra math to figure out where your studs are in relationship to one another. Again my solution for this is to use those bricks that are five plates high, typically used in Brickheadz, stack them all up, then figure out what you need to remove in order to leave the studs you want.
This is going to be a good challenge for my kids. I want to see if they understand the explanation and if they can use it themselves. Thanks for the engaging article.
Would definitely like to know if I managed to make it understandable. As you might can tell from my comments, I could have dived into the really deep end and made it really hard to grasp.
So I tried my best to focus on the basics and make it as easy as possible to work with. I hope their creations turn out great!
My goal was to make this as easy to understand as possible.
I hope your kids can use it. Fingers crossed. 😀
I enjoyed. Really great article.
If using for a building, the building will be sitting on 1×1 round plates that are 1/3 brick off the ground. So one should probably find greenery to block the view under the building.
I didn’t mention this, but you can surround the 1×1 round plates or even basic square plates, (I just happened to have round plates handy.) wuth tiles. The tiles won’t get in the way of the brick or plate you are attaching sideways and you won’t end up with an odd looking gap.
Spooky!
Have just started a part of a MOC that needs a lot of this.
I can stop procrastinating!
Cheers, Chris
Nah, it’s never too late to start procrastinating!
Cool article! I just throw plates sideways on a surface and move them around until they stick. And I’m happy when they land the way I want them. Haha. I’m glad there is an actual method though, for you brainiacs. 😀
There will always be a need for builders to construct by trial and error, that’s how we get some of our best parts usage.
This was more to answer the question why and how can it be used for those that really like to plan things out. The Brainiacs! 😀
I was just looking at some LEGO triangles and telling myself I should memorize a few basic numbers… so this is perfect! I’ve done plenty of angles in builds but usually go for trial and error until I find something that works… which is sometimes a bit frustrating. Loved your explanation on using the hypotenuse, that technique is way clearer in my head now than it used to be!
I was also a bit worried it was going to be something I needed to memorize, forget, then memorize again. I was especially blown away the first time I saw a LEGO set off-center two 2×4 plates not realizing why it worked.
I think it is knowing the why that helps all the way around.
Hmmm, I’d assume Pythagorean Triplets would be quite useful for Technic builds, as well, considering how often you’d need to angle beams in those constructions.
Absolutely, in fact using my inflated method to measure with studs instead of spaces between studs will also come in handy with Technic. Technic parts often measure by stud legth as a basic unit.
Given the fact that triangles are some of the most basic stable structures you can definitely make a lot happen in the Technic world.
Of course, Technic is a lot less rigid in how it forms frames so all of geometry is handy for Technic. ;D
I’ve long been a fan of putting Pythagoras to work in my MOCs and appreciate this article running through some of the basics. Maybe there could be a follow-up showing ways these techniques can be modified, used in three dimensions, and examples of integrating angles into MOCs.