

 Although these days there are many hundreds of specialized LEGO parts, the heart-and-soul of LEGO is still the regular LEGO brick. If you ever get overwhelmed by all the choices, or feel like you are not up-to-date with all the possibilities, I encourage you to go back to the basics and see what you can do with the most basic elements.
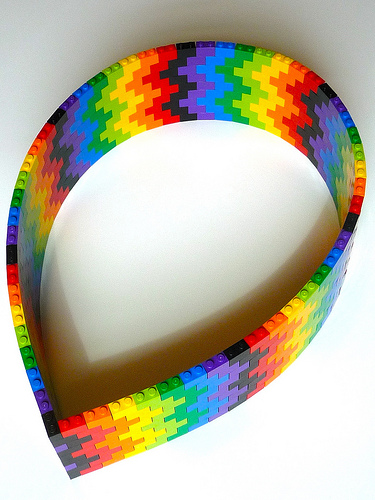
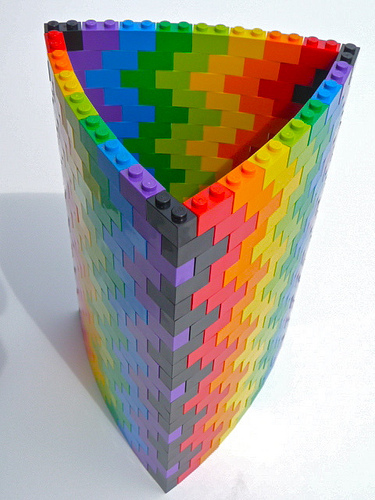
One of these basic parts is the 1×2 bricks. I’m sure you know how to stack them, but did you know there is a slight gap between the bricks as you line them up on studs? If you use enough bricks, this almost invisible gap allows you to bend the structure in various shapes.
 The basic LEGO shape you might want to try out first to see how this works is a circle. If you build up at least two or three layers of 1×2 LEGO bricks, the gap between the bricks will allow you to bend them all the way around into a full circle!

You would want to use at least 72 bricks to make one layer of the circle (so for 3 layers you would use 216). Why 72? Because if you use less there is too much tension between the LEGO bricks as you try to bend them, and the circle won’t stay together!
Minimum 72 bricks in a row give you a perfect circle without damaging your LEGO bricks or the circle blowing apart. This is the key to this technique; using enough bricks so they easily bend into the shape you want to achieve.
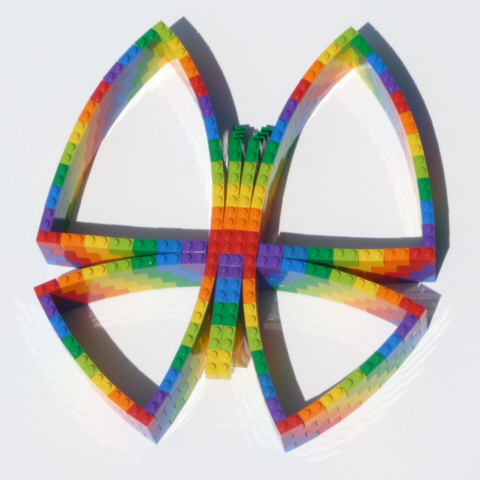
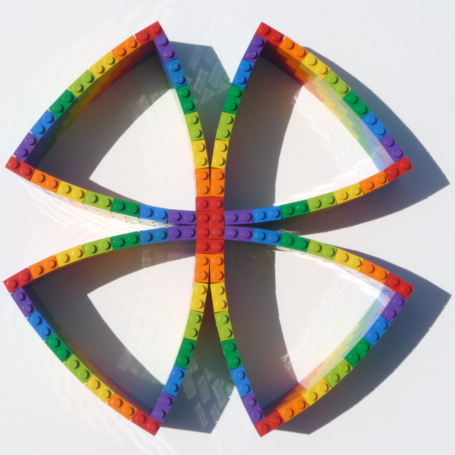
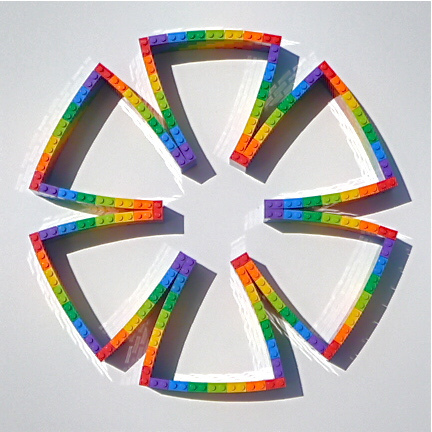
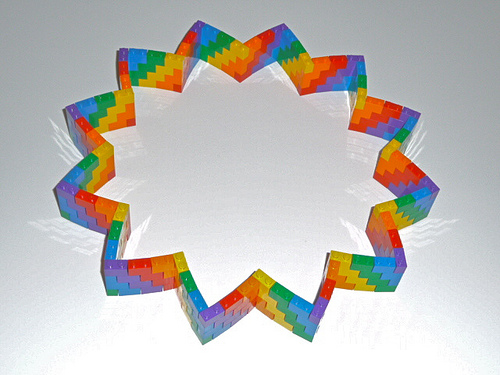
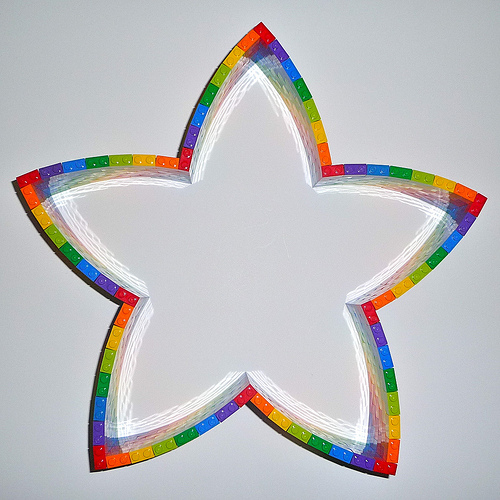
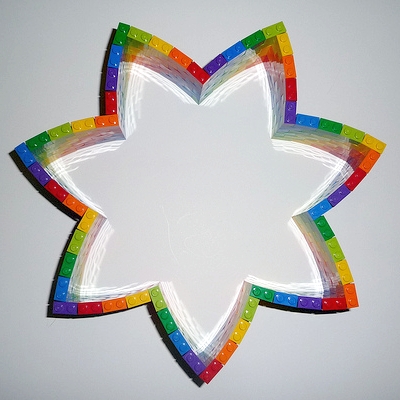
All of the LEGO shapes shown here are from Todd Wilder. Aren’t they amazing? You can check out Todd’s other creations here: Todd Wilder’s LEGO Gallery. Look at all the possibilities with nothing more than basic 1×2 LEGO bricks! (Click on any of the pictures for a larger view.)
Now you know how those rounded LEGO skyscrapers and castle-towers are being built! What would you do with this cool technique? What kind of LEGO shapes would you build? 😉


Oh man! These are way cool! I mean WAY COOL! I’m going play around with this on the weekend! What would I build? I don’t even know yet! My head just exploded with possibilities! 😀
Wow! I musy try this someday. 😉
I used a similar technique that I learned from a brick journal, but using 1X3 bricks which has a much more noticeable gap and can turn in smaller curves.
But I like this virtual seamless design with the 1X2 bricks and will have to make a massive curved something!
Thanks for the tip!
Yeah, this is awesome! Thanks so much for sharing!
I was impressed by what Will showed me with the 1X3 technique, but this looks so cool too! A much tighter design. Now I need to go buy a bunch of 1X2 bricks in different colors. 🙂
Thanks for the write-up! My question is: how would I have known about it if someone hadn’t told me?
Todd
Hey, Todd, I was planning to make a note on your flickr gallery that you have been blogged, however I had a family emergency this past weekend and everything got caotic and backed up. I will make a note on your gallery now. Sorry about that! 😳
That’s okay Admin; I’ve got a family too, so I understand.
Thanks for being understanding, Todd! 🙂
If you have the time and if readers ask questions about your designs would you mind responding?
I can direct readers to your gallery, or you can respond here as well, whatever you prefer.
And if you don’t have the time I understand that also. Readers are pretty good at helping each other out when necessary. 😀
Sure, I’d be happy to respond to questions. I may as well respond here; I’ll get an email when there’s a new comment. Thanks again for the attention!
Todd
Thanks, Todd! 😀
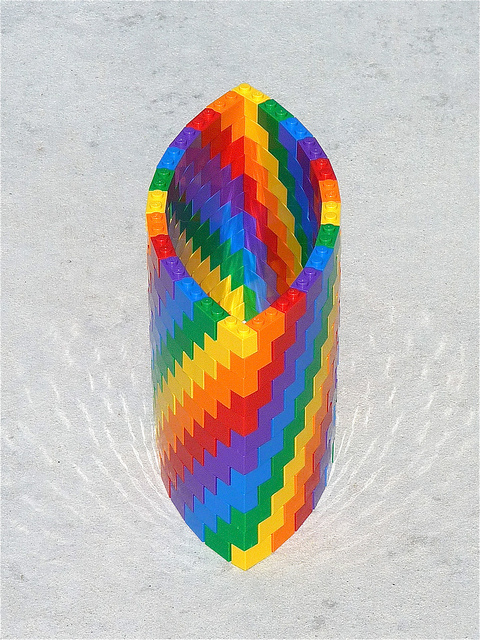
Beautiful designs! I especially love the vases. I was just wondering how would it be possible to make a bottom for the vase? I would love to make one with clear bricks, and put some lego flowers inside! 😀
Hi SPMom,
I don’t think it would be possible to make a bottom for the vase. What I did was put a clear glass vase with the flowers and water inside the Lego vase. Check out the photos here:
http://www.moc-pages.com/moc.php/273749
Great idea with the glass vase! Looks very nice! This way it can be used for real flowers too! Also love the flower design on the vases! Thanks for the ideas! 🙂
You’re welcome!
Todd, if you are reading this; the first picture in the article – are the meeting points between the sections attached by 2×2 bricks somewhere in the layers? Or is it something else?
Hi brickmaster,
You can see that the lime green bricks line up perfectly–this is where the attachments are made, in the middle layers–each with 2 2×1 bricks turned “sideways” (if that makes sense). 2×2 bricks could have been used to make these connections, but the theme here is to use only 2x1s. I hope that helps!
Todd, yes, thank you! That explains it!
No problem!
Great technique! This is definitely a great solution for skyscrapers, castle walls and a host of other buildings where a rounded wall is necessary. It only works on a larger scale though, so the bricks have enough room to bend. For smaller mocs you can create by curves adding a 1×1 round brick between each 1×2 brick. And I really like the rainbow colors here! 😀
Could you tell me how you found out the 72 minimum?
Samuel, it is explained in the article. If you use less, the tension between the bricks will be too much and the whole thing will burst. 72 is the minimum to not put too much pressure on the bricks without damaging them or having the whole cicrle fall apart. You can try it youself. 😉
Hmmph, I think what he meant is how are you *sure* that’s the minimum? Just trial and error?
Terilien, it is pretty obvious. One less and the whole circle will explode. Give it a try and you will see. 😉
I love stumbling across posts like this! Great stuff. I’ve done curves with 1×3 bricks and 1×1 cylinders before. Might have to try this some day.
Hi there your designs are awe some
I am just wondering if i was to make a round tower for a castle i am making how would i go about making the top of it as on a roof or a base for the top to put turrets and minifigs on any ideas thanks in advance chris
Chris, depending on the size of your castle-tower, you can use some of the round or modified plates. Here are some examples you might consider:
http://www.bricklink.com/catalogItem.asp?P=6003
http://www.bricklink.com/catalogItem.asp?P=6063
http://www.bricklink.com/catalogItem.asp?P=89523
http://www.bricklink.com/catalogItem.asp?P=2401
Just another idea in case anybody else comes back to this post, you can always place a few studs on the top of the round tower, and then place flat plates on the studs. Of course it would not be as easy as round and the edges would pop out some but if you do not have round plates it is better then nothing 😉
Great Article! Will definitely use this technique in future Lego builds. Good to know the exploding circle brick minimum 🙂 Thanks!
Yeah, the exploding part is pretty interesting to experiment with, but if you don’t want to damage your bricks it’s best not to go below the minimum.