(Written by William)
Today I wanted to do something a little different from the regular Brick Breakdown sessions. Instead of an official LEGO set, I would like to talk about a couple of techniques I used in one of my own LEGO models; the Weedy Z Greenhouse Nursery. This model was built as a display for my local LEGO store via LEGO’s LUG Showcase Program. 🙂

To start out let’s cover one of the questions I’m sure will come up; where did I get all the LEGO elements for this project? They came from four different sources. First, I loaded up on what I could from my local LEGO Store’s Pick-A-Brick wall. Second, I made a few purchases at BrickLink for making the detailed plants. Third, I went to a local LEGO reseller in my area called Five Star Bricks, who mainly sells on eBay. Finally, I got a lot of the needed pieces from the LUGBULK program. (I wrote up a post about the program if you want to learn more. See here: Secret LEGO: The LUGBULK Program. The rules may change slightly from year to year, but the concept remains the same.)

Just to give you a simple frame of reference, the LEGO greenhouse is built on a standard large gray LEGO baseplate. The topmost point of the greenhouse stands roughly 9.5” tall. All the windows are either door-frames or the three-panel windows that are the same dimensions as the door-frame. Consequently, there are a lot fewer pieces than other models of relative size, hovering around 1,000-1,500 in total.
➡ LEGO TECHNIQUE: WRAPPING
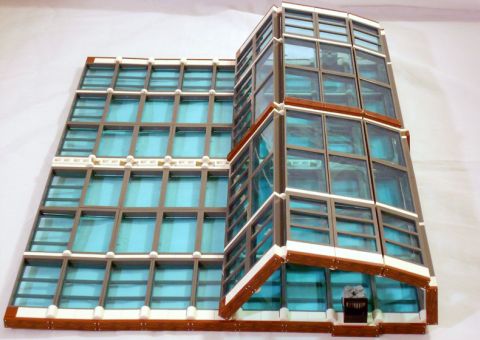
The first LEGO technique I would like to cover is wrapping. My first experience with this technique was in the #10217 LEGO Harry Potter Diagon Alley set. What this technique does is it uses swivel-hinges along with things like windows to make a flexible structure that can wrap around elements. At its most basic use it will form bay-windows, while at its most advanced form it can create a nice curved arch or circular shape.

For my LEGO greenhouse I wanted to take this technique to a whole new level, so I built the entire roof and part of the walls using the wrap technique. This ultimately resulted in a blanket-like element that I could simply drape over some supports. It also has a nice seamless look. And this brings me to the second part of the technique; when using a wrap, it’s best to have at least two points to frame your curve around. For the LEGO greenhouse I built up the two end walls and provided each with a curved edge for the roof to rest on. The real time-consuming part was figuring out how tall to make the side-walls. In total it took about an hour to build this project, and spent two hours on adjustments. Not a bad time-frame considering the size of the model.
➡ LEGO TECHINUQE: MIRROR-BUILDING
Another reason why the LEGO greenhouse was built so quickly was due to the fact that I was mirror-building. This is where you invert a design, but essentially you are building the same thing. For example, if a certain color goes on the left, then in the mirror side it will go on the right. The LEGO greenhouse can be divided either length-wise or width-wise and you get the same building. This makes creating large structures a breeze, and may allow others to help you finish your project. However, there is a downside to this technique; it runs the risk of looking too repetitive. To compensate I worked with the greenhouse’s unique characteristic of being see-through. This quality allows viewers to have a very interesting visual experience as they can see both the internal and external features of the building at the same time – turning a very repetitive design into something that looks incredibly complex.

➡ APPROXIMATE CONNECTION POINTS
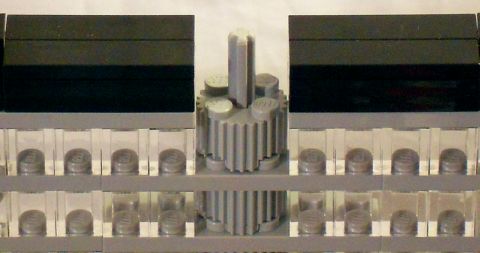
It is possible to make specific calculations to figure out how everything goes together in a LEGO model, however if you are engaging in free-building, strict math will often ruin the creative process. For that reason, it is handy to be able to give some wiggle-room for yourself when it comes to connecting things together. And this is why I turned to using LEGO Technic axles. Due to its length and design, LEGO Technic axles have a bit more give than your normal LEGO element.

When it came to the LEGO greenhouse, I used 2×2 round bricks with axle-hole as my connection-points to connect the roof into the frame. I knew that if I was about a plate off, the Technic axles would provide a nice mechanism to take up the slack, or provide the ability to stretch a bit. Generally speaking, LEGO axles work much better when used along their length, since you can use bushes or longer axles for adjustments. And even axles have their own limits for what they can withstand. It’s more of a technique you keep in mind when it looks like everything should fit, but for some reason they are a bit off.
➡ CANNIBALIZING COMPLEX LEGO ELEMENTS
On occasion LEGO does give us pre-assembled elements, simply because they would be irritating to constantly put together. A great example of this is the standard LEGO minifigure. Many people consider them being made of three parts: legs, torso and head. However if you take a closer look, you actually have nine elements. There is a right leg, left leg, hips, torso, right arm, left arm, two hands, and a head. Granted, they are very specialized pieces that may not have a wide range of use, but you may find a rather creative application for them.

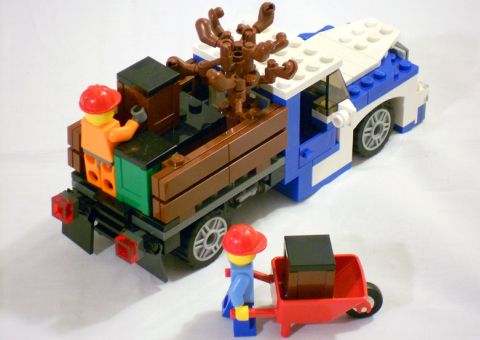
For example look at the bare tree on the back of the farm-truck. I started by taking one of the new 2×2 round plates with four bars off the side then placing a palm-tree top inside of it (that’s the piece that goes from one bar to four bars). This gave me eight bars to work with. From there I simply attached brown minifigure hands to the bars to make branches, and on some the arms are still attached to add some variety. By virtue of the natural crook in the minifigure arm and the ability to turn the wrist of the hand, I ended up with a highly customized tree that looks quite natural. Mind you, finding uses for minifigure body-parts is not simple. But this is a reminder not to overlook any possibility.
➡ APPLYING WHAT YOU LEARN
Wrapping is a marvelous technique that gets even more impressive simply by turning it in a different direction. Besides the LEGO greenhouse I also used it for a football-stadium to help create the rounded ends. The greenhouse was my second application of the technique and all I did was turn it sideways. The hard part is getting enough of the same hinges. If you look at the greenhouse roof, nearly all the white lines are hinges.
Mirror building is not so much a technique you have to spend time learning, rather it is one you have to watch out from over-using. As humans we love symmetry. However, depending on it too much can lead to a boring design.
In most cases, building with LEGO is an exact science. However, creativity is usually beyond such constraints. When possible, it is good to find ways to break out of the mold and give yourself more flexible options.
Finally, breaking pre-assembled LEGO elements down, like minifigures, can wear down those parts real quick. Of course, that doesn’t need to stop a great design. It’s more important to realize you have the option of using those pieces and it is a great practice in using your imagination.
So what do you think? How do you like the LEGO greenhouse and the techniques used? Have you ever used them yourself in your own LEGO creations? Feel free to share your thoughts or ask any questions in the comment section below. 🙂
And to check out the regular Brick Breakdown sessions see here:
- Brick Breakdown: LEGO Lord of the Rings Council of Elrond
- Brick Breakdown: LEGO Castle Dragon Mountain
- Brick Breakdown: LEGO Lord of the Rings Pirate Ship Ambush
- Brick Breakdown: LEGO Ninjago Golden Dragon
- Brick Breakdown: LEGO Superman Black Zero Escape
- Brick Breakdown: LEGO Lord of the Rings Tower of Orthanc
- Brick Breakdown: LEGO City Dump Truck
- Brick Breakdown: LEGO Monster Fighters Ghost Train
- Brick Breakdown: LEGO Lone Ranger Silver Mine Shootout
- Brick Breakdown: LEGO Lone Ranger Constitution Train Chase
- Brick Breakdown: LEGO Ninjago Temple of Light
- Brick Breakdown: LEGO Lone Ranger Colby City Showdown
- Brick Breakdown: LEGO Lone Ranger Comanche Camp
- Brick Breakdown: LEGO Lone Ranger Stagecoach
- Brick Breakdown: LEGO Star Wars AT-RT
- Brick Breakdown: LEGO Arkham Asylum Part 1
- Brick Breakdown: LEGO Arkham Asylum Part 2
- Brick Breakdown: LEGO Legends of Chima Polybags


I’ve just seen the LEGO Movie’s spot on captain Metalbeard. He’s piloting a pirate themed Mecha! That’s one set I have got to get. Nothing beats a pirate piloting a giant mecha…
Yeah, I saw that set too! I can’t wait for that set. I love mechas too! 😀
BTW, I have one post scheduled for The LEGO Movie for tomorrow, and another one (written by HP) for next week. 😉
I remember seeing this at one of the meeting a couple months ago, and I was and still am really impressed by it. The pictures doesn’t do it justice. ( you didn’t take a bad picture .That is not what I am saying . The detail is much better up close and personal.)
Oh, really?! You saw it in person?! Lucky! 😀
that greenhouse rocks dude! 😎
Great model and very impressive build time. Another virtue to the wrapping technique is that depending on the model, sometimes you can unfold the roof or what ever for easy access. So you have a nice function, but rather then lose style for it you gain conplexity. Lego can go a little too far with this technique when they leave the back out so you can, “play inside!” If they are going to leave bricks out then do it but I for one would rather just tak the back walk apart and use the extra then go without it altogether.
Thanks all,
Yes the wrapping technique gives a great look, but there are definite downsides as you pointed out.
I think the simple fact that this is a complete building is what really makes it neat in person. You can walk around it and since so much is transparent your line of sight is never blocked.
The next stage of life for this model is to be winterized for a holiday show. The building and interior will remain but the grass and bushes will give way to snow and pine trees.
When I have time I’ll do a write up on the other model I made for the upcoming event that the green house is in. The other MOC is in the Modular building style, but it is a three story Candy Shop.
Of course I will be bringing both to the next LEGO meeting on November 9th in the Sacramento area. Plus I’ll be bringing an interesting surprise.
You wouldn’t happen to have build instructions for the greenhouse? Really nice looking….I’m trying to build a Santa’s Toy Factory and this type of roof (and overall build really) works great as you can look in to see all the cool details.
Michael, this is William’s own custom build with no instructions, but you should be able to build something similar by looking at the pictures. Large window elements are the key to this project, and it’s really easy to work with them. As William mentions in the article, you can basically build a large blanket with them and wrap it into the shape you like. 🙂