

(Written by Geneva – gid617)
As you probably know, LEGO has launched a new LEGO Ultra Agents theme early this year, similar to the old LEGO Agents and LEGO Agents 2.0, but with a new set of heroes and villains, and an even better color scheme (black/trans-light-blue, instead of dark-blue/silver). I picked up one of these sets and wanted to share with you my review, thoughts and tweak on it. 🙂

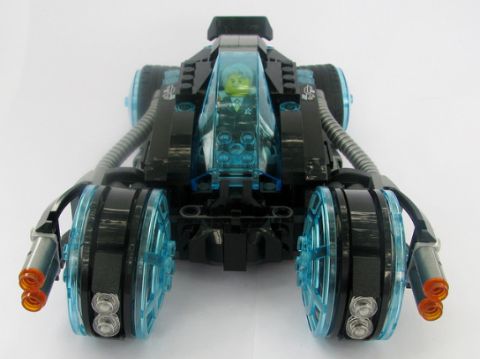
The #70162 LEGO Ultra Agents Infearno Interception is a $30 set of the 2014 line (see all LEGO Ultra Agents sets here), and it includes Solomon Blaze’s Interceptor/Hovercraft, and Infearno escaping with a fiery and flying concoction. For this article, we’re going to focus on the Agent’s vehicle, discussing how practical its functions are, how good the shaping is, and what can be done to improve it.
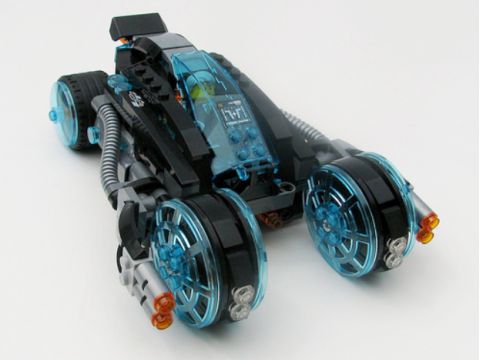
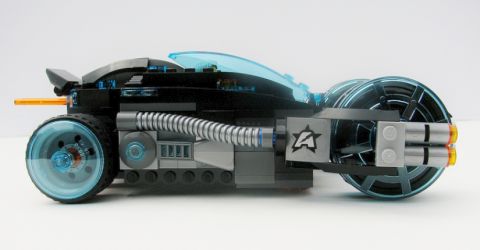
From the viewpoint you can see in the picture above the Interceptor looks almost perfect; just the right combination of busyness and smooth stealth. But a side view reveals that the previous angle is obviously one of the better ones and there is room for improvement.
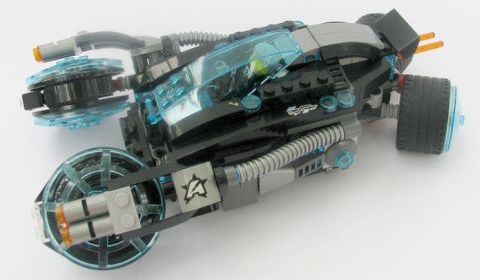
Another flaw lies in the Interceptor’s hovercraft function; for one thing, the front wheels don’t turn nearly as much as they should. The back view especially highlights the remarkably small turn capacity, due to the pieces used. This gives for a rather unrealistic look when the vehicle is in hovercraft mode – the amount of force brought to bear on the ground, thus giving it lift, is too small and directed at quite an angle. The back wheels are probably supposed to help give the vehicle lift, but what is going to power the whole thing through the air? Plus the wheels are at a pretty extreme angle. In my opinion the back wheels ought to rotate toward the back of the vehicle, giving it a bit of propulsion power, and leaving the front wheels to provide lift (which, with a bit more of a turn, they should be able to do). Of course we’re talking hypothetically here; since nothing like this actually exists, fault can’t exactly be found with the current model on the basis of realistic-ness, but the more possible it looks, the better! Below is a look at the original Interceptor’s hovercraft mode.

Lastly, I found the ejector seat a bit of a plain. Of course, it is rather small and obviously cannot have a huge amount of detail, but a little more detailing would have gone a long way!

As you can probably tell, I found quite a few faults with the original design. In fact, I was left rather disappointed after building it – the whole thing looked plain compared to what I had expected, and had several problems when it came to the hovercraft function. The ejector seat was a bit of a pleasant surprise as I hadn’t realized the set included that function when I bought it. However, even that wasn’t much to write home about! Nevertheless, after examining it from all different angles, checking out the functions, and getting a few ideas as to how I could improve it, the vehicle started to grow on me. So I decided to change it up a bit, and see how I could improve the areas I found problematic. Most of them were fairly easy to correct, but fixing the hovercraft function to my satisfaction, especially given the fact that I was working with a very limited amount of bricks (not my whole collection by a long shot), was a bit more of a challenge! In the end though, I was able to hit on a very satisfying design.

At first glance, it seems not much has changed. However, I was able to correct the nagging exposed studs on the side of the vehicle, and also the height disparity between curves around the cockpit, which had been bugging me a bit. From this perspective, those are the most obvious differences. But another less obvious change is with the hovercraft function; now the front wheels have a much greater turning capacity (more noticeable in real life than in the pictures), and the back wheels turn out rather than down, giving the hovercraft a bit of propulsion power.
The change of the front wheels was accomplished fairly easily by using an L-shaped 1×1 brick, thus giving the axles more room to rotate. This naturally necessitated a few other changes here and there, but these weren’t too hard to accomplish.

The change in the back wheel direction, on the other hand, is a bit more complicated, especially because the pieces I was working with were quite limited, particularly when it came to LEGO Technic pieces. I was constantly thinking of other, easier ways to accomplish the rotation with pieces I knew were fairly common, but instead I was forced to settle for this version, which is admittedly less than ideal. The pieces attaching the wheel aren’t quite long enough, meaning that the trans-light-blue dish pieces don’t attach as well as they should.
I found the section between the front wheels quite empty when the vehicle was looked at head on. The obvious reason for this is to allow room for the wheels to rotate, so there wasn’t a whole lot that could be done, but I felt some sort of bumper was most definitely in order! So I played around with it a little, and hit upon this solution:
The last major change was to the cockpit and the ejector seat. I’ve already mentioned that the original seat was rather bland – little more than a flying disc, in fact. So I added a few levers and a bright orange piece on the bottom. Given the addition of the bottom piece, I figured I’d have to raise the seat a touch. This also helped it to eject a bit more easily – before the change, it was rather difficult to get the seat to un-stick! I also removed a few bricks that were doing nothing but take up space! So now, with the ejector seat inside, the cockpit looks like so:

The final modified interceptor can be seen below, with Solomon Blaze alongside in his ejector seat.

As you can tell, I’ve kept the basic structure and a lot of the final details, but changed a good deal of the functional sections. The end result is much more functional, conserves most of the stability (trust me on that one, I’ve hauled it around the country wrapped in a plastic bag in my suitcase, and have generally found that only one or two pieces have come off!), and at the same time sharpens the interceptor’s stealthy outline. Ultimately, I was quite happy with the set; not only did I enjoy the initial building time, but I got the added benefit of having fun changing it around! If you are interested in any of the LEGO Ultra Agents sets, they should be avilable at most LEGO retailers and of course you can also find them at the Online LEGO Shop.

So what do you think? Do you have the LEGO Ultra Agents Infearno Interception set? Did any of the same details bother you? Have you made some of your own modifications on it? Are there other sets – LEGO Ultra Agents or otherwise – that you modified? Feel free to share your own thoughts and tweaks in the comment section below! 😉
And you may also want to take a look at the following posts:


Those are some interesting tweaks. I especially like the reorientation of the back wheels and the upgraded ejector seat. Good job!
Thanks! The back wheels was the thing that most struck me as needing some serious adjustment!
Nice modifications! Personally, I take my sets apart so quickly that a modification wouldn’t be worth it. I like the original ejector seat because it’s simpleness makes it look really high tec, but your’s makes it more of a nice feature overall.
A lot of sets quickly succumb to my desire for MOCing parts as well, but this one I got with a special eye to keeping it built. Given all the problems I found with it, keeping it meant that I’d definitely have to spend some time changing it!
Thanks!
Hey Admin just sent you a post. Cool modifications! I should do that!
I’d recommend trying out a few changes at least. It’s certainly fun to modify! 🙂
Great modifications! I personally think the best tweak is the back wheels turning in, instead of down. Also, coincidentally my Toxikita’s Toxic Meltdown finally came today. It took longer than I expected, and it is currently the first building in my town’s extension. I also put a whole load of acid/poison related minifigs on there, all transformed. How would you extend the lab? I’m thinking about growing it, but I don’t really have much a choice of pieces…
Thanks!
Depending on how you want the lab to look, I’d either build a building around it (but that would take quite a few pieces of course) or add a series of counters/desks as a sort of prop to stand nearby. If possible adding a third or possibly fourth panel, following the same basic design would probably work pretty well. I’d change the robot arms/radioactive element stand a little too. The radar seems a bit out of place to me, but maybe it looks better IRL. I’d have to see that though.
Thanks 😀 . I have a few computer screens and desks, and changing the robotic arms and the crystal seems like a good option. I have quite a few white bricks, and was thinking of making maybe another little building next to it. BTW, it is next to my little town/village, but it’s quite a bit lower. I think it would be cool if the radar pointed there 😉 .
you know solomon blaze is the guy from galaxy squad, just older?
I had not realized that, though you’re definitely right! Looking at the bios, it does mention that he’s a former pilot. That’s pretty neat!
Yeah, he is one of the orange suit guys. One of my favorite characters from Galaxy Squad. He was young those days though. 🙂
Sorry, no. Blaze belongs to the blue team, with Max Solarflare. The orange team guy is Jack Fireblade. Still, pretty cool.
Also, I finished my article, and Word says there are 1113 words. But that includes all the notes for pictures and smiley codes. Should I just split the article in half anyways? It would allow me to add more details. 😕
Oh, yeah, you are right! I forgot that he was originallky a Blue guy and it was me who added him to the Orange team! 🙄
As far as the article that sounds fine. You can just leave it as it is. It is not too much over the limit.
Interesting. I wonder if Galaxy Squad has a designated place in the Lego timeline. Maybe that could have been first, then the task force or whatever went to space and defeated more aliens, and now they’re just on earth, defeating various baddies.
So sorry, I meant Alien Conquest, not GS.
Are you sure? It’s 2 and 1/2 pages long, and it could use some extra detailing. Two parts might actually allow me to add some other pieces that currently aren’t in the article. 😕 Maybe I should do that, how does it sound?
@Strider, Galaxy Squad is part of the LEGO Space timeline already, otherwise it would require another theme after Ultra Agents involving GS characters to make a timeline. 😉
It’s your article; if you want to split it is fine with me. All I was referring to is that going over the limit a bit is not a big deal. 😉
Ok, I think I will split it, that way it won’t seem so long and tedious. Plus, I can divide the normal parts from the functional parts. 🙂
No, I have both versions he was a blue suit guy!
As I have said; I made him join the Orange team. 😉
Updated your Contributor Page as you requested. Also added this last post. 😉
Thanks! 🙂
Nice mods! I consider myself to be a master LEGO modifier, but I doubt I would have come up with anything close to as good as that! One thing, though: it doesn’t look like the front wheels rotate farther than they do before modifications, but I suppose that’s just the angle of the pictures, like you said. Also, this trend of “repulser-lift wheels” seems to continue in next year’s sets, with the bike from Invizable Gold Getaway having the same type of function. What do you think of the wheels’ angles there? https://lego.fandom.com/wiki/70167_Invizable_Gold_Getaway
Yes, nice mods overall (the ejector seat is much improved), but I agree that there must be a minor error in your unmodified build as the front wheels on mine also swivel much more than in your first picture. When swiveled into hovercraft mode, their lowest point is above the bottom of the vehicle (the grey curved slopes with the A logo on them very nearly touch the black slopes of the vehicle body) and looks basically like your “after” picture.
Thanks for the interesting review & mods. Always fun to read! 🙂
Thanks! You may be right, I’ll have to check that out once I get a chance. I can’t quite see where I could have gone wrong, but it’s certainly possible!
After checking it out, I had in fact put the black technic pieces (with the four cross style holes) backwards, which seriously limited turn capacity. I’m not sure why I didn’t catch that when I went to modify it! Turning them around really improved the rotation capacity; as you said, it’s about what I ended up with after the modification (but keeping the modification gives even more turn).
I think I should have tried to get the exact same or very very similar angle on the hovercraft, but it didn’t occur to me at the time, and yes, I’m pretty sure that the rotation increased by a sizable about – though deraven may be right; could be that I did something wrong the first time around! I have a tendency to skip instruction steps now and then and rely on catching all the additional pieces later! 🙄
As for the new set, the angle seems even worse – to me, lift should push as close as possible straight down. The sort of half twist just looks weird! That set would need some really serious modification though, to get the wheels to turn farther.
I haven’t been here for a few months!
That looks really awesome. I’m buying that!
I typically rip apart my stuff, as I am an intense MOCer. But I also modified this set too! Then I built a cycle out of it. 😉
That sounds cool! This has just the right pieces for it too!