(Written by William)
In this Brick Breakdown series I review official LEGO sets, from the perspective of looking at interesting building techniques we can all learn from. Today we will be looking at the #79018 LEGO The Hobbit The Lonely Mountain set. You can also check out the previously discussed LEGO techniques found in official LEGO sets at the end of this article. 🙂
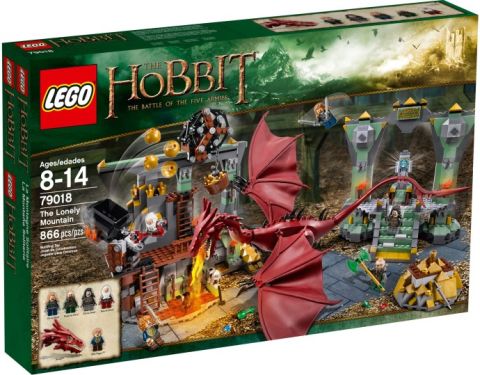
First and foremost, check out the wings on Smaug! I’m usually not a fan of rubbery pieces, but here they do make sense. Just touching these rubbery wings with the hard plastic ribbing feels very realistic – like how a dragon’s wings should look and feel. Essentially, if the only reason you plan to pick up this set is for the dragon, you’re making a wise choice. As for the rest of the set, it’s a solid play-set. It seems a bit weird to say this, considering the unusually high price-tag, but this is an officially licensed set and the dragon is a brand new mould – which is the most likely reason for the higher price. However normally a $130 set has a lot more detail and a higher piece-count than what you find here. It’s not bad at all, but it’s best to prepare yourself for the fact that you will be getting less than what you may be used to in this price-range. Aside from this, it’s a large enough set to contain a couple of interesting techniques. So let’s get our weapons forged and prepare for battle – and by battle I mean using some awesome building-techniques!
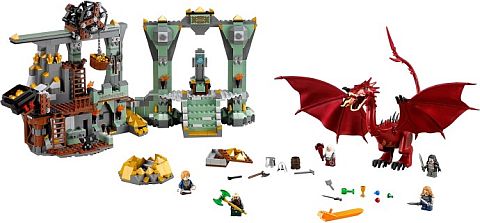
➡ COMPLEX MECHANISMS, SPACE & THE WOW-EFFECT
We often end up building complex mechanisms without thinking much about it. For example the catapult in this set can both swivel and hinge forward when it throws its ammo. Having these two features makes it a complex mechanism. So then why does the winch that can slide around look so much more impressive? The simple answer is that it uses more space. From one stand point this seems contradictory. We work so hard at condensing mechanisms to fit into tight areas, and it should follow that a small mechanism is much more impressive. Granted they are, but they only get appreciated by a small group of people. Those individuals are usually the builder themselves and other fans who understand the difficulty involved in such an accomplishment.
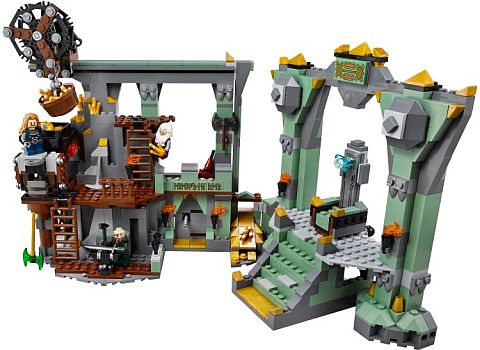
Truth be told, if you can’t see it, it’s hard to value it. I have a personal experience with this. Recently I participated in a show at a museum where I displayed a motorized Mixer and motorized Ferris-wheel. Between the two, the Mixer was far and away the more complicated build, however since the Ferris-wheel was roughly two feet in diameter it was talked about ten times more. Going back to the #79018 LEGO The Hobbit The Lonely Mountain set, the winch itself does not take up a lot of room. The length of the chain and the amount the winch can slide is the real culprit when it comes to eating up space. This is a great example of how you can produce a grand effect without straining too hard on the design. Essentially, people are drawn to large spectacles, so if that’s what you want there’s an easy way to achieve it.
➡ VERTICAL SUPPORT WITH LEGO BRACKETS
Within the last couple of years the number of brackets LEGO released has increased significantly. In the past all we got were a couple of brackets with either a 1×4 or 2×2 stud surface hanging down on the side. Now we have brackets that go up, ones that have a 1×2 face, and others that cover a 2×4 stud area. This proliferation of bracket-styles has created a new common practice of adding vertical stability to surfaces using brackets. In the #79018 LEGO The Hobbit The Lonely Mountain set you can find this technique on the catapult, the winch, one of the pillars, and even the throne. In fact, on the throne, the connection between the back and base of the seat fully relies on the use of brackets.
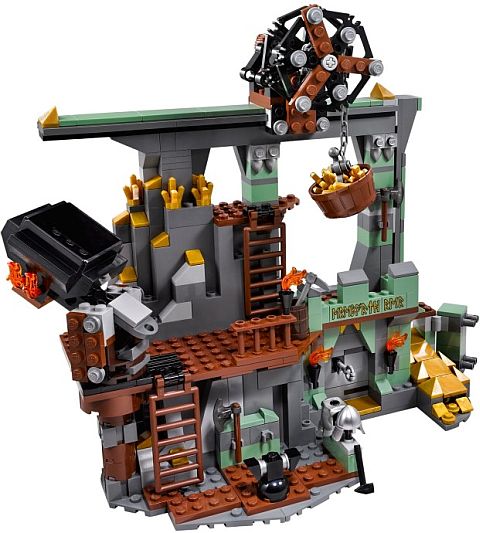
Using brackets is not a new technique, the real novelty comes from how much easier it is to do it now with all the different bracket-types. You can basically incorporate them into any type and size of space you have to work with. Giving your LEGO creations vertical stability with brackets allows more points of decoration, and also increases the stress-levels your model can withstand. Take for instance the winch in the #79018 LEGO The Hobbit The Lonely Mountain set; having more stability at its base means it can handle a heavier load. Normally if you try hauling up something like Smaug, the winch would snap off its base and look sad. Now you can do all of that with ease.
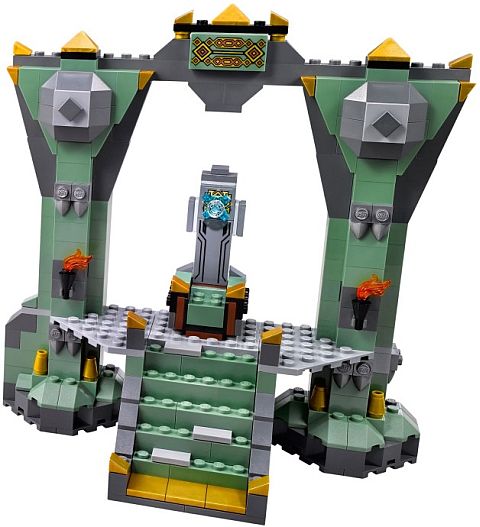
➡ APPLYING WHAT YOU LEARN
Large-scale LEGO creations have always been fascinating and they draw the most attention. This is especially true when you also mix in complex mechanisms. Just keep in mind that it’s the effect that needs to be big – which also means that the mechanism and the complexity can remain small. If you nail this, you are building smarter not harder. As far as using brackets, up until a couple years ago brackets were more or less just a good idea. Now that LEGO added a lot more varieties of brackets you are able to do much more with them. The #79018 LEGO The Hobbit The Lonely Mountain set is a good example of how they can be used time and time again in various ways. I strongly recommend that you learn to incorporate them to improve both the design and stability of your LEGO models.
So what do you think? How do you like this LEGO The Hobbit set? Have you had a chance to build it? Did you learn from the interesting building techniques used in the sets? Feel free to share your own experiences and tips, or ask questions in the comment section below! 😉

And you might also like to check out the other reviews in this series:
- Brick Breakdown: LEGO Super Heroes Green Lantern Set
- Brick Breakdown: LEGO UCS Tumbler
- Brick Breakdown: LEGO Minecraft The Cave
- Brick Breakdown: LEGO Minecraft Ender Dragon
- Brick Breakdown: LEGO Santa’s Workshop
- Brick Breakdown: LEGO Ideas Exo Suit
- Brick Breakdown: LEGO Ideas Research Institute
- Brick Breakdown: Emmet’s Contruct-O-Mech
- Brick Breakdown: LEGO Forest Animals
- Brick Breakdown: LEGO King’s Castle
- Brick Breakdown: LEGO Cinderella’s Castle
- Brick Breakdown: LEGO MetalBeard’s Sea Cow
- Brick Breakdown: LEGO MetalBeard’s Duel
- Brick Breakdown: LEGO Minecraft Sets
- Brick Breakdown: LEGO Disney Princess Sets
- Brick Breakdown: LEGO Back to the Future DeLorean
- Brick Breakdown: The LEGO Movie Ice Cream Truck
- Brick Breakdown: LEGO Parisian Restaurant
- Brick Breakdown: The LEGO Movie Flying Flusher
- Brick Breakdown: LEGO The Hobbit Dol Guldur Battle
- Brick Breakdown: LEGO Winter Village Cottage
- Brick Breakdown: LEGO Winter Village Market
- Brick Breakdown: LEGO Lord of the Rings Council of Elrond
- Brick Breakdown: LEGO Castle Dragon Mountain
- Brick Breakdown: LEGO Lord of the Rings Pirate Ship Ambush
- Brick Breakdown: LEGO Ninjago Golden Dragon
- Brick Breakdown: LEGO Superman Black Zero Escape
- Brick Breakdown: LEGO Tower of Orthanc
- Brick Breakdown: LEGO City Dump Truck
- Brick Breakdown: LEGO Monster Fighters Ghost Train
- Brick Breakdown: LEGO Lone Ranger Silver Mine Shootout
- Brick Breakdown: LEGO Lone Ranger Constitution Train Chase
- Brick Breakdown: Ninjago Temple of Light
- Brick Breakdown: LEGO Lone Ranger Colby City Showdown
- Brick Breakdown: LEGO Lone Ranger Comanche Camp
- Brick Breakdown: LEGO Lone Ranger Stagecoach
- Brick Breakdown: LEGO Star Wars AT-RT
- Brick Breakdown: LEGO Arkham Asylum Part 1
- Brick Breakdown: LEGO Arkham Asylum Part 2
- Brick Breakdown: Legends of Chima Polybags


Hmmmm… Using brackets is a good idea. Unfortunately, I don’t really have all that many. I don’t normally use the few that I do have for stability as much for adding extra details to my MOCs.
$130 seems a bit pricy to me, for only 866 pieces. I know that there’s a lot of big, exclusive pieces (like Smaug), but pricing this set somewhere between $100 and $120 would have made me happier.
Space (or volume, or surface area) does tend to increase people’s interest in something, though I do like the little awesome techniques incorporated into most LEGO sets. It’s fun to build them, put them all together, and see how they fit into a complete model. But my habit is to try to conserve space, so if it can be smaller, I’ll make it smaller. 😕
As for brackets, their usefulness knows no bounds, but the bracket part itself is so thin it doesn’t line up well with normal bricks, which often makes it difficult to use, even if it does increase strength.
Also, having watched Ninjago episode 38, I’ve determined all the Masters in the tournament and their element. But, what I’m wondering is, what happened to Ash, Olobal, and Gravis? They lost, yet they weren’t in the factory with Cole. Were they in another part, or just forgotten? 😕
I tend to use brackets at the edge of models for the reason you mentioned; it is hard to line them up properly without a gap. But they are so useful I have considered spending some time with them to work out the best combinations and ratios. As far as the Ninjago characters, I will have to re-watch the episodes, but I think they were all there, just not as prominent.
Actually, I recently used my 75006 to build a small speeder MOC, and as the set comes with six of these: http://brickset.com/parts/4654582 , I had to find a way to make use of them. In the end, I came up with a large rear engine that had studs facing in about 5 directions, with only one small gap at the top. I had a fun week after that, building more MOCs with brackets. 🙂
You would think that when Karlof and Cole were tied in the same line, the other de-powered Masters would be there. And I think it would be easy to spot a guy with a large beard that grunted a lot. 😉
Yeah, LOL! I will just have to re-watch that part to see who is there and who isn’t. Been a while when I watched it last time. And yes, brackets are fun to work with. I also take particular notice when they are used in official LEGO sets that I assemble to see how LEGO designers use them. Always learn something new. 😛
I have literally 100’s of each type of bracket in a range of colours as they are very useful for non linear building. For example if doing towers you can use them to hide the joins when you step hinges round.
Also for doing timbering etc they are vital as although you do get a slight gain in width you can mask it as being the width of timber.
Tom, that’s a great idea with timpering! In fact I’m going to try it out later today! 😛
let me know how you get on – i nabbed the idea from someone on eurobricks and it looks really smart.
I have this set its a really fun, cool looking set great play features (Although I prefer to have my sets on display rather than play with them) and Smaug is a couple of really nice pieces, both his head and his torso have a really nice print. the wings are made really nicely and have a good texture. Over all I really love this set.
This set is overpriced, but for anyone interested it is very likely the subject of an unadvertised sale at your local Lego Store (store only, not website). This set plus a few other sets that have been hanging around are discounted 20%. I had been waiting for this set to go down in price, and so picked it up last weekend for $103.00. It seems a good candidate for eventual clearance at other retailers but I very seldom see it in stores besides Lego so that would be a very rare find.
Catapults are also very common in sets. A winch feels more novel. That could likely play a part.
That’s a good point as well! 🙂