(Written by William)
In this Brick Breakdown series I review official LEGO sets, from the perspective of looking at interesting building techniques we can all learn from. Today we will be looking at the #71016 LEGO The Simpsons Kwik-E-Mart. You can also check out the previously discussed LEGO techniques found in official LEGO sets at the end of this article. 🙂
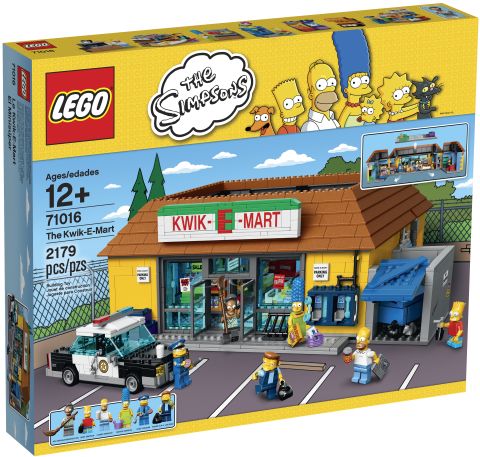
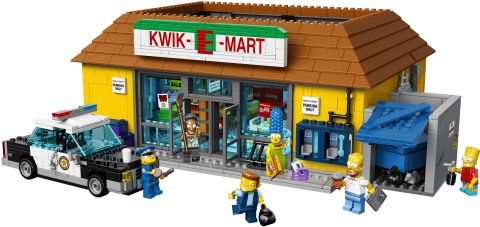
In Springfield there is one place to go for nearly everything you need. So it’s no surprise that the next building in the LEGO The Simpsons line is the #71016 LEGO The Simpsons Kwik-E-Mart. If this set could be described in one word, that word would be “detailed.” So let’s take a detailed look!

One of the most obvious features that you will notice right away is all the elements with graphics. Many of the designs are printed right on the LEGO elements, and others are stickers that you have to apply yourself. While I’m sure LEGO fans will be very happy with the new printed parts, the two sheets of stickers will probably be the biggest complaint about this set. These sticky bits of design range in size from a full frozen minifigure to tiny 1×1 tile shaped squares. It will take a delicate touch to get everything in just the right place, so make sure you take your time with them.
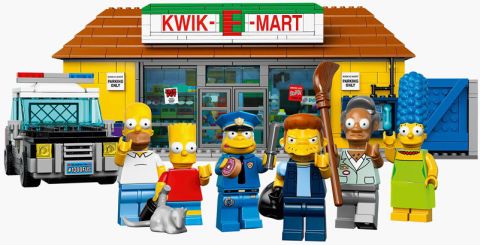
As for the included minifigures in the LEGO Simpsons Kwik-E-Mart, Snake is the only entirely new character, however the others are updated in small ways, like Chief Wiggum having messy lips and a stain on his uniform. As mentioned before, the brilliance of this set is not in its grandeur, but in the details. Speaking of details, it is time to dig into the finer techniques found in this set. So cue the music and roll the opening credits, because this episode is ready to begin. And if you have the #71006 LEGO The Simpson’s House set, feel free to do a couch joke of your own design before we begin. 🙄
➡ LEGO THE SIMPSONS – PIMP YOUR RIDE
Building a LEGO vehicle has always been a fairly straightforward process. You simply find a piece long enough and make that the foundation of your design. Then you add the wheels, body, etc. This way you can be assured that your vehicle is strong. However the Springfield Police Car is built a little differently. If you have the #21108 LEGO Ideas Ghostbusters Ecto-1 set, you will recognize a similar building style. Essentially, the vehicle is not built as a single unit but as several sections that are later combined together. These sections include the hood, the cab, and the trunk. How these sections interlock is fairly basic with the use of overlapping plates for the most part, but the question remains; why are these areas sectioned apart?
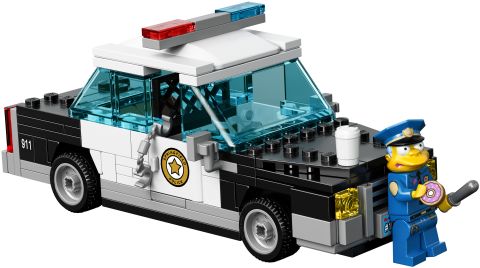
The answer is all about focus. If you can concentrate on a single section of a vehicle and really study it without being distracted by other sections, you can emphasize a certain type of building that is most appropriate for that area. In the hood section of the police vehicle detail is key. So various sideways techniques are used to build the headlights, and specific shapes of plates are used to form the hood. In the cab section it is all about figuring out how to fit all the minifigures in such a tight space. To accomplish this, a bit of off centering technique was employed to make use of space that would normally not be used. Finally, in the trunk section, having a functional trunk was the main goal by hollowing out some space for it.
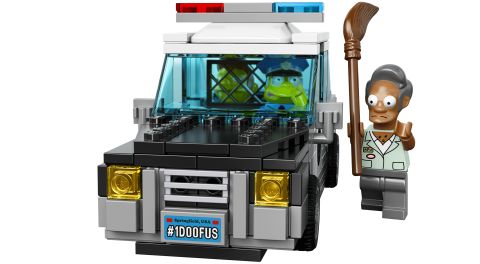
Once these three sections are generally conceptualized, they are then brought together. A typical piece to accomplish this is the modified plate that has a high and low section. This piece comes in a variety of heights and lengths and makes a natural undercarriage for a cab. Throw in some extra plates to solidify the connections and you are done. If you plan to use this style of building vehicles, keep in mind that the separate sections will ultimately need to connect – which can be a bit tricky to accomplish if you don’t plan ahead.
➡ LEGO THE SIMPSONS – DO IT YOURSELF FLOORING
Occasionally, you may create a LEGO building that does not fit on a normal baseplate. In these instances, your best option is to create the flooring you need. Depending on the size of your creation, you may be able to get away with building on top of plates and providing support by locking them together on the top. Unfortunately, once you go beyond sixteen studs this becomes a very unstable option.
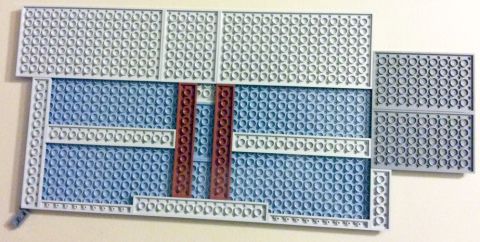
The solution to creating larger flooring is all about effectively using plates. This often takes the form of a two plate thick design. The first layer represents support struts, which should be present along every major seam of the flooring. This section does not need to look pretty, it just needs to be secure. It should be noted that this is similar to building a base for very large LEGO vehicles, like the #76023 LEGO Super Heroes Tumbler. The only difference is that a vehicle will need more support, since it will have to be able to move around. Once all the struts are in place, it is time to lay the flooring. It’s best to use the largest plates you have to prevent having too many weak points. You will also want to test the flooring by pressing the middle of large plates to see if there is any sagging. If there is, that area would make an excellent candidate for additional support.
Even after building a secure floor with two layers of plates, it is a good idea to build over the seams of the plates when you start building on top. This provides an extra layer of interlocking parts that prevent the building from splitting apart. Overall this is a very basic technique, but it does not get a lot of practice due to the size of the LEGO creations that require such a large foundation. So it’s worth studying how it is done in this set. It is certainly a technique that you can learn through trial and error, but it is best to be familiar with it beforehand, so your massive building doesn’t fall apart in your hand just to learn this lesson.
➡ DON’T FIGHT AGAINST THE MACHINES
We’ve all come across some pretty amazing and very creatively built equipment in various LEGO sets. Unfortunately LEGO is not always consistent with their clever designs; some sets would have the most awesome solutions, and another set would lack quite a bit when including something similar. Fortunately the #71016 LEGO The Simpsons Kwik-E-Mart is full of very creative equipment that are a pleasure to put together and fun to learn new techniques from.

First we’ll look at the two arcade machines and the EZ Cash ATM. These machines are mainly dressed up by the use of stickers, however if you take the time to look at the construction, you can see the start of some really nice machines. Essentially, basic elements like bricks and slopes are used to form recognizable shapes. The stickers provide the rest of the context, but it is understanding the use of shape that is important here. If you are just starting out with LEGO, begin by using shapes and colors to get the idea of the machine you are building.

Next we move into some slightly more complicated equipment in the LEGO Simpsons Kwik-E-Mart. These are the coffee station, the soda-fountain, and what looks to be an alternative drink machine. These and similar designs are what you could attempt when you feel comfortable with using basic shape and color. Notice the addition of small embellishments with modified LEGO elements to give the impression of texture and function. Also, take a look at those coffee posts that are made by repurposing a few common LEGO pieces in a very imaginative way.
The most complex equipment in the LEGO Simpsons Kwik-E-Mart are the phones at the front of the store, and the Squishy machine. Both of these base their designs on the previous two principles, and in addition they also look for new ways to maximize a given space. For the phones, this involves a two layer approach where one layer is entirely off-centered to get the spacing perfect. And for the Squishy machine, positioning brackets in clever ways is used to achieve additional detailing.
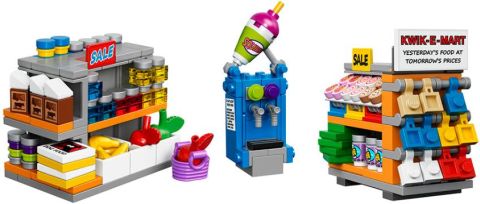
Following these examples is an excellent way to improve your building skills. You can start with defining the shape and color of the machine you are building, followed by refining and detailing, and finally maximizing the space and decorative areas you have available with specialized elements. In the end, you can stop at any point you feel comfortable with and know you have made a great machine.
➡ LEGO THE SIMPSONS – BUILDING UP TOP
Roofs on big buildings are often challenging to build. Flat roofs are the simplest in some cases, but they don’t really catch the eye. Sloped roofs have a lot of style but can get tricky if the building is too wide. In the world of LEGO we rarely see a real example of a full roof, since most LEGO sets only represent a small portion of a building. Therefore, we need to learn as much as we can fro the LEGO Simpsons Kwik-E-Mart, as it is one of the rare sets with a full roof. I would also make a quick note here that the LEGO Simpsons House set is another excellent example of a different type of roofing system.

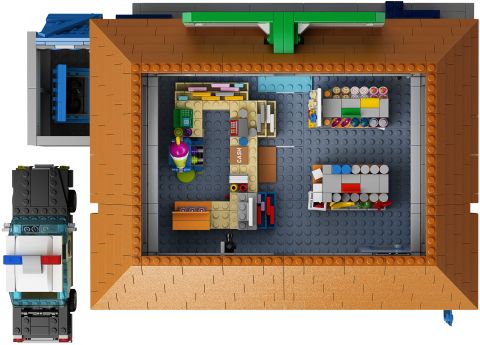
The LEGO Simpsons Kwik-E-Mart includes both sloped and flat sections for the roof. The interesting part of this combination is that the sloped portion covers up a whole area of the building that would in other circumstances make it hard to build a solid roof for. Take a look at the train car bases used to make the foundation of the rooftop. They are 24 studs long and rather solid. Sure, baseplates can and do get much larger, but the train car base is a very rigid and solid piece perfect for foundation work. Now look at how wide the building is; it goes well beyond 24 studs. This means that for the train bases to work the sides needed to come in to help make the gap smaller. And this gave a perfect role for the sloped portion of the roof to serve. So while the sloped roof provides an attractive outer profile, it also disguises the functional need of the builder to create a smaller gap to fill.
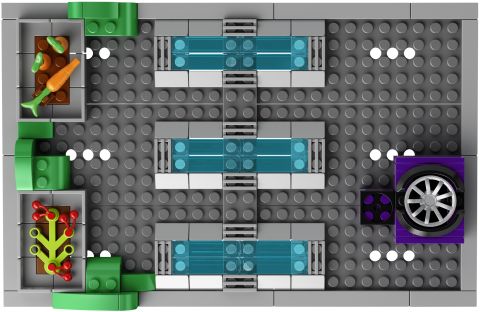
Now let’s examine the flat portion of the roof. As mentioned before, it uses train bases. This is a piece I personally never considered using for such a task. However, they have all the characteristics necessary to make a strong roof. It is definitely possible to build any size roof with regular plates, however every element that is not a solid one-piece structure increases the amount of sag that can appear on the roof. This sagging represents loss of structural integrity, as well as a sign that the gap you are spanning is too large without additional support. Finding places to put supports in houses is simpler with the numerous interior walls, but when you are making an open floor plan like the LEGO Simpsons Kwik-E-Mart, additional supports are just not possible.

To sum it all up, having more decorative roof styles on the outside are ideal for hiding the fact you need to control a functional component, like the size of empty space. As for dealing with large gaps, choosing the appropriate pieces is crucial. Make sure the pieces you select are not prone to flexing and can cover most, if not all, of the space you are trying to cover.
➡ APPLYING WHAT YOU LEARN
A large set like the LEGO Simpsons Kwik-E-Mart is all about detail – whether it is the included building itself, the decorations, or the vehicles and other details. We started off by giving an example of breaking down the police car into three sections. This principle can be applied to anything you construct. Finding ways to connect things is simple, since LEGO elements are built for that purpose. The difficult part is getting the details right. But if you can section off your model, it will allow you to put a greater amount of focus on each area, and thereby giving you a much more polished end result.
When it comes to special flooring, chances are that you’ll need to build it yourself instead of using pre-made elements. Keep in mind that if you plan to move the model a lot, you may want to build a stronger framed floor than what is seen in the LEGO Simpsons Kwik-E-Mart. I’d recommend checking out the previous breakdown on the LEGO Super Heroes Tumbler (see link at the end of this post) if you need something a bit more heavy duty. But when it comes to stationary creations, the technique here should work every time.
When we discussed machines and equipment, we were actually using a real architectural technique that is used by architects for refining abstract designs. The majority of LEGO builders are more likely to make a soda-machine than a building that looks like an elephant, nevertheless the concept is the same. Start with foundational shapes and colors and refine the process gradually. It puts a lot less pressure on you than trying to come up with a brilliant design from scratch every time you build.
Finally, seeing a full roof from LEGO is always a treat. Nothing is done by accident. It is simply a matter of catching what is happening for what reason. Sure, the model looks like the one in The Simpsons show, but that does not mean smart techniques get thrown out the window. If nothing else, the master model builders have to rely even more heavily on the cleverest and most solid techniques they know. Just keep in mind that there are a lot of roof types out there that you can experiment with, just like in real life.

So what do you think? How do you like the LEGO Simpsons Kwik-E-Mart? Do you have it already? And did you learn from the interesting building techniques used in the sets? Feel free to share your own experiences and tips, or ask questions in the comment section below! 😉
And you might also like to check out the other reviews in this series:
- Brick Breakdown: LEGO Pirates Treasure Island
- Brick Breakdown: LEGO The Hobbit The Lonely Mountain
- Brick Breakdown: LEGO Super Heroes Green Lantern Set
- Brick Breakdown: LEGO UCS Tumbler
- Brick Breakdown: LEGO Minecraft The Cave
- Brick Breakdown: LEGO Minecraft Ender Dragon
- Brick Breakdown: LEGO Santa’s Workshop
- Brick Breakdown: LEGO Ideas Exo Suit
- Brick Breakdown: LEGO Ideas Research Institute
- Brick Breakdown: Emmet’s Contruct-O-Mech
- Brick Breakdown: LEGO Forest Animals
- Brick Breakdown: LEGO King’s Castle
- Brick Breakdown: LEGO Cinderella’s Castle
- Brick Breakdown: LEGO MetalBeard’s Sea Cow
- Brick Breakdown: LEGO MetalBeard’s Duel
- Brick Breakdown: LEGO Minecraft Sets
- Brick Breakdown: LEGO Disney Princess Sets
- Brick Breakdown: LEGO Back to the Future DeLorean
- Brick Breakdown: The LEGO Movie Ice Cream Truck
- Brick Breakdown: LEGO Parisian Restaurant
- Brick Breakdown: The LEGO Movie Flying Flusher
- Brick Breakdown: LEGO The Hobbit Dol Guldur Battle
- Brick Breakdown: LEGO Winter Village Cottage
- Brick Breakdown: LEGO Winter Village Market
- Brick Breakdown: LEGO Lord of the Rings Council of Elrond
- Brick Breakdown: LEGO Castle Dragon Mountain
- Brick Breakdown: LEGO Lord of the Rings Pirate Ship Ambush
- Brick Breakdown: LEGO Ninjago Golden Dragon
- Brick Breakdown: LEGO Superman Black Zero Escape
- Brick Breakdown: LEGO Tower of Orthanc
- Brick Breakdown: LEGO City Dump Truck
- Brick Breakdown: LEGO Monster Fighters Ghost Train
- Brick Breakdown: LEGO Lone Ranger Silver Mine Shootout
- Brick Breakdown: LEGO Lone Ranger Constitution Train Chase
- Brick Breakdown: Ninjago Temple of Light
- Brick Breakdown: LEGO Lone Ranger Colby City Showdown
- Brick Breakdown: LEGO Lone Ranger Comanche Camp
- Brick Breakdown: LEGO Lone Ranger Stagecoach
- Brick Breakdown: LEGO Star Wars AT-RT
- Brick Breakdown: LEGO Arkham Asylum Part 1
- Brick Breakdown: LEGO Arkham Asylum Part 2
- Brick Breakdown: Legends of Chima Polybags


I really like this set even without the advanced building techniques. But it is great to look at those too, so thanks for the post. The section on the police car and the machines was particularly interesting. 🙂
I love all the great printed pieces in this set! Perfect for my grocery store.
Wow! That’s a set I wouldn’t buy so I’m particularly interested in reading about the construction details.
What an interesting entry! I look forward to more investigating other sets.