

(Written by William)
For the longest time I have been considering opening a little BrickLink shop to help fund my LEGO hobby. (As you probably know already, BrickLink is the largest online LEGO marketplace with buyers and sellers from all over the world.) I finally decided to take the plunge, and after a bit of research a preparation, I moved forward with opening a store.

I figured I will share with you what I have learned in regards to opening a shop of BrickLink, as well as some pointers on good seller practices. Keep in mind this advice is from a single person’s perspective and is not meant to be the only way to do these actions. But it should get you started in the right direction in case you want to open a store yourself.
➡ OPENING A BRICKLINK STORE – PREPARATIONS
Before jumping into the world of second-hand retail, it is a good idea to get everything you need in place. Here is a short list of some of the basics:
- POSTAL SCALE – You will need a scale to be able to accurately calculate postage fees for charging the buyer, and also for printing shipping labels. For just starting out I recommend picking up a $20 postal scale from Amazon. Here are some examples: SHIPPING SCALES ON AMAZON
- PACKING MATERIALS – Bubble mailers, ziplock bags, bubble wrap, boxes, shipping tape, etc. At the beginning you can just get these at your local office supply place. If your BrickLink shop gets large and you sell frequently, you can research bulk options for these items online.
- METHOD TO RECEIVE PAYMENT – PayPal is the easiest choice as most people use it already. Also, you will need PayPal to pay your BrickLink seller fees. Make sure your account is verified and connected properly to your bank account to be able to transfer funds easily.
- BRICKLINK SELLER ACCOUNT – When you first open an account on BrickLink, you will get a buyer account. Upgrading to becoming a seller is easy. Click on the “Sell” tab at the top of any page on BrickLink, and nearly anything in this category will walk you through the steps.
- TRACKING LOG – It is a good idea to track everything from the very beginning, including all expenses related to selling, as well as income. This way you will know exactly how much money you are making from your BrickLink store. You will also need these numbers when you file your income tax, and report them under hobby related income. I personally use an Excel spreadsheet.
Before moving on, I would like to point out a few things you may want to consider while preparing. First, make sure the packing materials you get will safely and adequately match up with the items you sell. For instance, loose LEGO pieces are best to place in ziplock bags first, and then packaged in a bubble mailer. This is because in case the bubble mailer gets damaged the pieces inside will still have an additional layer of protection. Never mail LEGO pieces in a plain envelope, as they are not designed to ship bulky items, and will get ripped apart by the mail sorting machine. LEGO sets should be packed in a shipping box with room for additional padding on all sides, so the set doesn’t get crushed. Generally, packing items the way you would want to receive them is a good rule of thumb.
Another point I’d like to bring up is that it is a good idea to be already familiar with BrickLink and PayPal as a buyer before beginning to sell anything. This way you will have some experience with these platforms, and reduce the risk of things that can go wrong with a transaction. Also, having some feedback already as a buyer will make you a more trusted seller.
Finally, keeping track of your expenses is very important. They will help reduce the amount of the income tax you owe from your hobby store. So the items we talked about above – postal scale, packing materials, fees charges by BrickLink and PayPal, the price of shipping, the cost of LEGO you sell, etc. – can all be deducted as business related expenses.
➡ OPENING A BRICKLINK STORE – YOUR SELLER ACCOUNT
Once all the prep work is out of the way, it is time to register to become a BrickLink seller. Most of these steps don’t need to be described in detail because you are just filling in your personal information. If you are already registered as a buyer, the steps are even quicker. BrickLink gives you very little guidance on what to do next after you are done registering as a seller, so this is what we will focus on.
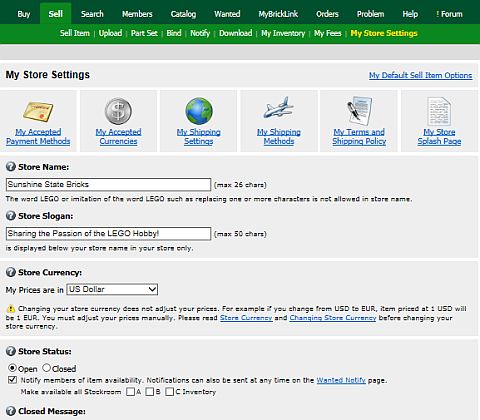
First click on the “Sell” tab, then click on “My Store Settings”. This is where you will build up your BrickLink store. You will name your store, determine how things are displayed, select whether the store is open or closed, and much more. You will notice that there are a number of icons with text describing what each selection covers. It will be necessary to go through every one of these icons to make sure the settings are how you want them.
Perhaps you only want to sell to buyers in certain countries, or only want to accept certain currencies. You can do all of that and more. Please note that BrickLink will not charge you for opening a store, nor will they charge you listing fees when you upload items. As long as your store is not yet opened to the public (or opened but there is nothing listed), you can take your time to get familiar with everything and set up your store the way you like it. And you can always change the settings later as well, or close your store whenever you don’t have time to process orders.
➡ OPENING A BRICKLINK STORE – YOUR INVENTORY
Before selling items in your BrickLink store, you will need to add them to your “Inventory”. There are several ways to upload items to your inventory, and here I will show you one of the easiest ways by taking advantage of the BrickLink Catalog. This way all the information on the item will be pre-filled for you, and it is much harder to make a mistake.
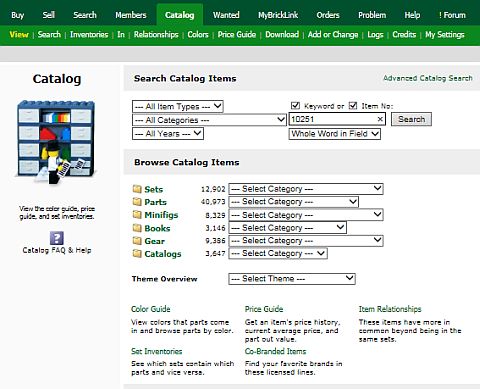
Start by clicking the “Catalog” tab at the top. All LEGO sets have a set number which is printed prominently on the box, as well as on the instruction booklet. Just type in this number and the set will come right up. If you are selling loose elements, minifigures or instructions, you can use the same method of finding the set first that they appear in, then select the pieces you want to list from the parts list.
Once you have the correct catalog entry for the item you want to sell, you can go straight to adding the item to your store inventory by clicking on the “Add to My Inventory” tab, or spend some time researching what price the item listed for and sold for by other sellers under the “Price Guide” tab.
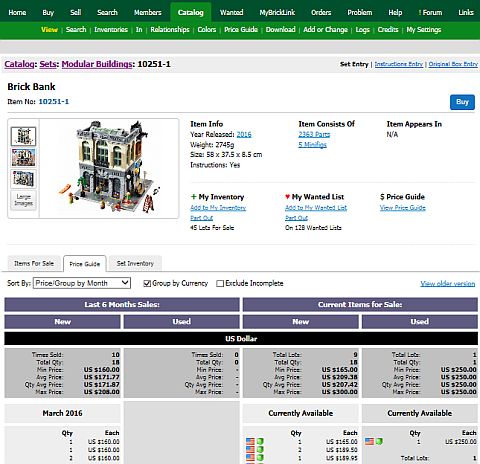
When you are under the “Add to My Inventory” section, you can select what quantity of the item you have, the price you want to sell it for, the condition of the item, as well as any special notes and deals. (For example you can list items in bulk so buyers are forced to get them in multiplies, or add discounts for buying larger quantities.) If you are not sure about something, next to each option there is a question mark symbol that will take you to the BrickLink help page with more detailed explanation.
Once all the selections are made, you can then preview your listing, which will show you exactly how your item will appear in your store. If you are happy with everything, click the “Add Item” button and you now have the item in your inventory. If you have more than one item to sell, follow the same steps for each of them.
➡ OPENING A BRICKLINK STORE – MANAGING YOUR STORE
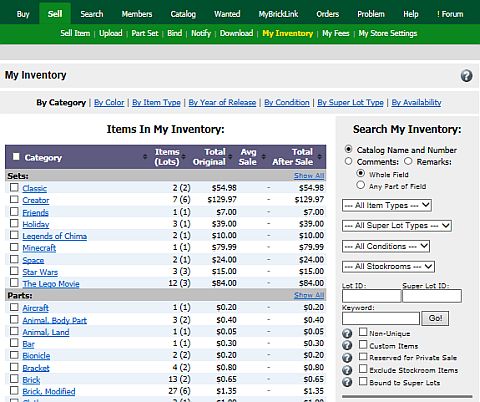
Now that you have a few items in your BrickLink store, there are two main areas you will need to manage. The first is your store inventory itself. This is where you can update prices, add notes to items, manually change the quantity of items, and so on. Click on the “Sell” tab at the top, then click the “My Inventory” tab under it. The default view is a breakdown of all the major categories of items in your store. To the right are tools you can use to filter items, or institute mass changes. You can also click through the categories to find your individual entries. You might make some minor updates here from time to time, but in general this section will stay fairly static.
The other major area to manage is the orders that you receive. If you set things up correctly, you should get an email informing you that an order is waiting. To check on it, you will need to go to the “Orders Received” section. Click on “Orders” tab. Then click “Received” under it. This brings you to a list of every order that has been placed by buyers in your store. To give a better understanding of what you see here, I’ll go over each part of an entry.
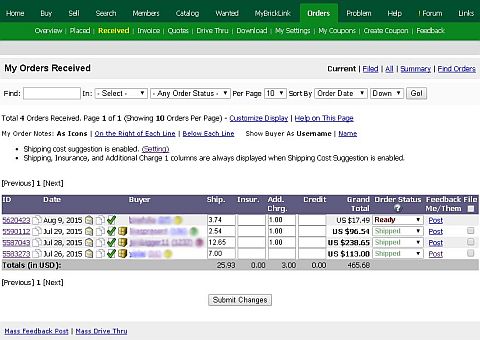
From left to right, the first is the order number. Clicking on this number gives you the details of the order, as well as the buyer’s contact information. Next is an icon for notes, where you can include a brief note about the order, like a tracking number. After this is the date the order was placed. Then there are a series of icons. The first lets you email the buyer, the next lets you write a note about the buyer. This is followed by the “Invoice” icon so that you can send out a finalized invoice to the buyer. The last icon doesn’t appear unless you’ve marked the order as “Shipped”. It contains a form that allows you send a notification to the buyer that their package was shipped.
After the icons is the buyer’s name or user ID (depending on your settings) with their feedback number. Then there are a series of boxes in which you can type various charges; shipping, insurance, additional charges and any credits that you may have offered to the buyer. The total amount box will automatically add up all the items purchased as well as the additional charges. Next up are a couple of combo boxes with drop-down lists to indicate the payment status and order status – you can set these yourself as a reminder. The last two icons indicate feedback left for the buyer, and feedback the buyer left you. Finally, there is one additional space for filing the order away so it no longer appears on the active orders page. This will appear as a check box only after you’ve marked the status of the order as “Shipped”. Below is a suggested pattern to follow when handling an order.
- Receive an order.
- Go to the “Orders Received” page.
- Change the status from “Pending” to “Processing” while you gather items. This way the buyer will know that you are working on their order.
- Determine charges like shipping and fill in the appropriate boxes.
- Change the order status from “Processing” to “Ready”.
- Send an invoice to the buyer.
- Get Paid.
- Change status from “Ready” to “Paid”, if the buyer didn’t do so already on their end.
- Pack the items.
- Change status from “Paid” to “Packed”.
- Ship the items.
- Change status from “Packed” to “Shipped.”
- You may now optionally send a “Drive Thru” email informing the buyer that their order has been shipped. And you can add a note to the order with the tracking number. (If you print your shipping label via PayPal, they will also notify the buyer with the tracking number.)
- At this point you can leave feedback for the buyer, although generally it is best to wait until the buyer marks the order as “Received” or leaves feedback. You can also change the status of the order as “Completed”, and file it away.
➡ OPENING A BRICKLINK STORE – GENERAL UPKEEP & TIPS
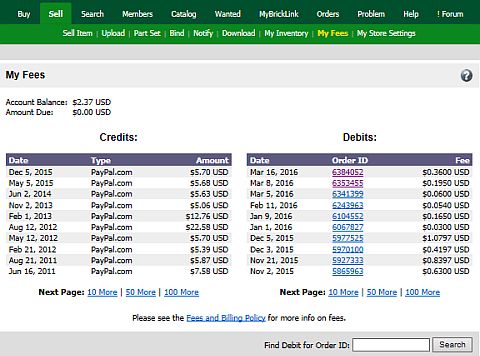
When it comes to upkeep, there are two major areas to maintain. The first is the fees you must pay on your Bricklink sales, which is 3% of the total of each order (without shipping and other add-on fees). At the end of each month, Bricklink will calculate what you owe and send you an invoice on the 5th of the following month by email, and you can also find the bill under the “Sell” tab “My Fees” section. Please note that you will only get billed if your current balance at the end of the billing cycle is at least $5 if you are located in the USA, or at least $10, if you are located outside of the USA. If your bill is lower, the amount will simply carry forward to the next billing cycle.
The other major area to maintain is records for your income tax. Generally speaking selling on Bricklink can fall into one of two categories; either small business or hobby. What defines this primarily revolves around how you treat your Bricklink store. If you think of it as a hobby and a way to sell off some of your collection, then it is hobby income. If you primarily run your store to generate income, have significant inventory, employees, etc., then you have a small business. If you are running your BrickLink store as a small business, it is a good idea to see a tax preparer or CPA to help you file your taxes. If you are just a hobby seller you simply need to keep track a few numbers:
- Total the money you brought in.
- Subtract the expenses you had for selling your items.
- Claim this number as Hobby Income on your tax return.
As for general tips, it all comes down to treating buyers like you want to be treated. Don’t be afraid to communicate with your buyer if a situation arises. Pack things like you would want to receive them. And be prompt in regards to responding to questions, orders, or anything that requires your attention. It is also a good idea to update your inventory at least once a year, especially if you are selling parts. Check to make sure that your prices are still in line with other sellers, and also check the quantities. Small pieces can get lost, added to the wrong order, or you may have used them in your own projects. So verify that your inventory is still correct.
Finally, if you are not sure about what to sell, start with items you know the most about. One of the biggest draws to buying on BrickLink is that most sellers are experts in the hobby. They know exactly what they have, and they can deliver to buyers exactly what you want. As a seller, it can only be beneficial to you to be an expert on what you sell.
Hopefully these tips will give you a good handle on what is involved in running a store on BrickLink. If you have other tips that you would like to share, or questions you would like to ask, feel free to add them in the comment section below! 😉
And you might also like to check out the following related posts:


Great article! Do you have a link to your store? I’d love to see what you are selling:-)
I emailed Will to respond to your question. 🙂
Since you asked so nicely here is my store link:
http://www.bricklink.com/store.asp?p=blackpyre&utm_content=globalnav
Since I write what I call Brick Breakdowns I chose that for my name.
Also, if you do happen to place an order don’t be surprised to see a different name. Will is my middle name and I use my first name for most business. Just so you don’t think I’m pulling a fast one. 😉
Thanks so much for the link, checkin’ it out now!
You’d need a good assortment to start a store like that. Since postal fees are quite high, especially internationally, you’d need an interesting enough variety of pieces, so that the customer feels he could still cherry-pick among them and get back his money’s worth.
Actually it depends. If you plan to be a high volume store that is a second income then yes. Large amounts of everything is best.
However, specializing also can work well for small volume stores. Ones that only specialize in one thing for instance.
However, I do agree with you when it comes to quantity. If you have a lot you’ll sell better or if you have a lot of just a few things and can be competitive with your pricing you’ll do decent.
Still, sometimes all you need is a really rare part to sell. Like things found in early modulars as an example.
Yeah. If you can focus your store on one particular niche, you might be able to compete on similar terms…
But for rare parts, you need an influx equal to the amount you sell, and you still need to buy them cheap enough to cover your expenses.
Yeah, that typically why I stick to selling sets for the most part.
It is sometimes easier to stock a semi rare set or the set will retain a good price because of some rare parts or figs in it.
Thank you for an interesting article…any chance for a follow up with tips on how to store all of your inventory (once listed) in an organized way so you can fill orders quickly/efficiently? 🙂
That’s a good suggestion, and definitely a topic that should be explored. I’m a seller on BrickLink myself and also active on the BrickLink forum, and I have seen people having some very-very efficient systems where they even time themselves to get better at pulling orders. I will make sure Will sees your comment, and perhaps he will get inspired to write on the subject. 🙂
I think I’ve heard about software that let you pick out your requested pieces, and then the software could calculate it so you could buy the requested lot from the fewest Bricklink stores possible. (It would cut down the amount on postal fees, but it might still not be the cheapest buy, I guess…)
HA!
Sorry, I’m pretty terrible at organizing my inventory. Since I have so much for my hobby I simply know where everything is.
I will be moving soon and we plan to have a LEGO room. So I might be able to get more efficient myself at organizing.
I’d say for the most it is personal preference, but I have some ideas how one might structure a system that works for them. Thanks for the idea.
Thanks for the article. I’ve thought about opening a bricklink store. I sometimes sells extra mini figures with my print shop on Ebay, or at conventions. I’ve just not had the time to look in to opening another online store front.
That said the best place I found for bags is clearbags.com. There one bag that just the right size for storing minifigs. The 1 1/2″ x 2″ LDPE Clear Zip Bags [2PE1H2] is what I use. They have a similar size bag with a hole in the top in case you want to display them on pegs.
Thanks, it’s always good to have options for packing materials.
I think I’ll try buying from Uline. I received their massive catalog because I signed up for reporting taxes. They’re great prices but I have to be prepared to store a lot of materials.
Oh, and you might want to check out a program called brickstore. It can help coordinate selling on multiple sites and lets you only have to deal with one inventory.
I get the uline catalog. There is a lot in there, but Clearbags had the backing boards I need to store my print so I just order form there.
Thanks for the tip on brickstore.
On a related note, this was just posted at Brickset…
http://brickset.com/article/20266/everything-you-wanted-to-know-about-buying-at-bricklink-but-were-afraid-to-ask
Funny timing! 😀
Thanks for the information