(Written by William)
I recently put together the very popular #60134 LEGO City Fun in the Park – City People Pack, and was hankering to continue building more LEGO City sets. Thankfully, LEGO recently released several sets that don’t involve emergency personnel. I was intrigued by the concept of an air show, so I picked the #60103 LEGO City Airport Air Show for my next build. We have done a general review of this set before (see: 2016 LEGO City Summer Sets Review), so today I will only focus on the interesting building techniques. 🙂

While the LEGO City Airport Air Show is a simple build, with three planes and a hangar it has a great deal of size and substance. I’d definitely recommend it if you need a big set that will not frustrate a less experienced builder. For this reason, the techniques we’ll look at today are also going to be foundational in nature. These are the type of concepts, that while simple, can make a real big difference in your LEGO models.
➡ SHAPING WITH LEGO PLATES
There’s nothing quite like a good wedge-plate, especially if you have a lot of them in different angles. Wedge-plates are great for shaping both mechanical models and landscapes. LEGO normally adds at least a few wedge-plates in most sets to create interesting angles and curves. The planes in the LEGO City Airport Airshow set are packed with plates to shape the body, as well as create the colored lines.

If you take a look at the top of the two jets, you will notice that not only the wings are formed by wedges, but the shape of the fuselage is built using stacked plates as well. As for the biplane, the wings are expertly crafted using many different wedges. Essentially, the concept of using this technique is giving the impression of using slopes without actually using slopes. Sometimes slope elements are just too thick to make something look right. This is where wedge-plates really shine. They give you the ability to sculpt a model with more refined lines and curves. But you do have to know where there should be rises and declines as you are using them.

If you are new to using wedge-plates and not sure how to implement them in your own model, I suggest starting by using basic bricks. These bricks should be roughly laid out to approximate the shape you want. Now you can methodically replace bricks with layered plates. In doing so you can determine where angles should appear. The idea is that you’ll be carving down to the shape you want, versus trying to fully imagine it before you start.
The ultimate payoff is that you can get interesting shapes without giving up stability. Plates can easily be stacked and interlocked to form sturdy connections. The downside of this technique is that LEGO makes a lot of different wedge-plates with many different angles. Usually your collection needs to be fairly large to have all the right angled wedges for your LEGO models, not to speak of having the right colors. However, sets like the LEGO City Airport Air Show are good sources for getting many different wedge-plates to build up your stash.
➡ FRAMING WITH LEGO TECHNIC
Spend any time with LEGO parts, and you will quickly realize that there are multiple building systems that can work together, but also have their distinct characteristics. The two main systems are LEGO Technic (made up of pins, axles, gears, and other functional elements) and LEGO System (the standard tube and stud connections most people are familiar with). There are also plenty of crossovers between these systems, allowing for some really interesting creations.

Many novice builders stay within one system, and don’t venture into exploring the possibilities of mixing them with other systems. It is true that the different systems require different type of thinking and designing, and also lead to different looking models. Just think about how vastly different a LEGO vehicle looks using standard building elements, vs. using LEGO Technic. However LEGO designers themselves mix the systems together in some sets, which can encourage LEGO fans to explore the idea in their own custom models.
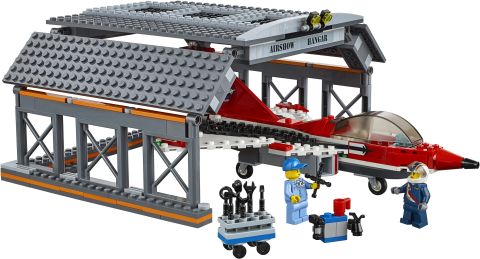
Problem is that this can lead to unrealistic expectations. A novice builder who experiments with mixing up LEGO’s different building systems will quickly realize that this takes quite a bit of expertise, which can make them get discouraged. So it is important to point out designs that feature a mixture of building systems in a simple way. One great example is the hangar in the LEGO City Airport Air Show set.

The hangar is more or less a giant tent that can house one of the planes that need servicing. To make it large enough and sturdy enough, LEGO Technic parts are used to build the frame. In general LEGO Technic elements are strong, while using very little space – so they are perfect for building framework.
Thinking of LEGO Technic elements as fixed joints is probably the easiest method to work them into your own creations. Because of how little space is used, you can figure out how to cover joints that you may not like the look of. The only tricky part is figuring out how to put studs in places for mounting regular LEGO System elements onto a LEGO Technic frame. This set demonstrates this beautifully by using a handful of angled joints. The end result is a vast structure that is very stable, but doesn’t really weigh much.
➡ APPLYING WHAT YOU LEARN
French writer Antoine de Saint-Exupery wrote in his memoir that “Perfection is achieved, not when there is nothing more to add, but when there is nothing left to take away”. Shaping with LEGO wedge-plates gives you this ability within the LEGO building system. Whether it’s sharp angles or smooth curves, the various wedge-plates can bring to life very subtle shapes when used correctly. It can be a bit of a pain figuring out which plates you need, but your creations will have a very finished look when you can mold things to such a degree. Wedge-plates usually come in left and right pairs, so make sure you get both of them if you want a symmetrical design. Also keep your early experiments to a three plate thickness to get a handle on shaping. The three plates will equal the thickness of a brick, and help keep things simple until you’re ready for more complexity.
Whether you see it or not, all LEGO models (and even real life models) have a skeletal structure. Some are more complex than others, but you always have to think of building a solid core first. Using LEGO Technic framing will lighten this core structure, without compromising the stability you need. Ultimately this technique allows you to build much larger models without the need to use vast amount of LEGO elements. It is worth studying how to transition from LEGO Technic to standard LEGO elements to mix up these two great building systems for the best result.

So what do you think? How do you like the LEGO Airport Air Show set? And what do you think of the building techniques used here? Did you learn something new that you can incorporate in your own creations? Feel free to share your own experiences and tips, or ask questions in the comment section below! 😉
And you might also like to check out the other reviews in this series:
- Brick Breakdown: LEGO Elves Water Dragon
- Brick Breakdown: LEGO Creator Brick Bank
- Brick Breakdown: LEGO Burj Khalifa
- Brick Breakdown: LEGO Batman – Batcave
- Brick Breakdown: LEGO Ideas Winter Toy Shop
- Brick Breakdown: LEGO Super Heroes Hulk Buster Smash
- Brick Breakdown: LEGO Creator Ferris Wheel
- Brick Breakdown: LEGO Simpsons Kwik-E-Mart
- Brick Breakdown: LEGO Pirates Treasure Island
- Brick Breakdown: LEGO The Hobbit The Lonely Mountain
- Brick Breakdown: LEGO Super Heroes Green Lantern Set
- Brick Breakdown: LEGO UCS Tumbler
- Brick Breakdown: LEGO Minecraft The Cave
- Brick Breakdown: LEGO Minecraft Ender Dragon
- Brick Breakdown: LEGO Santa’s Workshop
- Brick Breakdown: LEGO Ideas Exo Suit
- Brick Breakdown: LEGO Ideas Research Institute
- Brick Breakdown: Emmet’s Contruct-O-Mech
- Brick Breakdown: LEGO Forest Animals
- Brick Breakdown: LEGO King’s Castle
- Brick Breakdown: LEGO Cinderella’s Castle
- Brick Breakdown: LEGO MetalBeard’s Sea Cow
- Brick Breakdown: LEGO MetalBeard’s Duel
- Brick Breakdown: LEGO Minecraft Sets
- Brick Breakdown: LEGO Disney Princess Sets
- Brick Breakdown: LEGO Back to the Future DeLorean
- Brick Breakdown: The LEGO Movie Ice Cream Truck
- Brick Breakdown: LEGO Parisian Restaurant
- Brick Breakdown: The LEGO Movie Flying Flusher
- Brick Breakdown: LEGO The Hobbit Dol Guldur Battle
- Brick Breakdown: LEGO Winter Village Cottage
- Brick Breakdown: LEGO Winter Village Market
- Brick Breakdown: LEGO Lord of the Rings Council of Elrond
- Brick Breakdown: LEGO Castle Dragon Mountain
- Brick Breakdown: LEGO Lord of the Rings Pirate Ship Ambush
- Brick Breakdown: LEGO Ninjago Golden Dragon
- Brick Breakdown: LEGO Superman Black Zero Escape
- Brick Breakdown: LEGO Tower of Orthanc
- Brick Breakdown: LEGO City Dump Truck
- Brick Breakdown: LEGO Monster Fighters Ghost Train
- Brick Breakdown: LEGO Lone Ranger Silver Mine Shootout
- Brick Breakdown: LEGO Lone Ranger Constitution Train Chase
- Brick Breakdown: Ninjago Temple of Light
- Brick Breakdown: LEGO Lone Ranger Colby City Showdown
- Brick Breakdown: LEGO Lone Ranger Comanche Camp
- Brick Breakdown: LEGO Lone Ranger Stagecoach
- Brick Breakdown: LEGO Star Wars AT-RT
- Brick Breakdown: LEGO Arkham Asylum Part 1
- Brick Breakdown: LEGO Arkham Asylum Part 2
- Brick Breakdown: Legends of Chima Polybags


Those planes are really sweet. It’s nice that they made the two jets different, and added a classic plane too. Great looking set. And I agree that building large structures with Technic is so much easier.
Yes, this is a great set for learning how to build planes, and the hangar is just an awesome extra. 😀
The two things that impressed me most about this set were the hangar and the color scheme. (The orange and gray.) You don’t usually get this much structure paired with so many vehicles with the City theme unless you get a 89.99+ set it seems.
Just saw that it does cost exactly 89.99, so maybe I stretched the comparison a little too much.
You got that price exactly right! That’s impressive! 😀
LOL, I got lucky.