

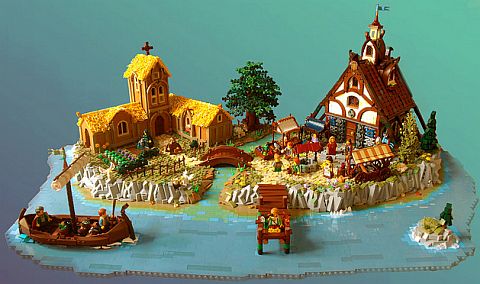
LEGO fan Simon NH is known for some stunning LEGO creations, like the Island of Catan diorama pictured below. As you see, Simon is a master of blending colors and using some very advanced building techniques to achieve a lifelike result. Simon also shares many of his techniques, so you can experiment with them on your own. Below, I will show you some examples, and also include links to where you can find his tutorials. 🙂
➡ LEGO WALL TECHNIQUE WITH CHEESE-SLOPES: The small LEGO 1×1 slopes (also referred to as “cheese-slopes” because of their shape), are very popular for adding delicate details to LEGO creations. They are tiny, smooth with only one hole to receive studs, and come in a huge variety of colors. The most obvious way to use them is to attach the hole to a stud, but this can quickly get too repetitious and boring. LEGO fans discovered however that these small slopes can also be treated as mosaic pieces, and even if they are not attached to studs, if they are framed properly, they will fit in place snugly. Katie Walker, the “Queen of LEGO Mosaics” is the revered inventor of this method.
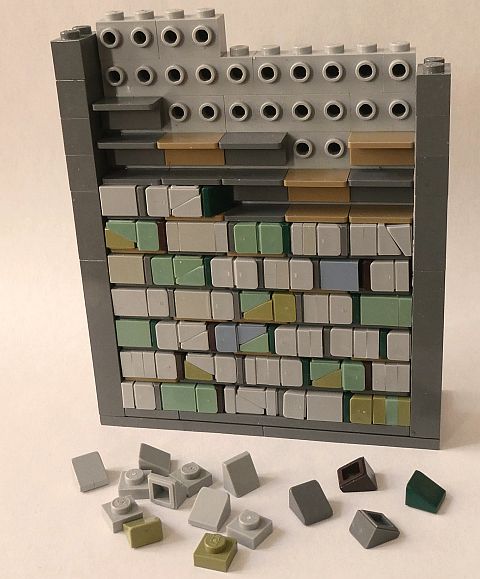
In the picture above, you can see Simon using the mosaic technique with cheese-slopes, but for building intricate weathered walls. The cheese-slopes sit in groves created by 1×2 panels attached to bricks with studs on their sides. The key to this technique is the framing on the two sides, which keeps the otherwise loose cheese-slopes in place. To add some additional variety, Simon also added some standard 1×1 LEGO plates and tiles. I have tried this technique myself as I wasn’t sure how sturdy it would be, but it actually works very well, with all the cheese-slopes tightly remaining in place.
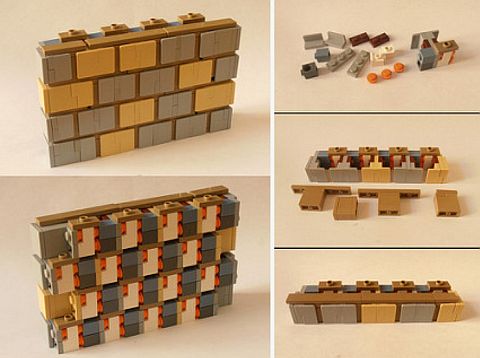
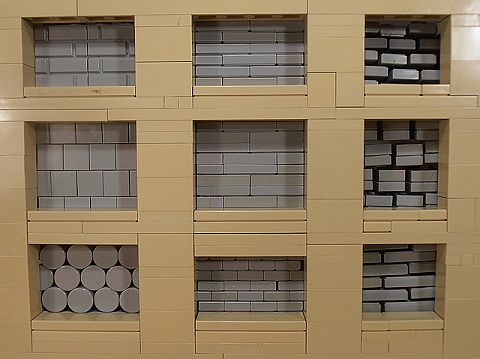
➡ LEGO WALL TECHNIQUE WITH PANELS: While this technique is very parts-intensive, the end result is a very realistic bricklaying pattern. The key here is the placement of 1×2 panels back to back, with a complicated framework behind it to space them and connect them together.
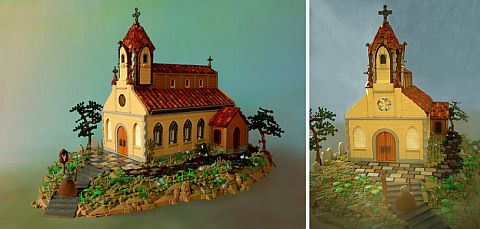
The technique is used in the stone walkway that leads up to this gorgeous little church, also built by Simon. Make sure you check out all the other different techniques used here, as there are many wonderful details.
➡ LEGO WALL TECHNIQUE WITH PLATES: The two techniques below are simple and subtle, but quite handy. They appear the same from both sides, which is great when you want to have a finished look from both front and back. The technique on the left uses 2×2 plates and 2×2 jumper-plates, and it can also be done with 1×2 plates and jumpers. The technique on the right is done with 1×2 and 2×2 jumper-plates and provides a little bit more texture.

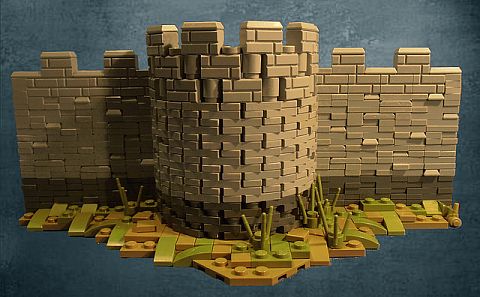
➡ LEGO WALL TECHNIQUE WITH JUMPER-PLATES: A quite simple, but very decent looking wall technique using 1×2 jumpers (the newer ones with grooves at the bottom) and 1×2 door rail pieces. As you can see on the first picture below, you can achieve quite a bit of texture with just these two elements. A variation of this technique adds some other interesting pieces to create even more detail (second picture).

The techniques are demonstrated in this excellent castle wall, which also includes a curved section to create a tower. The wider you make the round section, the more subtle the stonework will appear.
➡ LEGO WALL TECHNIQUE WITH TILES: The technique below stacks different size 1 stud width tiles. While they may look loose, they are actually strategically connected at the back to support pieces. The end result is a very nice and sturdy brick wall that looks quite realistic.

➡ LEGO WALL TECHNIQUE FOR THIN WALLS: If you have little space to work with, but you still want to create some detailed weathered walls for your castle or other older building, the three examples below will give you some good ideas. The first method simply uses a larger plate that you stack with different color small pieces (plates, tiles, jumper-plates, plants) then attach the entire section sideways to the main structure, using bricks with studs on the side. The second method stacks pieces in the traditional way, but incorporates some pieces with interesting textures to break up the surface. Notice that there is even a minifig leg in there! The third method takes advantage of some bricks with studs on the side to add even more detail to the otherwise traditionally built wall.

There are many other very interesting wall building techniques Simon shares, which you can find in his LEGO Techniques album. Also, you can visit his main album here, with more beautiful creations. They will give you more ideas and examples of what can be achieved with these methods. If you like to experiment with advanced building techniques, I highly recommend checking them out.
What do you think? How do you like these LEGO wall building techniques? Have you tried any of them already? Which one is your favorite? Are there any other wall building techniques that you really like? Feel free to share and discuss in the comment section below! 😉
And you might also like to check out the following related posts:


Wow! Just wow!
Thanks for sharing examples of such impressive building skills and outside the box creativity.
You’re very welcome. Long time no see! 😉
I am praying for a response, even though this is an old article… I’m trying to do the same technique with the panels, cheese slopes, and 1×1 plates and tiles. I can’t get the pieces to grip firmly, though you claim to have tried it with success. What can I do to fix this? Please help!
Dustin, you can send me a picture of what you got and I can take a look. Working with cheese-slopes can be challenging, but it’s fun. It’s all about LEGO geometry. 🙂
WOw! Beautiful! Will have to try these out!
Very impressive techniques and some of them are not that part intensive. I’m definitely going to try these out. Thanks for sharing!
All in all, it’s just another brick in the wall…
The end results look pretty impressive. Could be worth the effort…
(Could be interesting with a similar article explaining space greebling…)
Greebling spaceships is one of my favorite pastimes, so yeah, definitely! 😀
Also the insides, I want walls with a lot of Jack Kirby-/ Moebius-like linear decorations all over.
(You could google the artists, if the names aren’t familiar, for examples…)
Oh! That’s some busy artwork! 😀
So many great techniques! And the village and the church are beautiful! It’s amazing how much effort, talent, and hard work some people put into this hobby!
That is awesome, have bookmarked for future reference. I have also been interested in the different approaches people use for building custom roads.
https://www.youtube.com/watch?v=MlfFcJJj9sg&feature=youtu.be (which is how i would have done it initially)
https://www.youtube.com/watch?v=VwFYPmCFNLQ&feature=youtu.be (without the gaps between plates…. leads to some interesting possibilities but would want to make it smaller modular sections to allow for what i want to build)
Phil, thanks for sharing those! Great tutorials! I especially like the second one with the green median. Really adds some uniqueness to the road!
I have a bunch of the older road plates found cheaply on various thrift stores (Gen.1 – Gen. 3, I think), so I’ll probably use them if I’d build some serious city…
Despite their limitations and illogicalities concerning zebra crossings and similar…
Road plates are always useful, and are definitely cheaper than building up roads from bricks and plates! But yeah, the crossing can be a bit weird, depending on where they end up. 😀
Simon is definitely a master of crazy parts-intensive detailed walls. Unfortunately I don’t really have the parts to try any of them, but I have been keeping kind of a mental register in case someday I can pick up the right pieces!
I was wondering if you were aware of Simon and his builds! Good to hear that you do! 🙂
Some of the techniques are actually not that parts-intensive. I tried a few of them myself, although to really build a big wall, you would definitely need a lot of pieces.
The work done by a number of castle builders is also phenomenal. Combinations using 1×1 round plates with headlights and 1×1 round bricks with 1×2 bricks to give curvature etc are amazing. Also the technics tread trick for curved walls and so on.
There are a lot of fab guides in the historical forums on eurobricks that are well worth a read and could easily be adapted for city and so on.
Yes, EuroBricks is an excellent resource for Castle builders. The only problem is that it is very difficult to find things on their Forums. I also really like the Technic tread version because it is very sturdy and the threads are pretty cheap. 🙂