(Written by William)
With the winter holiday season upon us, it’s time to arrange and display the LEGO Winter Village sets. This year, the #10267 LEGO Winter Village Gingerbread House takes us to the whimsy side, just like the #10245 LEGO Winter Village Santa’s Workshop did back in 2014. New neighbors have moved into the village and they are the Gingerbreads!
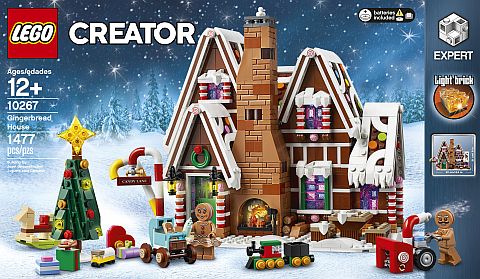
Some time back, there was a LEGO Ideas project featuring a gingerbread house. I know many LEGO fans were disappointed when it wasn’t selected to be made into an official LEGO set. As a slight consolation prize, LEGO did give us the mini #40139 LEGO Gingerbread House that was a free gift-with-purchase set back in 2015. It’s nice to see that we finally get treated to the full sized concept after all these years.
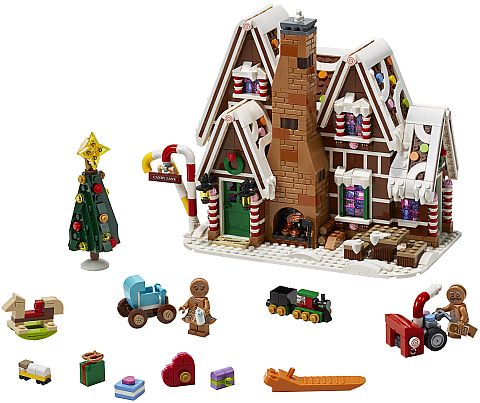
The set comes with a gingerbread family complete with baby. Some LEGO fans expressed disappointment that the baby is simply a printed tile, however, this allows the kid to be placed in its crib, its stroller, and even ride the rocking horse. Additionally, outside of this set, the printed tile works great on a cookie sheet for a baker to pull out of the oven. So, I think it was a smart choice.
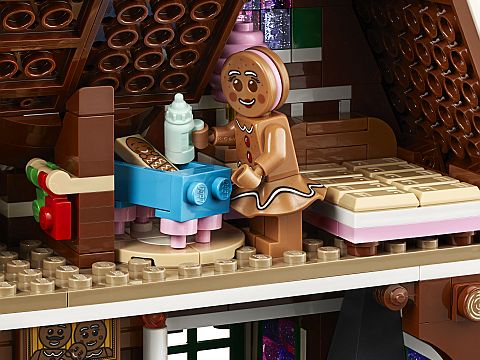
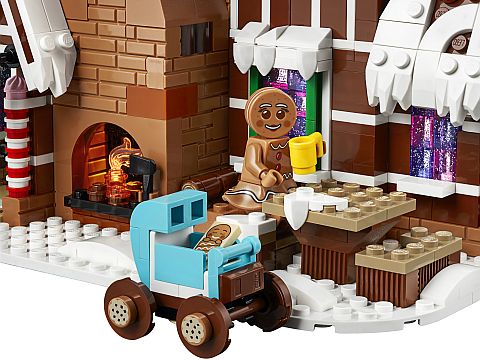
Some of the outstanding details in this set include the bathtub and crib, which are rather novel designs for an official set. The fireplace is also quite interesting by it being accessible from both the inside and outside of the house. Plus, it also lights up!
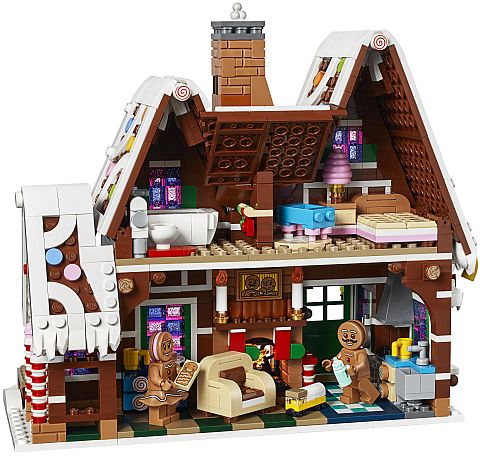
One other thing makes this set special; thanks to its more whimsical design, it can serve as a stand-alone set outside of the LEGO Winter Village collection. This means those who may have missed out on other LEGO Winter Village sets won’t feel like they need to have every set in the collection. Don’t get me wrong, I love this series and would recommend every set in it, but that has to do more with the expert level techniques found in these bright cheerful displays. Speaking of which, let’s talk about the interesting techniques found in the set!
DECORATING WITH LEGO
Normally, I don’t talk about specific decorations in Brick Breakdown articles, unless they are connected in some interesting way. However, due to the sheer abundance of decorative elements in this set, I think it’s worth taking note. Specifically, I’d like to point out that the #10267 LEGO Winter Village Gingerbread House makes a great template for deciding how you might want to decorate your own models.
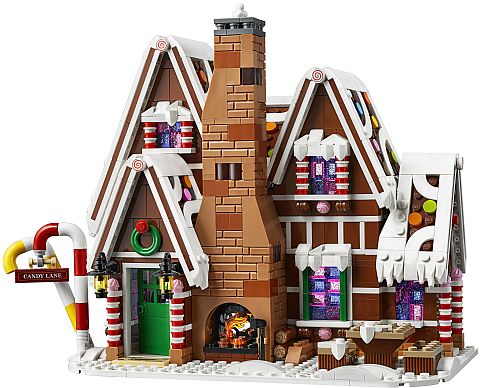
Between the colors and the textures, this set covers nearly every inch of the house, Yet it does not look over-done. Part of this is thanks to the use of complimentary colors. This is primarily done for the walls of the building. This is not to say LEGO designers didn’t use high contrasting colors as well, but rather, they put them in specific points where they work the best.
In this case, bright colors make up some very bold decorating on the roof, as well as outlining the key features of the house. Doors and windows stand out boldly from the muted browns that surround them. Additionally they help frame and contain many of the wilder colors in the set.
The use of colors and decorative elements makes the house quite interesting. It has every potential of being a gaudy mess, yet it looks put together and rather elegant. Overall, the set is a great example and study material for what you can do. For example, you may have a wall that’s boring. Taking inspiration from the examples in this set, you could put a decorative trim at the bottom of the wall, or splash a layered design in the wall, or dress up the top or bottom of any window in the wall, etc. Same goes for the roof. Remember, it’s not a question of what you should decorate with, but rather how can you be the most effective with the decorations you use.
BUILDING PEAKED ROOFS WITH LEGO
When building a peaked roof, there are two and a half principles to consider. The first two are absolutely necessary, while the final half is an optional consideration that can help your own models.
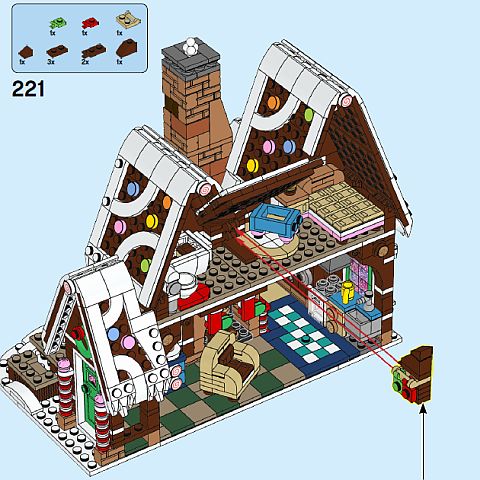
First, you need a hinge. LEGO elements are notorious for being square, so you need something to give you the right angle for the roof’s slope. Whether it is a tilting hinge brick or a LEGO Technic pin connection, you really only have to make sure it is suitable for the size and weight of your roof.
Second, you need a frame. Or, to be more specific, you need something to help define the roof’s shape. Sometimes all that is needed is for the roof pieces to lean against other pieces like a ledge, but some of the cleanest roofs use slopes. Take, for instance, the center roof piece that is in the middle of the second floor of the #10267 LEGO Winter Village Gingerbread House. You attach a mini wall section with a towel bar under this piece. This makes its primary purpose as a frame for the roof.
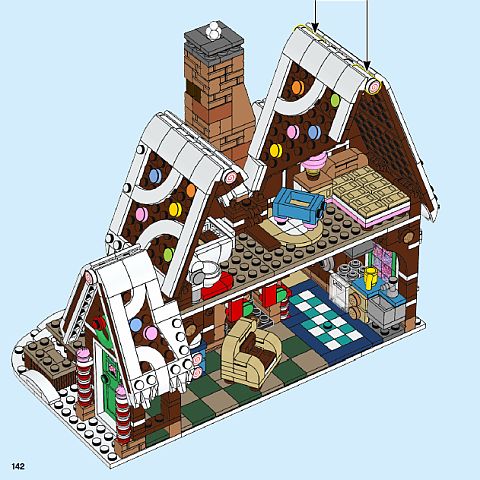
As for the half principle you need to consider, that all depends on whether or not you have multiple peaks meeting. If you do, you may consider how they connect at the apex of their peak. The reason why this is important is that this is a natural weak point for a roof. Failure to address it may result in a lot of rebuilding. Because this is only a weak point, and not all peaked roofs create a point, this makes it more of a “when it happens” sort of advice. If you do create an attachment, make sure it doesn’t put any stress on the hinges. Many times, you can make this attachment point a hinge all its own, like it was done in this set.
APPLYING WHAT YOU LEARN
By its very nature, the #10267 LEGO Winter Village Gingerbread House is meant to be outlandish in its design. But, just because something is meant to be bright and a bit out there, doesn’t mean it can’t look stately. This set is a master class in how to apply decorations and well worth revisiting if you are stumped with your own creations.
Part of the set’s beauty comes from the sharp lines of its roof. Having such bold peaks demands a lot of attention. But that doesn’t mean it takes an engineering degree to build it. By remembering the two and a half principles, you can build all manner of peaks on your own.

What do you think? How do you like the #10267 LEGO Winter Village Gingerbread House? Have you used the building techniques we discussed here in your own creations? And are there any other interesting techniques in the set that you really liked? Feel free to share your thoughts and discuss in the comment section below!
And you might also like to check out the following related posts:
- LEGO Gingerbread House Big & Small Review
- Books for Expanding the LEGO Winter Village
- Brick Breakdown: Winter Village Fire Station
- Brick Breakdown: LEGO Creator Holiday Train
- LEGO Holiday Train Review, Thoughts & Tweaks
- LEGO Winter Village Station Review & Thoughts
- LEGO Winter Village Additions & Modifications
- Custom LEGO Winter Village Cider Mill


Peaked roofs are always the toughest part of any MOC to me. I was very impressed with how smoothly and sturdily the designers managed to build some very steep peaks and that complicated slope behind the chimney into this set!
To me the open fireplace is slightly bizarre but I guess if you’re a gingerbread man you don’t want your house getting too warm anyhow. 😛
Everybody is talking about the roof techniques, and I have to agree. I also agree with William about the decorative elements and colors. It looks obvious when looking at this set, but it’s another thing to do it yourself.
As far as the Chimney having an outside entrance, I think they just did that so the light can shine through whether you look at the set from the front or the back. By the way, some chimneys have an outside door, so it’s easy to load wood from the outside. So, it’s not entirely inappropriate.
I never thought the chimney was inappropriate just that it would be something very unfamiliar to quite a few people across the world. Given the fact that there is a stack of wood next to the outside of the chimney definitely suggests that is what they were going for. And I can definitely see them not putting a door on the outside so they could get the effect of the light.
I always find it interesting when they build something I’ve never been exposed to. For instance because of where I live I’m not familiar with the snow blower either so I’m happy to see it in a set.
It’s just good to know this is based in reality even though this is a Gingerbread House.
Although, I really really like the idea that their house is sort of trying to avoid being an over sized oven. 😉 Although, this style of fireplace kind of makes it more like an oven in some ways.
How the roofs come together is really neat. The other thing I like about this set is all the accessories like the snowblower, train, baby carriage, and rocking horse. Building small like that is not easy.
Those small accessories are some of our favorites from the winter village sets. They are very cute and the kids love them.
Another technique that could be mentioned is how to make white pieces look like snow (or in this case frosting?) Those textured pieces come very handy. Sorry, I don’t know what they are called.
Absolutely, smart part selection will make a world of difference when it comes to decorating. And we got two good candidates here when it comes to icey snow.
There is the modified 1×1 plate with verticle tooth over the windows and the one you are talking about is the plate modified 1×2 with 3 claws/Rock fingers. Part number 27261
Whenever you run across an interesting shape it’s always worth studying the patterns it can form by putting them in a series together. Or if you’re really advanced try to see if the geometry of the piece allows you to do something you couldn’t have done before. Good call on spotting that bit of decoration!
I agree with others that the roof is the most intriguing part of this set. How all those roof angles come together, wrap aroudn the chimney, connect at weird angles, etc. It’s a masterpiece.